


AWP3RATOR
-
Posts
4 -
Joined
-
Last visited
Content Type
Profiles
Forums
Events
Posts posted by AWP3RATOR
-
-
@Legitimate_Player1 As far as I've found, there isn't an automatic resize option available with Aida64. The resolution of the sensor or LCD panel is a hard setting for a specific resolution. However, if you have the source file, it's easy enough to set the resolution to your needs. For the odospace, you're under the Preferences>LCD>Odospace tab. On that same tab, there are resolution settings. Simply set these to 1024x600.
This will however resize only the "canvas" itself. If the original was something like 1280x800, you will see the right and bottom parts cut off. The sensor elements, labels, etc. still exist - just outside the viewable area. What I've found as a workaround with a resize project, is to first open up Photosthop/Gimp/paint and create a background image in a solid color in the desired resolution. Then import this image to your original sized panel you want to scale down. Set it as the lowest level so everything sits on top of it. Now you have an area to move all the items to that you know is the correct size. Once you're done, go back to Preferences>LCD>Odospace and reset the resolution to your target: 1024x600.
It just so happens I already created a background image like this, with guidelines for alignment - in the size you are looking for. Attached here. Just either hide it or remove it when you're done.

-
 2
2
-
-
4 hours ago, SveNRG said:
Hey folks,
I watched this nice video / tutorial by JayzTwoCents about making a sensor panel in AIDA64.
Here's my first try. I wanted to make it look like that space suit that Matt Damon wears in "The Martian" (2015).I'm still looking how to run this on an old Android phone that was collecting dust. I read on reddit that I need to enable HTTP server but I cannot find such a thing anywhere. Any tips?
2020-11-07.sensorpanel-v1.sensorpanel 194.85 kB · 4 downloads
I just got this up and running on an old Android tablet running OS 4.4.2 Kitkat. I followed this guide:
(same posted just above). All in all works very well, but being that this sits on my desktop, I may just run an HDMI to a small display panel and convert mine to a sensor panel on second screen. But it works very well on the Android tablet. If you have any issues, I might be able to help.
-
3
-
-
I also watched the JayzTwoCents about making a sensor panel in AIDA64 for a recent build of theirs, which led me here. Searching around for inspiration, and being that it is N7 day, I made a Mass Effect themed dashboard for an old Samsung Galaxy Tab 3, I had collecting dust.
To create this, I found a similar dashboard on this site: http://www.lamptron.com/Products/HardwareMonitor/117.html and recreated it from scratch using assets I found in this thread, or created myself.
The zip file includes everything you will need, including the 3 different gauges, BitFenix logo (my case). The font is Mass Effect 123 from fontm.com: https://fontm.com/mass-effect-123-font/
Dashboard dimensions: 1024x600
For the gauges, I created all new image files (15 per gauge) with a new gradients from blue to white to orange.
Colors used:
- Blue - RGB 0, 200, 255 #00c8ff
- Orange - RGB 237, 88, 4 #ed5804
- White - RGB 0, 0, 0 #ffffff
- Dark Gray - RBG 30, 30, 30 #1e1e1e
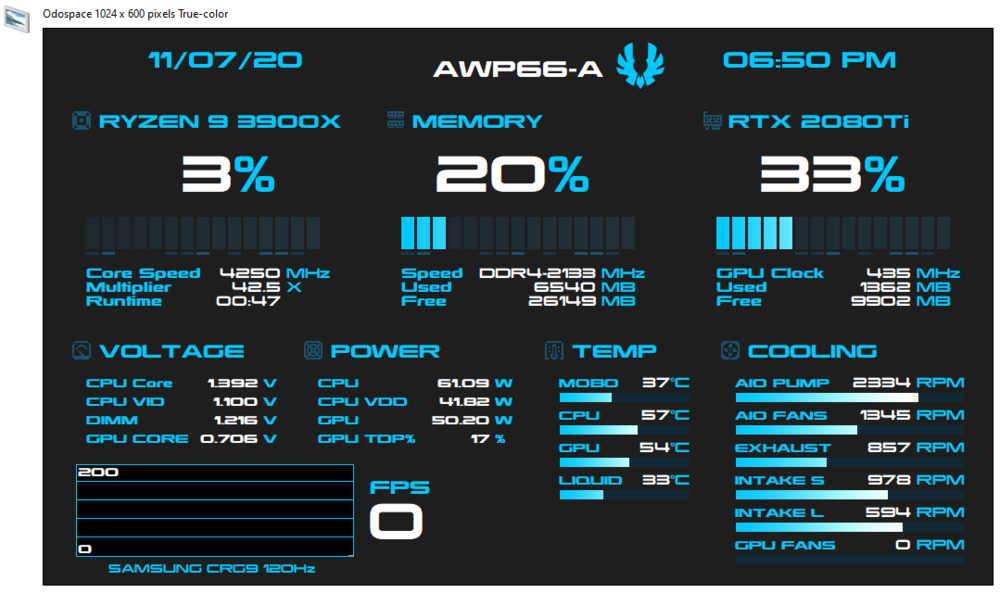
Download: mass_effect_theme_sensor_dashboard.zip
-
6


Share your Sensorpanels
in SensorPanel
Posted
.xcf is Gimp's standard format for project files, similar to .psd for Photoshop. In the File menu, select Export As... and select your preferred format. PNG works well with Aida64 but could also use .jpg as well.