


Dave59337
-
Posts
21 -
Joined
-
Last visited
-
Days Won
7
Content Type
Profiles
Forums
Events
Posts posted by Dave59337
-
-
12 hours ago, pradeeptr said:
Can you share this in 1080*1920 please
On 3/24/2022 at 8:41 PM, Dave59337 said:Had to put sensor panel separate due to size.
I did share it on the next post. I had to share it separately due to size.
-
4 hours ago, operbico said:
I took image in google search, many user have taken my projects, but I am happy because these have been improved, I have no problems with anyone, and I am happy that they did and then shared them.
I always thank the users who gave me the idea
I just need the indicator in 16 position in rpm gauge, unfortunately ther are only 28 notches but 32 would be needed
This is a SHARING forum, nobody steals anything
bye
I agree on your thoughts on Linux. However, I've been "playing" with computers since the 70's in high school. There was even a time I got paid for writing programs freelance. But that was still weekend play to me. If I "worked" with them as a career and/or needed my work for recognition or money, instead of a relaxing past-time, my opinions would probably be different. Here is the sensor panel. Feel free to use/change/whatever. I hope to see your final product here.
5 hours ago, Dave59337 said:The gauges can be put on top of the image I included, or your own.

When I said this, I wasn't thinking about the hands being in your previous images. You would have to put gauge and background gauge image over your background. I'm sure you can figure it out.
-
 1
1
-
 1
1
-
-
12 hours ago, operbico said:
 thank you, but I am not a good creator, I'm not able to use photoshop, I like simple and quick solutions
I think that everyone in this topic should share everything, like others important community such as linux, to improve everything.
Many Thanks to Aida64 staff support, and users who share any panels
Thanks in advance if someone can help me, I am not able to use Photoshop...I need a conversion of this images in aida64 gauges for new project.... I think that these are the best race gauges ever (Lancia Delta Group A)
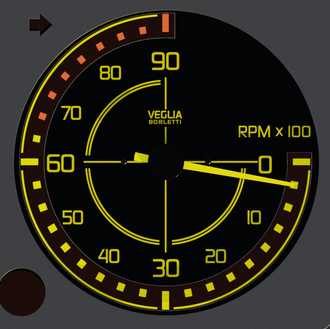
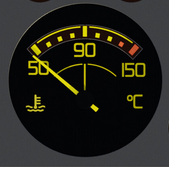
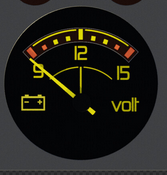
I took your challenge and created three gauges...They are 0-15 images a piece. The gauges I make are images of hands that can be placed over backgrounds (gauge image.png's). I have included stripped images from your request with and without labels, so you can change them by adding text over them. (Between the image and gauge.) The gauges can be put on top of the image I included, or your own. Unless the gauges are of different size.
I have a request before I would upload of the .sensorpanel file though. Lately I've been accused of stealing someone's designs. I need to ask where they came from, and hopefully I can verify there "free-ness." They have partial transparencies, so I doubt they are screen grabs from a game.
-
5
-
 1
1
-
 1
1
-
-
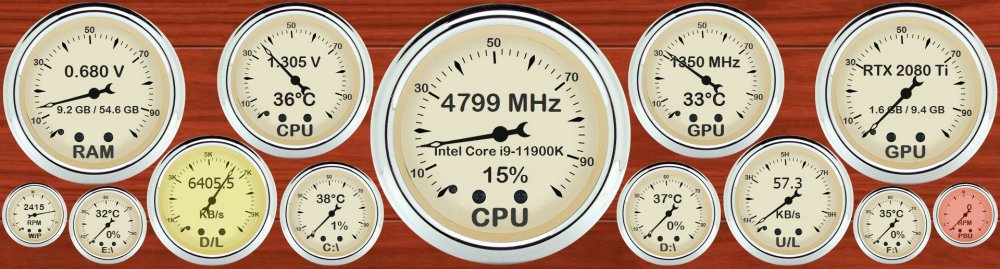
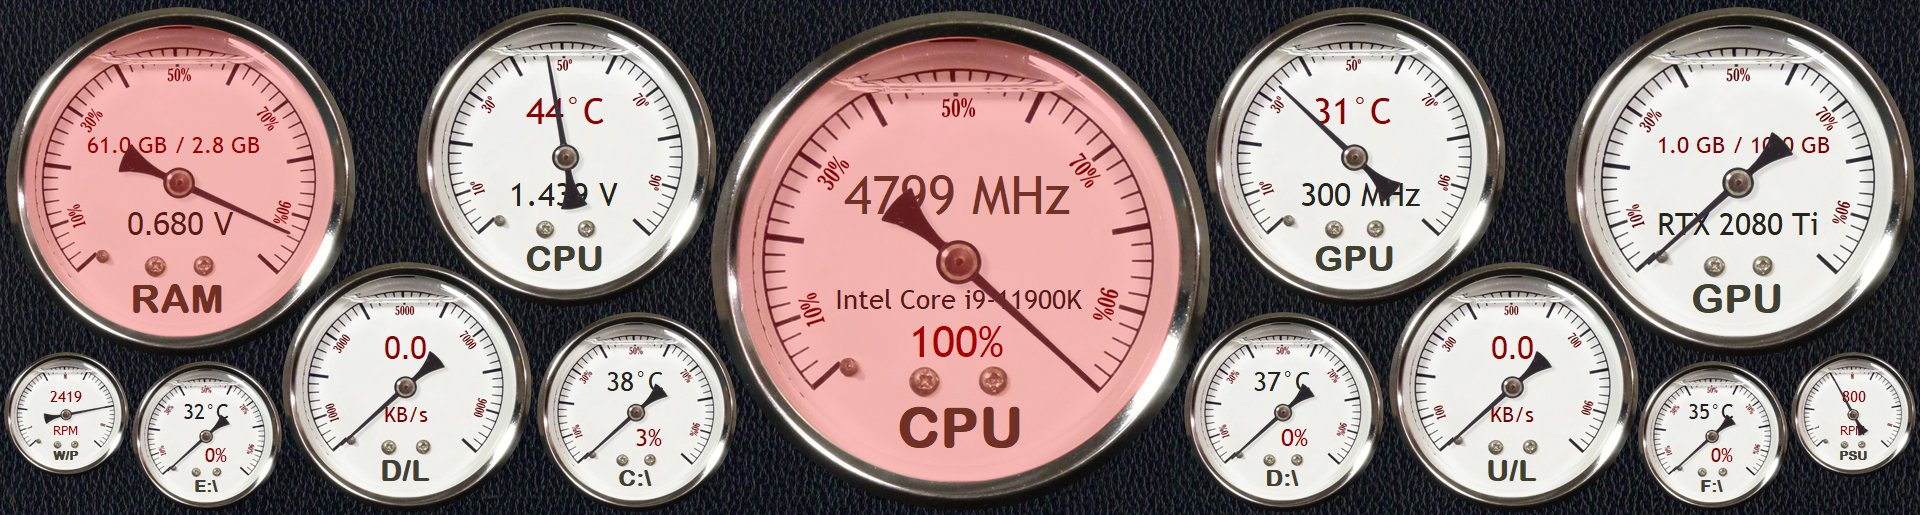
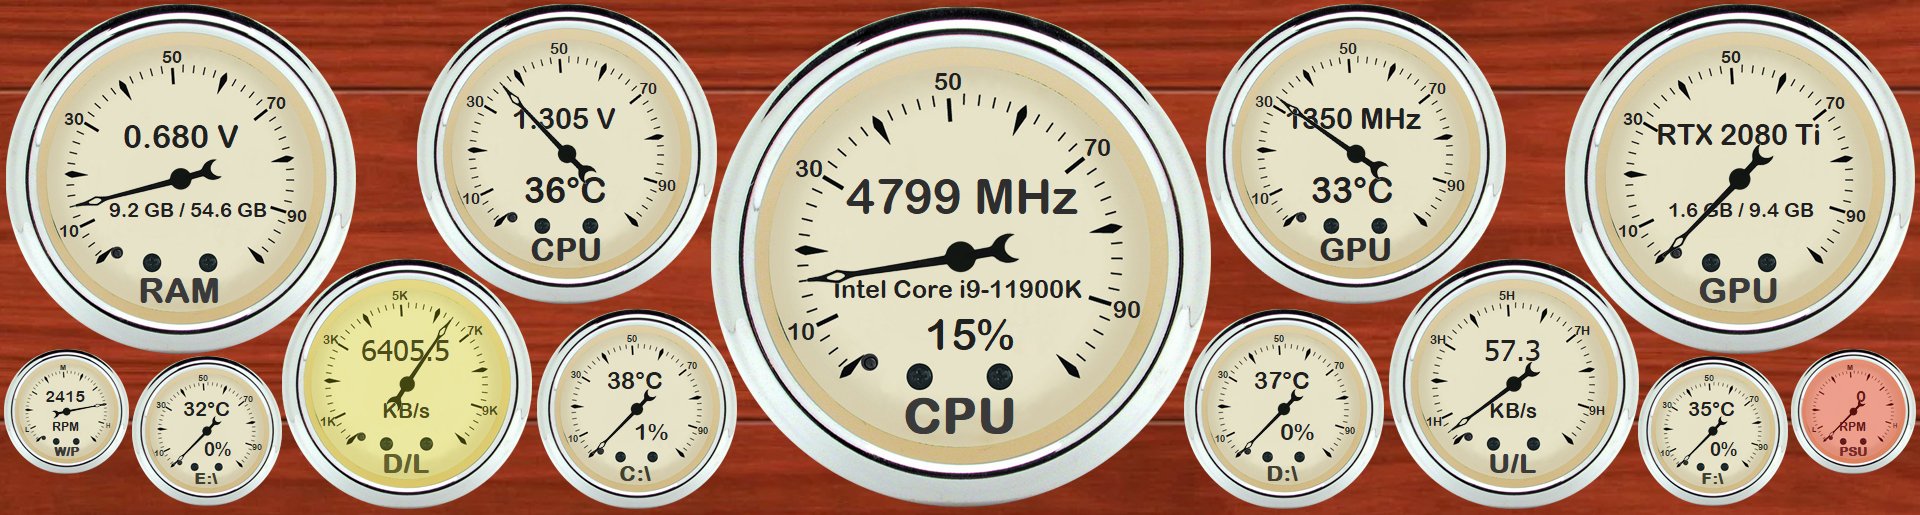
I redid the sensor panel once called "WaterMeterBig2." Changed the labeling style and a few graphical distortions. Now ALL gauges are 51-stage gauges. All hands always point to 0, 2, 4, 6, ..., 100 on the gauge. I also grabbed a .png off the internet of a car oil pressure gauge that I thought looked cool. I laid it out similar to the other one on a cherrywood background. It reminds me of the cool boat in the movie "On Golden Pond." Running them doesn't seem to slow my machine down at all. It uses about the same CPU time as the 16 stage gauges. But doing an export takes about 10 seconds with Aida64 showing the "not responding" warning on the sensor panel manager.
As you can see, I also included the warnings for anything going at or near full speed as well as fans/pumps running too slow. On one I was running a memory stress test, and the other I turned off the power supply fan while viewing 3 security cameras at 64-time speed.
And before anyone asks for me to share..., I can't. WG2.sensorpanel is 11.1 MB and BG2.sensorpanel is 10.1 MB. Each gauge takes 54 png's to build, each panel has 7 different sized gauges, plus the background...that's 379 pics to store. I only had 9.77 MB upload space allowable before I dropped these two jpg's down. Does anyone know if that ever increases or resets? I had to delete my 101-stage upload to add anything.

-
7
-
1
-
-
21 hours ago, Awol said:
Changed it again
 Still need to adjust the hands to ensure fully central. Not sure if to keep cpu/gpu useage in the middle or make it clock frequency for both. I changed the range for both of the hands to 200, that way 100% would be the 12 position.

You might give a try to making a set of gauge-hands to overlay the other. You might take a look at my post of making multiple gauges. It's the 7th post on page 186 back from last year. You probably wouldn't like the green LED's crawling up the left or right, but a secondary red thin line (sort of like a second hand) might look nice. It's hard to tell at this size but the red hand has a shadow and light direction at 135 degrees and a shorter length instead of 145 when I made the black hand.
-
1
-
-
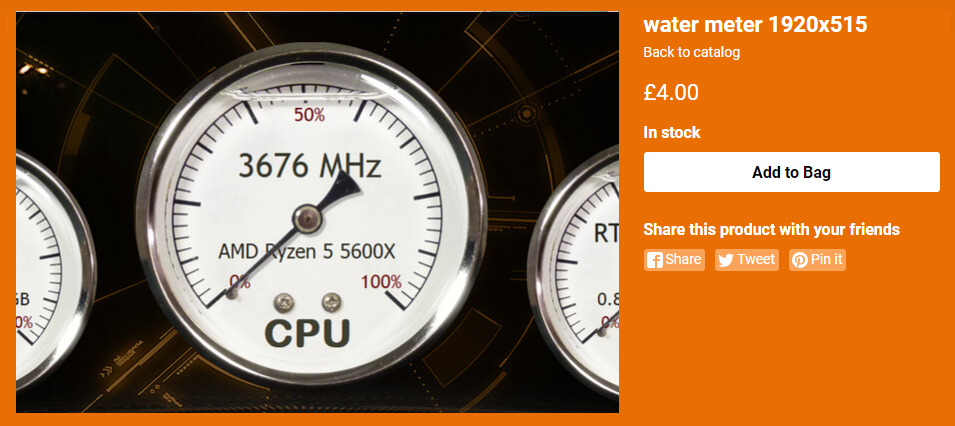
I previously stated: “So, I clicked on the invite to www.aida64skins.com from a previous message, and I see one of my sensor panels in stock and being sold there. Not too sure what to think about that.”
I’ve thought about it.
I should have said this: “So, I clicked on the invite to www.aida64skins.com from a previous message, and I see my gauges are in stock and being sold there. Not too sure what to think about that. With the hours I put on them, I could have at least got a request. I hope nobody lays claims to my 101 and 51 stage gauges I just added.”
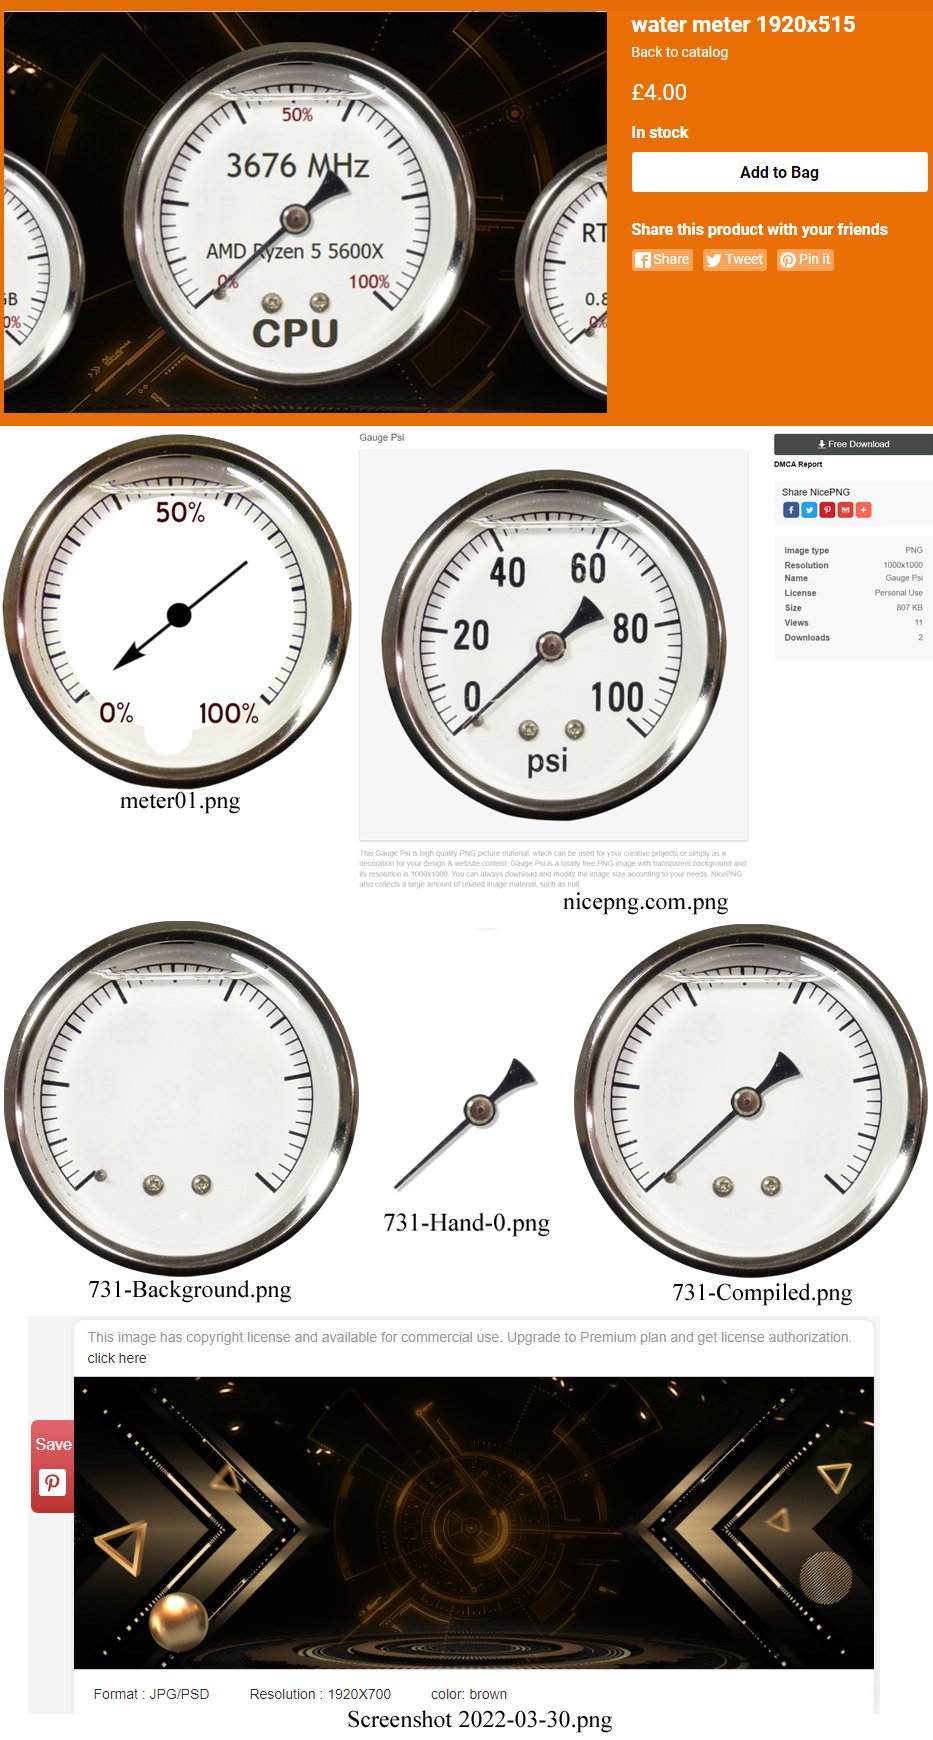
Yes, I downloaded pcrepairvk’s “meter 1024x600.sensorpanel” and “meter v1.sensorpanel” via link here. I liked his design but not his follow-through. His gauge images had crude hands placed at strange angles and white circles dropped on them to cover things he didn’t want. (See image meter01.png gotten from his .sensorpanel files.)
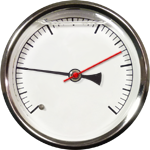
So, I went to the internet to find a gauge to use to create from scratch gauges for a sensor panel. I saw an image of a gauge that looked like his. I decided to give homage to pcrepairvk’s design. I right clicked, saved and cropped the image from a google search showing the gauge offered for free at https://www.nicepng.com/ourpic/u2w7e6y3e6w7w7e6_gauge-psi/. (See image nicepng.com.png.) His gauges are using 16 images with hands already on them. Mine are created with a background (see image 731-Background.png) and 16 transparent hand images (see image 731-Hand-0.png) placed on top to create the ones you see. (See image 731-Compiled.png.) All the 18 images for each gauge came from the nicepng.com image. (16 rotated hand images careful to not rotate the center nut so the lighting is correct with shadowing effect, and 2 background images; with and without screws.) I left out all the numbers and the “psi” for a wider possible usage (degrees and MHz, etc.). After creating all the 731x731 pixel images, I resized them to other sizes you get from my sensor panel uploads.
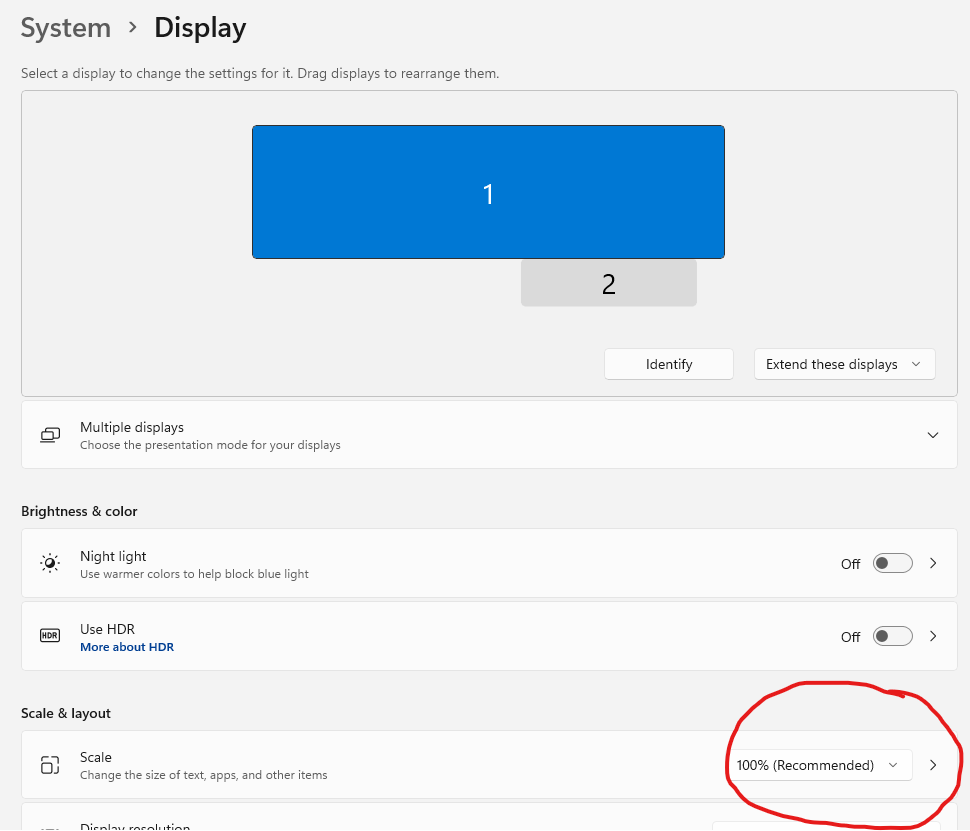
To finish I did use his background, because I ran into this while searching for a similar background: (See Screenshot 2022-03-30.png.) If he holds the copyright on this, he owns rights to the background, and should have mentioned it before putting in on the Aida64 site, I think. After the two uploads I deleted all his images and haven’t used them since. In fact, I had to redownload them today for examples.
I did not download and just move around his gauges/images, nor just change the gauge parameters and descriptions. All my uploaded sensor panels with custom gauges were created from scratch. And the newest 51 and 101 stage gauges were back-to-the-original downloads again. After moving rotating and cropping, the hands don’t line up with the new manipulated gauge background images. Just manipulating a sensor panel, via changes in the “SensorPanel Manager - AIDA64” isn’t worth the upload. (IMAO)
Look at the images and you all can decide who the work came from. If it looks odd that I only have one attachment, it was because I only had 2 MB upload space, so I placed the images on one white background and saved as a jpg.

-
2
-
-
So, I clicked on the invite to www.aida64skins.com from a previous message, and I see one of my sensor panels in stock and being sold there. Not too sure what to think about that.
-
 2
2
-
-
On 12/28/2021 at 5:27 AM, Wondersquid said:
If you make the gauges with more than one sensor monitor per gauge like 0-16, 17-33, 34-50 etc. you can get readings of 1-100 on one gauge on one for example CPU would be six gauges in one set to the readings.
Apologies!!! It was Wonderwquid's Idea. Even though Eddie did get my attention.
-
Here is the sensor panel file that would fit. I had to reduce the panel to only have 3 gauges. The RAM, CPU and C drive gauge. At least you would get all the 262 images needed to recreate it. Just duplicate the RAM gauge and move it, for the GPU gauge, and do the same with the C drive gauge to do the rest.
Be careful when changing the type of any gauge though. For example: the first of 10 gauges needed to make the RAM gauge needs to have a range of 0 to 15. When you click on any other choice it will instantly be changed to 0-100.
Have fun.
388161074_WasteofTime5(1920x515)_sensorpanel.72a193e2cfa7066e1a45bcc0c8f26c11
-
2
-
-
On 12/28/2021 at 1:07 PM, WayBadMojo said:
Ahhh.....
Thank you!

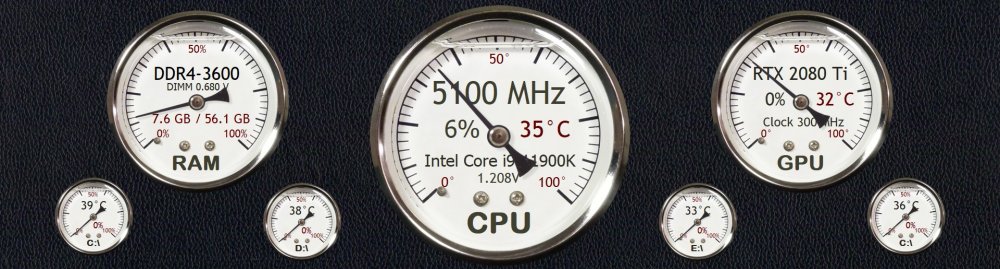
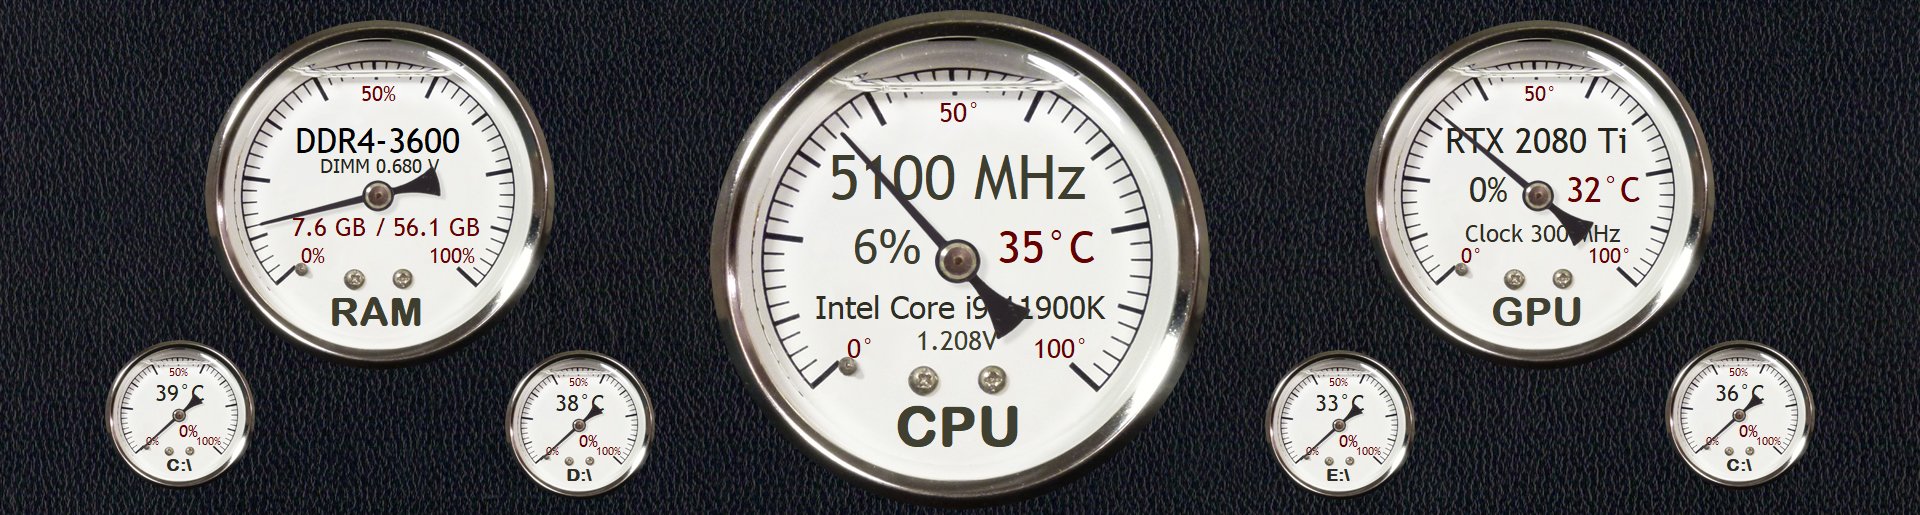
Well, I finally did it. A gauge with 101 stages from 0 to 100. There was never a need, just my need to say, "I did it." Thanks for the idea, WayBadMojo (not sarcastic, even though it took forever). However, because gauges display even when out of range you must leave an end image (1 or 16) blank, or you will always see only one gauge overwriting the previous one, if using opaque images like most people make gauges. This would be like; 0-15, 16-30, 31-45, and so on using at least 7 gauges to make one. I use transparent images, so I had to leave both ends blank or you will see multiple hands on the gauge image. So, it needs at least 8 gauges with; 0-14, 15-28, 29-42, and so on. I used 10 gauges so it will take on a yellow or red glow as a warning when getting high/hot. Also, you need to tweak the min and max values in the manager. The gauge with images 0-14 needs min/max of 0/15, the gauge with images 15-28 needs min/max of 14/29 and the gauge with images 29-42 needs min/max of 28/43, etc. I cropped the hands where I could for file size and still aligning (same top left corner).
In this panel the large gauges had 101 steps each requiring 10 gauges to make. A .png file for each degree/percent 0 to 100. The smaller drive gauges had 51 steps each requiring 5 gauges to make. A .png file for each degree/percent 0 to 100, counting by two. Notice the CPU gauge reporting 35 degrees and the hand actually pointing at 35, and the GPU gauge reporting 32 degrees and the hand actually pointing at 32. (Man am I good!)
So that probably was drivel for the “download sensor panels and ask the author to ‘fix/change it’ for my computer” user. But it might be useful for the doers that do the work. (Was that too negative?)
In creating the 101-stage gauge, I had to start from scratch, because I cleaned up after thinking I had the perfect gauge. They look a little better because I also did some internal stretching on account the “real” gauges faceplate wasn’t centered in the metal body. Also, I cropped the outside because the chrome bezel was wider on one side.
This is when I found out, when you import a gauge, it will overwrite the images in the SensorPanel folder. After creating new images and copying them into the SensorPanel folder (overwriting the not-so-pretty) images, the panel being displayed looked better. But then I imported a different design with images with the same name, images were the older version. And going back to the previous panel now had the older images again. It’s a good thing I copied instead of moved the files. I had to import, copy new images, export, import the other design, copy again, and then export to fix both.
I wonder if anyone reads the words as well as looks at the pictures. I know I always don’t. Would I have read what WayBadMojo had typed without Mojo’s bad-baby-face and Eddie Murphy’s head tapping image getting my attention? Without them I might had not-so-pretty images a-n-d many more hours of free time.Oops, the file it too big.
-
5
-
-
2 hours ago, EverStaR said:
Yes, I had resized it and everything aligned, like I said, when I exported it was all perfect. I shut down yesterday and when I started up today, its all out of whack. Also the resolution of the panel doubled in preferences, but note, I never touched that. Again it was all perfect yesterday, and today that is what you see. Reducing the resolution in preferences simply leaves thing not showing off the edges.
What happens when its put back to size it was created at, 1920x1080. not there is all the stuff in the first screenshot all off to the sides.
I get the parts tonight to mount my screen in the case, once I have done that I will give this another go by aligning it all one more time.
Is export the only way this gets saved?
Things to know. Aida64 likes to keep all .jpg and .png copies in C:\Program Files (x86)\FinalWire\AIDA64 Extreme\SensorPanel\ folder. You can load a pic from anywhere, but during the export it copies all the pics into the .sensorpanel file. When you import a sensor panel file, it makes copies of the pics into the said folder. Not sure if it overwrites files if they are already there. When you start Aida64, it loads from memory and only looks in the said folder. If it looked right when you exported, it "should" look right when you import. It might be too late, but if you imported what you exported, it would probably have been fine. I always export before I import. It ensures the files in the C:\Program Files (x86)\FinalWire\AIDA64 Extreme\SensorPanel\ folder are correct.
At one time I had an AIO computer set to 150% scale. If I exported a sensor panel from it, and then loaded the .sensorpanel file into my other PC that was set to 100% scale, the panel would be messed up. All text, graph and gauge locations would be correct, but the images would all be two-thirds size. Reversing from my PC to AIO would make the pics too large by one and a half.
I would hate to think if there were multiple users during logoff and login.
Yes, I have wide monitors.

-
On 3/21/2022 at 12:48 AM, BigWapo said:
does anyone know the best way to mount the monitor to the pc. i have no place to screw it into the pc case an need a diff way to any ideas would be helpful
On my previous rig, I made a little bracket/stand. Attached bracket to the monitor and a little 5-pound (1- inch round) earth magnet to the stand. Attached it to the 7-inch monitor and the magnet held it in place. You could also use tape on magnets, or auto tape.
-
1
-
-
Had to put sensor panel separate due to size.
1482083762_WaterMeterBig2(1920x515)_sensorpanel.84f0db95e97892603015ab18ef824f9e
-
1
-
1
-
-
So, I finally finished my gauge panel to my liking. I think it all works right. In one example I was running a short stress test. Every gauge has a warning transparency gauge on top. If fan or water pump slows down, drives start thrashing, running low on memory, something gets hot, excessive internet load, etc., the gauge will turn yellow then red to warn me.
.thumb.png.636437a48b78af73916caa49cbf6e4c9.png)
.thumb.png.2298ad6551dc1bc40f1be8fa115250d9.png)
-
11
-
-
I also made 300-pixel and 350-pixel gauges to take up more room. It was easy since my original trimmed download image was 731 by 731. I create the first gauge as big as possible then use a macro to shrink all the finished images to a more reasonable size. Makes for a cleared image.
.thumb.png.7dacfb566694d006e908ae8baa2069ea.png)
1659829566_WaterMeterBig(1920x515)_sensorpanel.6606e108e6c49068ea6913316ebe2488
-
11
-
2
-
-
First off, I want to give credit to the member pcrepairvk. I loved his entries on page 225. I downloaded them right away and started changing a few entries to match my machine. Then being a perfectionist, I noticed things that made me itch. The gauges go in increments of 0, 5, 10, 15, 20, 25, 30, 35, 40, 45, 50, 60, 70, 80, 90, 100. The tip of the original gauge hand was still visible after putting the off-centered white circle to remove the numbers and gauge hand. Retired math/art teacher here. I'd give it an A- in art and C- in math. So, I took pcrepairvk's idea and started from scratch. I believe I found the image of the gauge on the internet. It had a cool hand, two Phillips screw heads and a stop peg for zero (slightly over 1-1/2). I used the Band-Aid tool on photoshop to remove the numbers and some blemishes, remade/left the stop peg and left the screws as an option, pulled out the original hand and center pin to use them as hands with shadow in 15 even internals of 6-2/3, 13-1/3, 20, ..., 100. (I had it hit the peg for zero.) I recreated his 200, 250 and 450 pixel gauges my way. I did use pcrepairvk's background. Did I mention I loved his panel? This is what I created. It contains images with and without the screw heads. If you don't like the screws move the gauge-1.png images to be after gauge-0.png images or delete the gauge-0.png images in the manager. I put the gauges into groups. If you need to move a gauge, highlight the whole group and move them together.
.thumb.png.8d93a8088113af66fd85c2ef4e7764ce.png)
343514352_WaterMeter(1920x515)_sensorpanel.1b58e6a59455d40ab8ef6caf7ba87f51
-
8
-
-
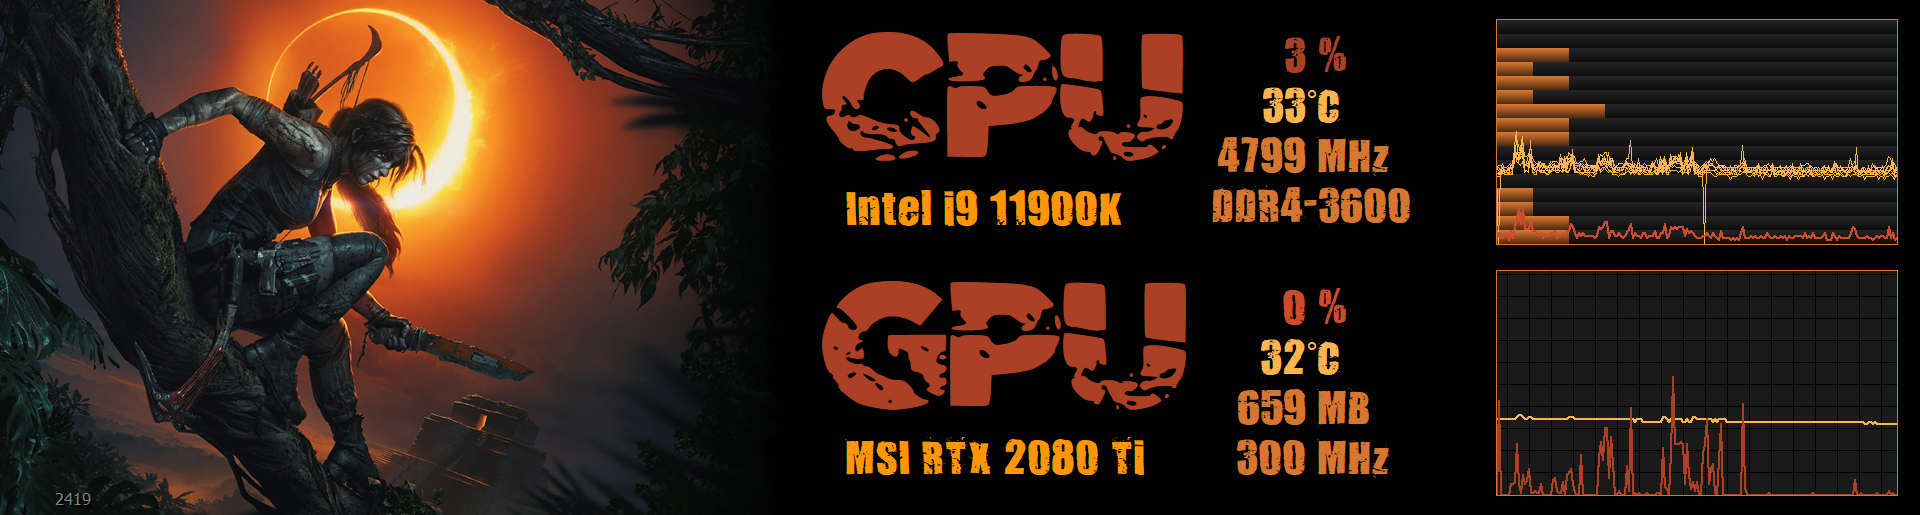
My 12.6 inch (1920 x 515) monitor finally arrived, so I threw this together. (the fonts are Tomb_Raider and 321impact)

-
2
-
1
-
-
I was riding my favorite 4-wheeler in to get a beer at the Spead Eagle thinking about 3 women on scales and keeping it light. Then I remembered I will soon get the 1920x515 12.6-inch Pi monitor I ordered. I needed to get ready with a new panel design. I took a screen shot, and this is what I came up with.
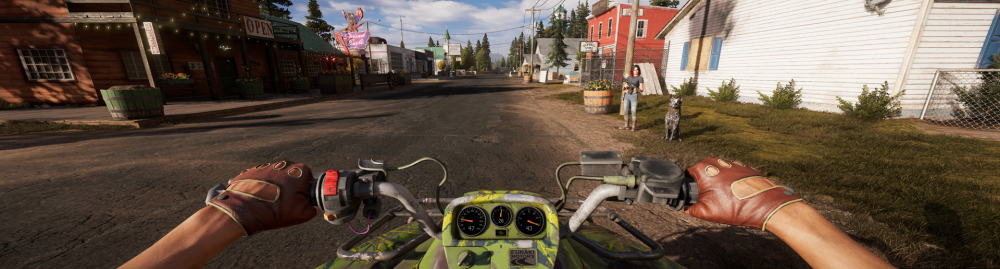
Left gauge is CPU activity and temp. Middle gauge is N-bridge and temp. Right gauge is GPU utilization and temp. And, the check engine light comes on if I thermal throttle.
897982548_FC5FunakiMotors(1920x515)_sensorpanel.9147ac33be81d1f79bc78b27518ef598
-
1
-
-
The title says, "Share," so I'm sharing. 8 custom gauges, interchangeable and stackable with 8 background images. Each gauge is 170 by 170 pixels, resized from 751 by 751 pixels originals exported from Microsoft Publisher. I created all images from scratch. Let me know if you would like a different size.
I've been working on gauges for over a month for my panels. I wish I had seen Kirstein Tito's post earlier, (Dashboard on 11/28 seen on page 181). The use of transparency and overlay is awesome (IMNSHO). I would have come up with mine much earlier. I knew I wanted multiple items on a single gauge. More like a mechanical gauge (non-transparent).
I tried making gauges with a transparent canvas to the sides to have the text (when ticked) not centered. They worked, but the 16 images needed to be modified every time I changed font and/or font size, so after issues with fonts and text overwriting images, I started over having several images and gauges to make one.
It sure would be nice if Aida64 would add an offset option to the custom gauges for text. Another thing Aida64 (if you are listening,) you can align left or right but not center on sensor items. That one I have an alternative: Use a 100% transparent .png image with all 16 stages of a gauge. But this method sadly has no labels.
This sensor panel is not much to look at, but it was easier for me to make and upload it instead of uploading 145 images, not to mention explain it. All LED and hand gauges can be placed atop each other to create different gauges.
Example 1 has activity percent of threads 1 and 2, core 1 temp and core clock speed.
Example 2 has AIO pump RPM and CPU temp.
Example 3 has only master volume.
Example 4 has my 3rd drive's activity and both of its temperature sensors.
Example 5 has GPU temp and FPS gauges with standard Aida sensor text mixed in.copy.thumb.png.015ee09a95cb9b3014969b9cd2781ac7.png)
2045868797_StackingExample(170x170)_sensorpanel.985d385e593aa81036af7ea5b89b4bb7
-
8
-
3
-
-
Long time user of Aida64, first time poster. This is on the screen of my All-in-one. The background is a copy of the corner of the desktop background, so it looks like it is floating:
.png.66d80609c262d7bd168deb751a5d9f6e.png)
And this is on my latest machine. It is displayed on an Andycine 7-inch monitor in the case.
.thumb.png.a2bbef6704eb20aa56a9158149bec023.png)
-
2
-

.png.3a6788e5ed0c56c207fe6bae5194f688.png)
.png.70dc1e03d479e1c71ea8d40c1e10a405.png)
.png.407ffe9bfe89eca16ffdcd09ca98ee50.png)
.png.f6abc2c69fa23702d31016de632c4ac5.png)

copy.png.b1d5eecadd6dacd1bc1cd999abfbdb16.png)
.png.77bd199b536f6be740b2eb344cc1720d.png)
Share your Sensorpanels
in SensorPanel
Posted
Try changing the screen resolution. Also try the "Advanced display" settings. Mine would flash once in a while at 60 Hz, and when I checked it wanted to run at 59 instead. Have you tried a different cable?