BHSY
-
Posts
305 -
Joined
-
Days Won
57


Recent Profile Visitors
13811 profile views


BHSY's Achievements
")


-
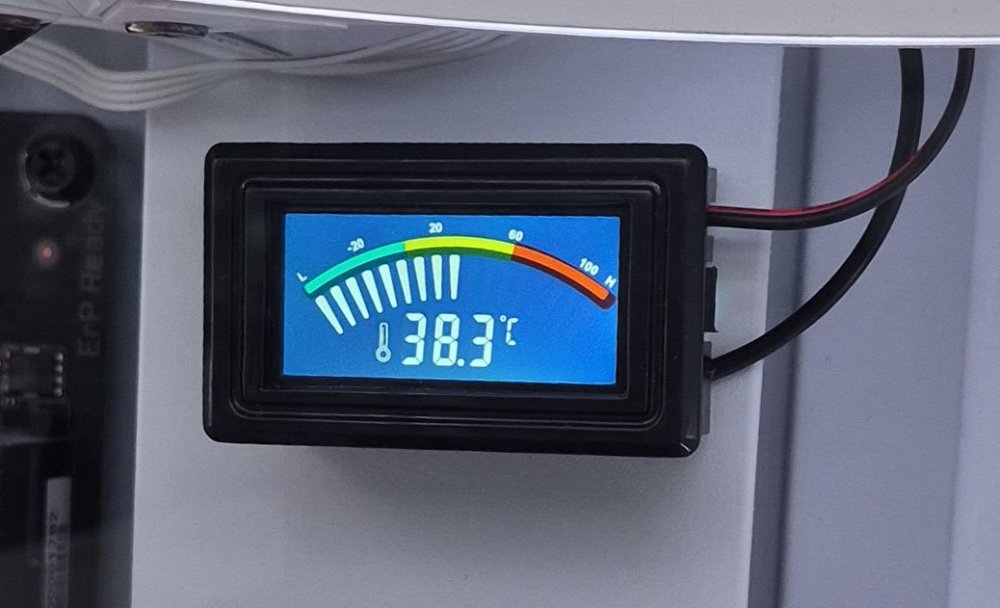
 I finally received the KETOTEK Digital Thermometer Temperature Meter Gauge using a metal rod to sense the temperature. My first order from AliExpress never arrived; local logistics lost the parcel,😔 and I got a refund. I then placed a new order through Amazon.com. I attached the metal rod to the NIC card heatsink as shown in the screenshot and used Kapton Polyimide tape (heat-resistant). My NZXT chassis case can mount 3 fans at the base, so it helps cool down my NIC card.👍 Anyone interested can get it from Amazon.com.
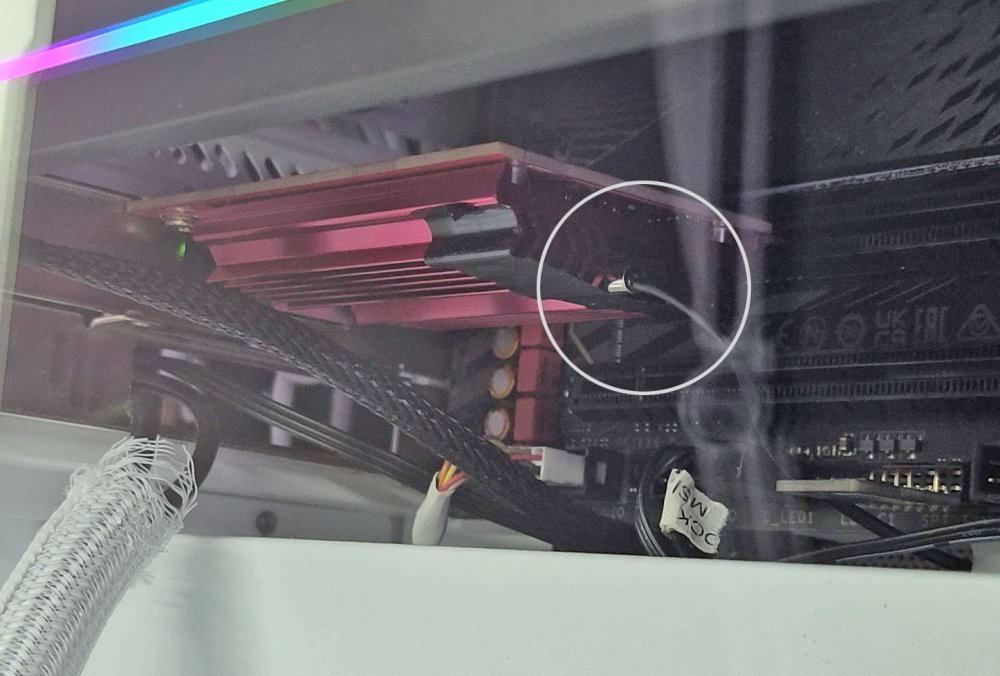
-
🚀 Introducing SynQPanel - A New Panel-Based Visualization Tool for AIDA64 Users
BHSY replied to GaHile's topic in SensorPanel
I really like the ‘Butter’ Glide Dynamics; look at how my CPU utilization and temp arc gauge and dial gauge move now. 💪 Thank you, GaHile, for implementing this feature.🙏 -
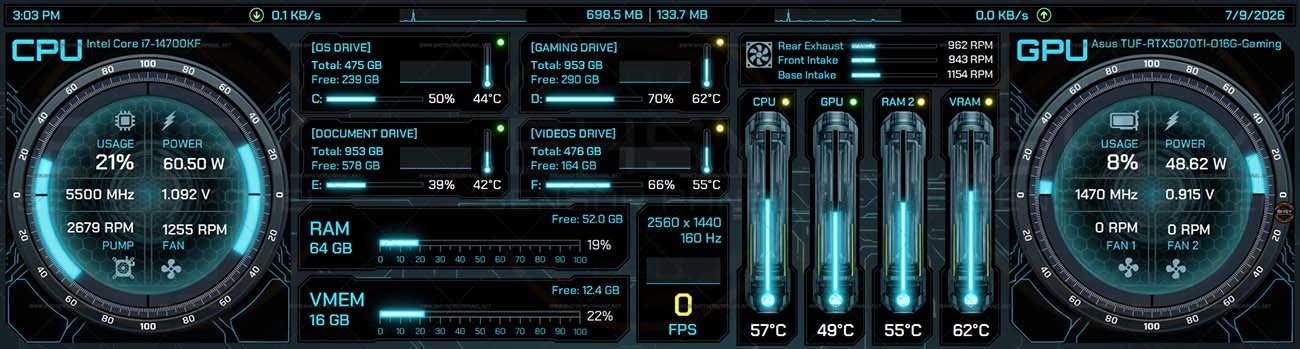
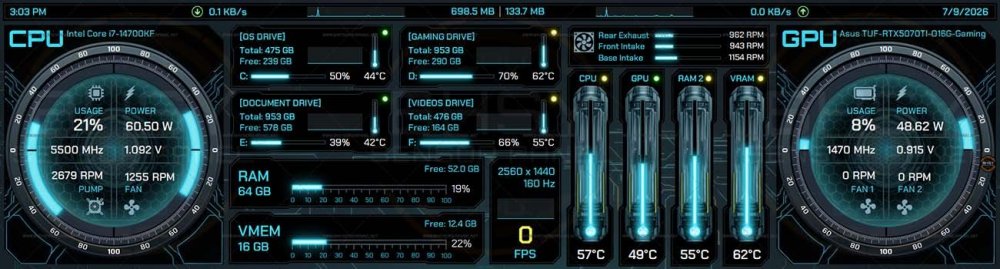
83 - LUMINA PULSE SENSOR PANEL TEMPLATE 1280x800 | 1920x480 | 1920x515 | 2560x720 | 3820x1100 | 515x1920 | 720x2560 | 1100x3840 83-LuminaPulse, designed for real-time PC monitoring. Displays CPU, GPU, RAM, storage, and cooling stats in a clean, organized layout. Perfect for gamers who want a stylish and functional dashboard to track performance and temperatures at a glance. Get yours today! Visit BHSYSensorPanel for more info. and designs
-
Hi Toveyr, I’ve shared some pointers about your panel. Please check your inbox.
-
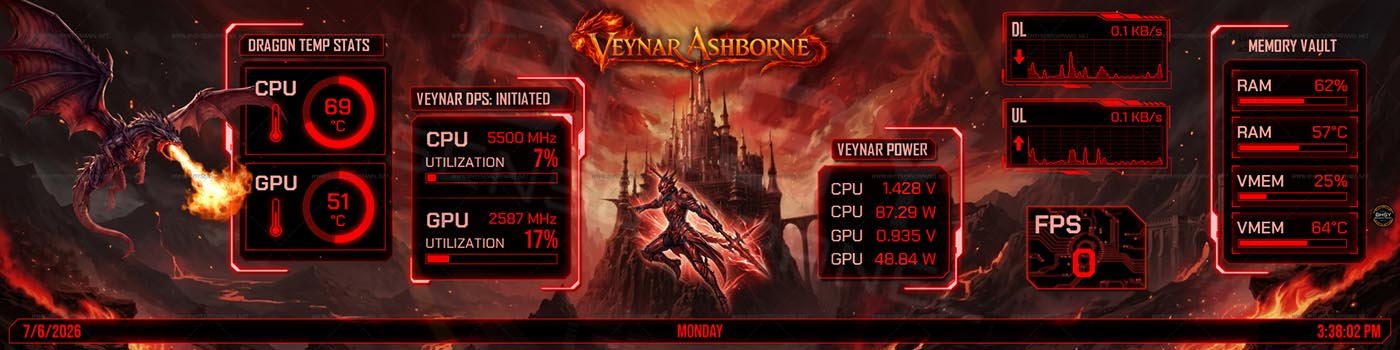
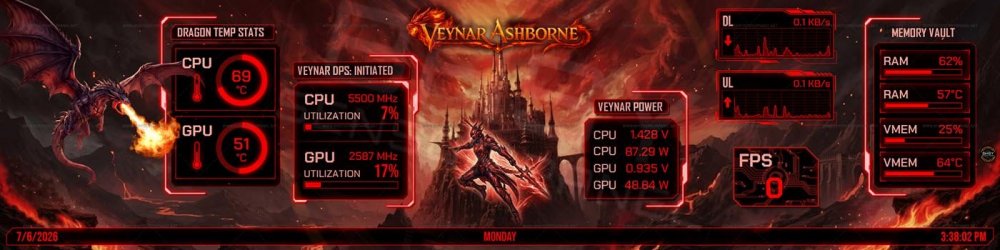
VeynarAshborne: A fantasy-themed PC performance monitor featuring a fiery dragon and warrior design, blending system stats with immersive RPG-style visuals. Current available size: 1920x480 / 1920x515 / 515x1920 / 1600x1200 For other sizes, please submit a request Visit BHSYSensorPanel for more info. and designs
-
Feature Request: Manual input of Scale Percentage by panel Width and Height
BHSY replied to BHSY's topic in Brainstorming
As there’s been no response for over a month, I’ll consider this request closed. -
☀️ Countdown: 20% Off All Sensor Panel Templates Starts in 5 Days! Hey everyone! Summer is here, and it is time to give your PC setup a brand new look. I am excited to announce that my Official Summer Sale is launching next week! For one week only, you can grab any of our ready-to-use PC Sensor Panel Templates for 20% off! 📅 Mark Your Calendars (Sale Dates): Starts: Monday, July 6th at 9:00 AM Eastern Time Ends: Monday, July 13th at 11:59 PM Eastern Time That’s a wrap on the Summer Sale 🌞. Thank you for being part of it!
-
BHSY changed their profile photo
-
🚀 Introducing SynQPanel - A New Panel-Based Visualization Tool for AIDA64 Users
BHSY replied to GaHile's topic in SensorPanel
I switched from the 1920×515 dark version panel to the 1920×480 white version to better match my NZXT white chassis case. Although the 1920×480 display is slightly smaller, its colors are noticeably more vibrant compared to the 1920×515 display.
-
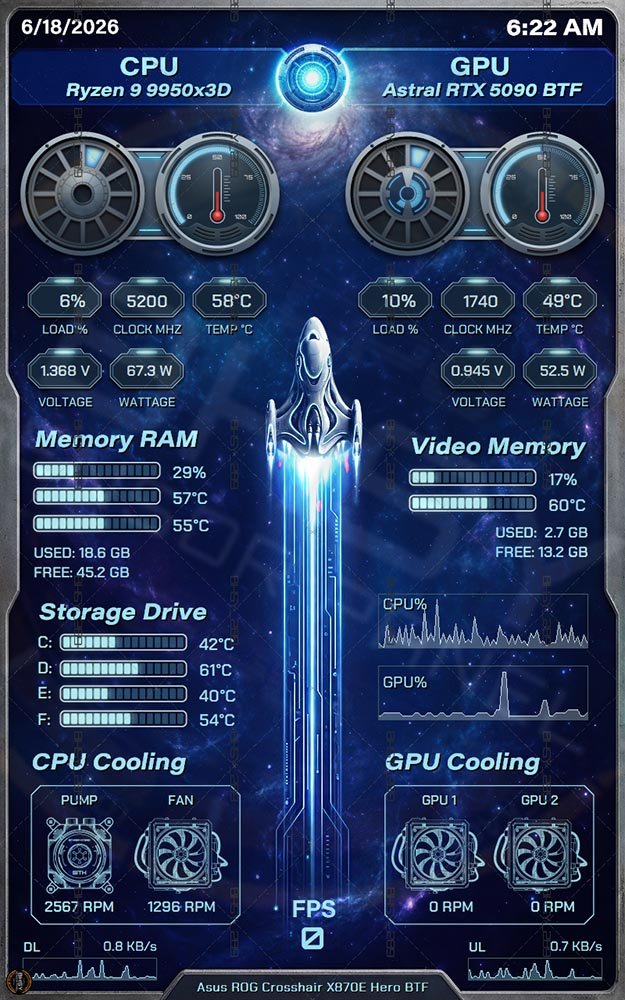
81 - Falcon Performance Core - 800x1280 A streamlined, space‑inspired system monitor that merges sci‑fi design with real‑time PC metrics. It displays CPU, GPU, memory, storage, and cooling data against a cosmic backdrop, with a radiant starship symbolizing system power. The design elevates technical information into an engaging, futuristic showcase while preserving a polished, high‑tech aesthetic. The sensor panel offers two interchangeable backgrounds with two distinct starship visuals. Visit BHSYSensorPanel for more info. and designs

-
🚀 Introducing SynQPanel - A New Panel-Based Visualization Tool for AIDA64 Users
BHSY replied to GaHile's topic in SensorPanel
No, this is a paid sensor panel. The gauge you saw on the forum was intended for SynQPanel testing purposes. If you have any questions, please message @BHSY. -
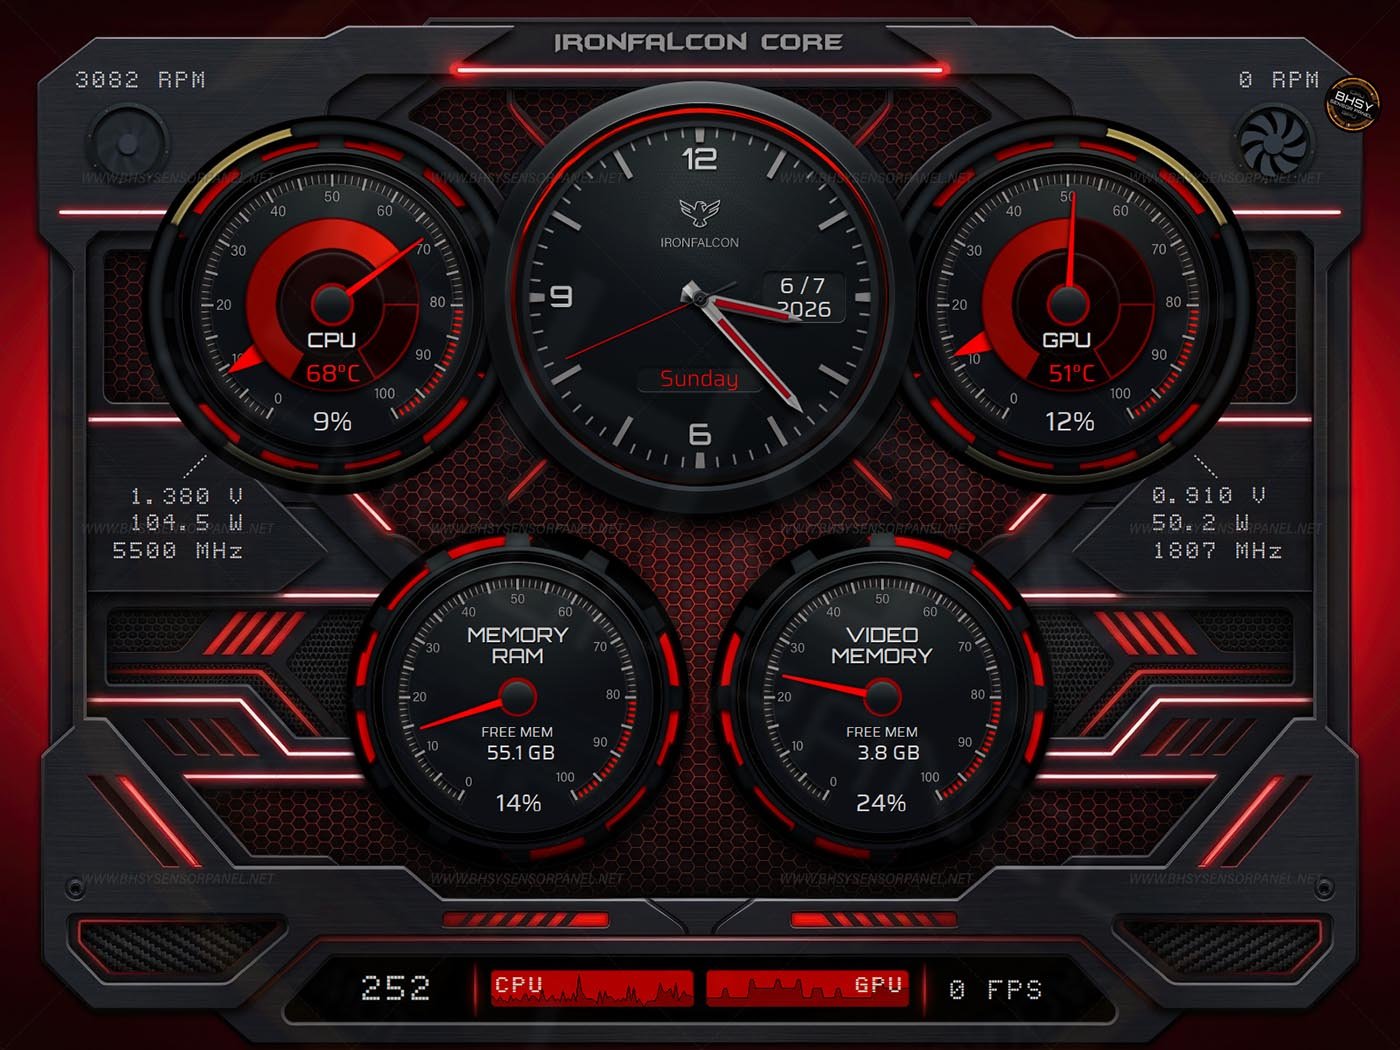
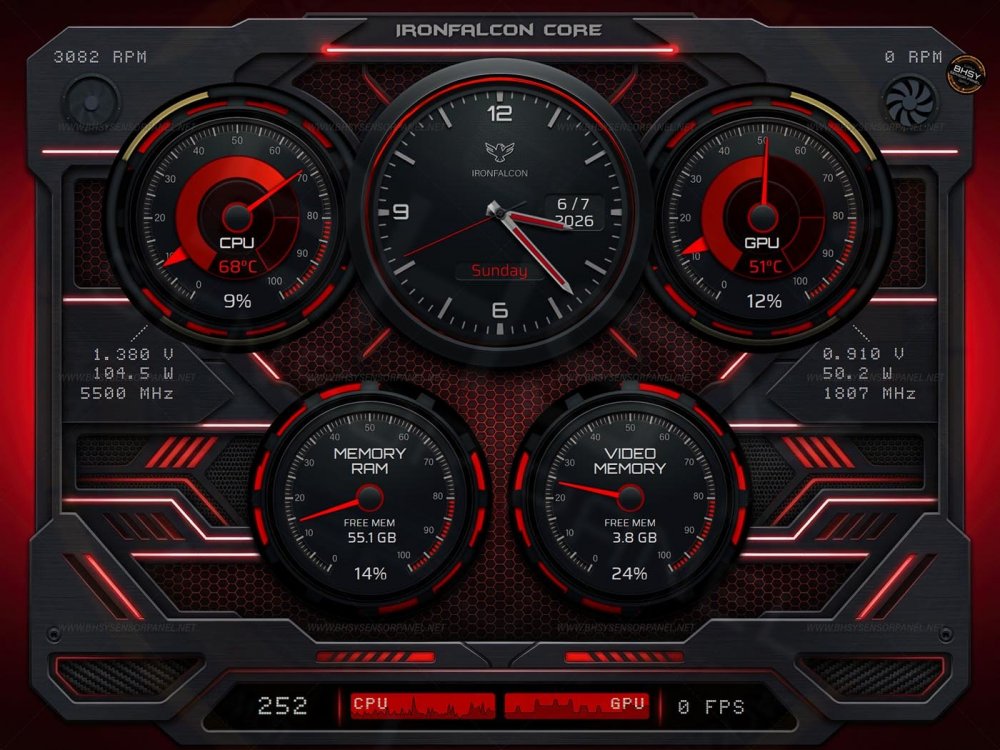
73-AIDA64 Sensor Panel - IronFalconCore is now available in 1600x1200. For other sizes such as 1280x800, please submit a request. Thank you. Visit BHSYSensorPanel for more info. and designs
-
Whoa! 3D printing really is impressive. That is a good idea. I wish I had one too. Then again, I’d probably end up using it only occasionally, or worse, printing unnecessary things or failed experiments that just turn into waste. 😅
-
Hi Surjeet, Thank you for your kind words. 🙏 I know you’ve always credited me as the original creator of my panels and respected my requests, and I truly appreciate that. One thing I’d like to highlight is that while giving credit is important, seeking permission before uploading or sharing someone else’s panel file should always come first. Permission should be the top priority, and only after that should a file be uploaded. Back then, we were all new and not fully aware of how important this was, but over time I’ve learned a lot, and I’m no longer as naive as I once was. It’s been three years since I joined this forum, and as I mentioned in my earlier post, I used to be a very closed‑minded person. AIDA64 changed that; it opened me up to sharing, learning, and connecting with others in ways I never expected. If you ever have questions about panels, feel free to reach out anytime. I’ll do my best to explain things clearly so they’re easy to understand.😉
-
From what I understand, a temperature of around 60 °C is still within the acceptable range for the card to operate reliably. However, lowering it further would be beneficial in helping to extend the card’s lifespan. Adding extra cooling fans could help the card, provided the PC case has enough space to accommodate them. I hope the AIDA64 program will be able to monitor the card’s temperature so that I don't have to get additional devices.
-
Yes, because regional requirements differ. That’s why your TP-Link support site still lists the V1 version. In our country, 10Gbps consumer adoption came much later than in other regions; we began introducing consumer-level 10Gbps broadband in mid‑2024, with rollout scheduled through 2026. So the V1 card was never introduced here. I just recontract my gamer plan from 2.5Gbps to 10Gbps. Since my motherboard doesn’t have an AUX sensor header, I’ll need to rely on either an external controller or a USB sensor device that works with AIDA64. If adding this thermal detection feature cannot be implemented directly through the AIDA64 program, I’ll consider purchasing one, or I could get a budget infrared thermometer, but it will be difficult to target the NIC card because of my horizontal GPU card holder is in the way.😕 Thank you. Thank you.