


odospace
-
Posts
48 -
Joined
-
Last visited
Content Type
Profiles
Forums
Events
Posts posted by odospace
-
-
I looked into the JDownloader forum, it seems the API is still maintained because it is the same as for the My.JDownloader API site. But there will never be an official DLL

-
Hi, i will try but it will take 2-3 weeks until i have time to implement.
-
Version 1.15 available- Fullscreen mode (long press for settings)- RemotePanel (for windows) version 1.15: Verbose mode for better problem handling, fixes a rare ADB hang when multiple PCs are connected to one android device.
-
Fiery I was wondering, in the OP you display that phone with the odospace running. Could you post the template you used for that so I can import it into my lcd items? I really like it !!
Here are my oslcd files for import into Aida64.
Best regards
odospace
-
Posted a review on google play. Great app! just what I have been looking for for a long time. Just one quick question, how do you guys get images in the background of your display? Can only see the option for colours and cant remember how I use to do it on my G19 either.
Thanks again!
Hi, to use your own background picture add an image item to the lcd panel.
-
HI Fiery,
are there any news about this? It would be great to display the read MB/s of my NAS (implemented through a PC) when watching a film.
Best regards
odospace
-
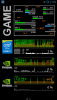
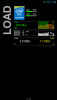
Android devices are cheap and maybe you have an old mobile phone at home. Such a device can be used for display look at Odospace Remote Panel.
-
Hi Amarek,
if you want to display only the Aida64 panel on the USB LCD. Take a look at the Odospace Remote Panel. It displays the Aida64 panel on an (old, cheap) Android device, connected via USB only. Without the need of WiFi.
Best regards
Odospace
-
-
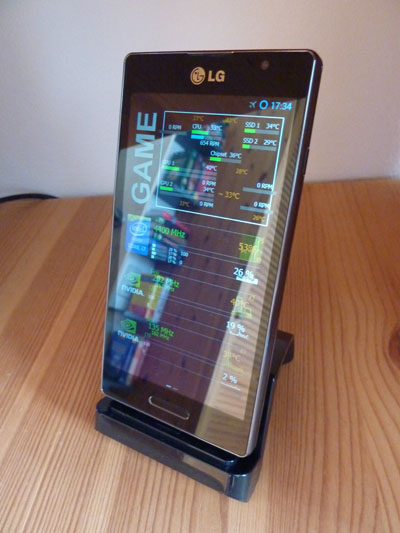
Uhm, pardon my noobness, but is there a way to output the sensor panel to an android device!? I'm noticing some android looking icons on top of your panels (I might be mistaken...)
I have a Note 3 & a very dusty S3 that I'm not using, would be amazing to turn it into a small LCD display for sensor panel.

The picture shows an Android LG L9 running Odospace Remote Panel see http://forums.aida64.com/topic/2776-display-pc-sensor-values-on-android-device-connected-via-usb-odospace-remote-panel
It is connected to the PC without Wifi and powered through USB. The L9 powers on and off automatically with the PC (see description in the link above).

-
Hi Necrofridge,
sorry but this is not planned in near future.
Best regards
Odospace
-
Hi Necrofridge!
Thank you for your feedback! Currently the Android App does not support optional scaling, simply because no option dialog is implemented in the app. Try to ask the Aida64 developer to either create larger gauges or to provide you with the corresponding images that you can size them at your own. Aida64 already provides a way to use custom images for gauges.
Btw: I changed the tray icon in Remote Panel for Windows version 1.14a.
Best regards
Edit: You can find the images in this post: http://forums.aida64.com/topic/940-gauges-editable/
-
Give your old android device a chance together with Odospace Remote Panel.

-
Hi,
the PCH diode temperature is not displayed on MSI Z97-GD65, whereas it is shown on Z87-GD65.
Best regards
odospace
-
Hi passionne,
you are welcome, if you like this app, please add a comment to google play.
Best regards
odospace
-
Hi,
added a description to the first post how to prevent vibration on power on of the android device.
Update:
It does not work always so i removed the description.
Best regards
odospace
-
Hi,
i searched for a solution connecting my old android device without WLAN (WiFi) and to automatically turn it on and off on PC start and stop. You can find my results here: http://forums.aida64.com/topic/2776-display-pc-sensor-values-on-android-device-connected-via-usb-odospace-remote-panel/
Greetings
odospace
-
Hi,
an update is available, i changed the description in the first post.
Best regards
odospace
-
HI Fiery,
maybe Aida64 can read arbitrary windows performance counter values, as seen in perfmon.exe.
I think about an settings dialog where it is possible to add performance counter values (like in perfmon.exe). It must not be sophisticated, only counter name, instance name and scaling factor may be enough.
A sample can be found here: https://msdn.microsoft.com/en-us/library/windows/desktop/aa372633(v=vs.85).aspx
Best regards
odospace
-
Hi,
here are my panels.
Regards
odospace
-
Hi,
is it possible to display the current SSD/HDD read/write speed - as shown in the Windows 8.1 task manager?
Best regards
odospace
-
IMPORTANT:
Google will remove old apps from Google Play after 31. August 2023, when not migrated to a newer API version. Because i don't longer actively support Remote Panel, i have moved the source (and installable runtimes) to GitHub.
---------------------------------------------------------------------------------------------
Hi,
Aida64 now provides support for the Odospace Remote Panel app:
 Reuse your old android device to display sensor values of a Windows PC. A WiFi connection is not (!) required, Remote Panel works even when the device is connected to the PC via USB only. However, an SDK for Remote Panel is provided also.Sensor values are provided by the industry-leading system information tool Aida64 which must be purchased separately. Please note that Remote Panel is not affiliated with Aida64 or FinalWire in any way shape or form and no support can be provided by the Aida64 team for this app.Requirements- Install the app from Google Play or https://github.com/odospace/Remote-Panel/raw/main/runtime/RemotePanel.apk- Aida64 version 5.20.3414 or heigher must be installed on the Windows PC.- Remote Panel (for Windows) version 1.16 must be installed and running, it can be downloaded with the following link https://github.com/odospace/Remote-Panel/raw/main/runtime/RemotePanelSetup.exe- Microsoft .Net framework 4.5 must be installed on the Windows PC. This will be done during the installation of Remote Panel (for Windows).- The android device vendor's drivers must be installed on the Windows PC.- USB debugging must be enabled on the android device. This is described in detail here.Enable Aiada64 plugIn- After installation of Remote Panel (for Windows) Aida64 must be restarted.- Within Aida64 open the preferences page, navigate to LCD and enable "Odospace". Add items within the LCD items page.Settings- A long press within the view opens the settings dialog.Troubleshooting- In general the settings dialog of Remote Panel (for Windows) can be opened from the popup menu of its tray icon.- Remote Panel (for Windows) uses port 38000 and 38001 for local communication, if you experience problems because another PC program is using one of this ports, change the port number within the Remote Panel (for Windows) settings dialog and within the Aida64 Odospace LCD plugin.- Remote Panel (for Windows) uses the Android Debug Bridge (adb.exe) for communication. If you experience problems with other Android synchronization programs, try to use another adb.exe file - it can be changed within the settings dialog of Remote Panel (for Windows).- On default, Remote Panel (for Windows) checks every 30 seconds for new devices, decrease this value within the settings for faster device recognition, increase this value for less CPU usage.Alternative usage- If an additional PC should send its sensor values to the android device, set the IP address within the Aida64 Odospace LCD plugin to the address of the PC where the android device is connected. For every PC specify a different panel position parameter. Remote Panel (for Windows) must be installed on every PC, however the Remote Panel (for Windows) executable must only be started on the PC where the Android device is connected.- Remote Panel can be used within a WiFi network also, in such case set the IP address within the Aida64 Odospace PlugIn to the device's address. The port must be set to 38000. The Remote Panel (for Windows) executable can be stopped in this case.Advanced topics- To automatically start Remote Panel you can use AutoStart.- To power off the device on PC shut down you can use AutomateIt Pro - use the USB disconnect trigger.- If the device battery discharge even connected via USB, try to set the CPU speed to a lower level. For example you can use Tickster MOD.- To power on the device on PC startup the device firmware must be modified (follow this AT YOUR OWN RISK, tested with Cyanogenmod 10.2 on LG P760/P880 and may not work with all devices):General1. Download the device firmware - it can be the original or custom ROM.2. Use Boot/Recovery Repacker to extract the boot.img file of the downloaded ROM.3. Within the file init.rc, in the section beginning with "on charger" replace the string "class_start charger" with "trigger boot" or "trigger late-init". Ensure that your editor writes the file in UNIX format.4. Use the repacker to compress the boot.img file.5. Apply the new firmware.Nexus 7 (2012)1. Boot in fastboot mode2. Issue the following command within a command prompt: "fastboot oem off-mode-charge 0"
Version 1.14
- Now sensor data of multiple PCs can be displayed on one android device- The android device can be connected to any PC (not only to the PC where Aida64 is running)- Requires Aida version 5.20.3414 or higher and Remote Panel (for Windows) version 1.14aVersion 1.15- Fullscreen mode (long press for settings)- RemotePanel (for windows) version 1.15: Verbose mode for better problem handling, fixes a rare ADB hang when multiple PCs are connected to one android device.Version 1.16
- New option added: Keep screen on (long press for settings)Version 1.16a
- Fixed Aida64 crash when resuming from sleepMany thanks to the Aida64 team for the great support!
Best regards
Odo-
 4
4
-


Display PC sensor values on Android device connected via USB - Odospace Remote Panel
in General Discussion
Posted
Version 1.16 available
- New option added: Keep screen on (long press for settings)