COSTAJUNIOR
-
Posts
518 -
Joined
-
Last visited
-
Days Won
98
Content Type
Profiles
Forums
Events
Everything posted by COSTAJUNIOR
-
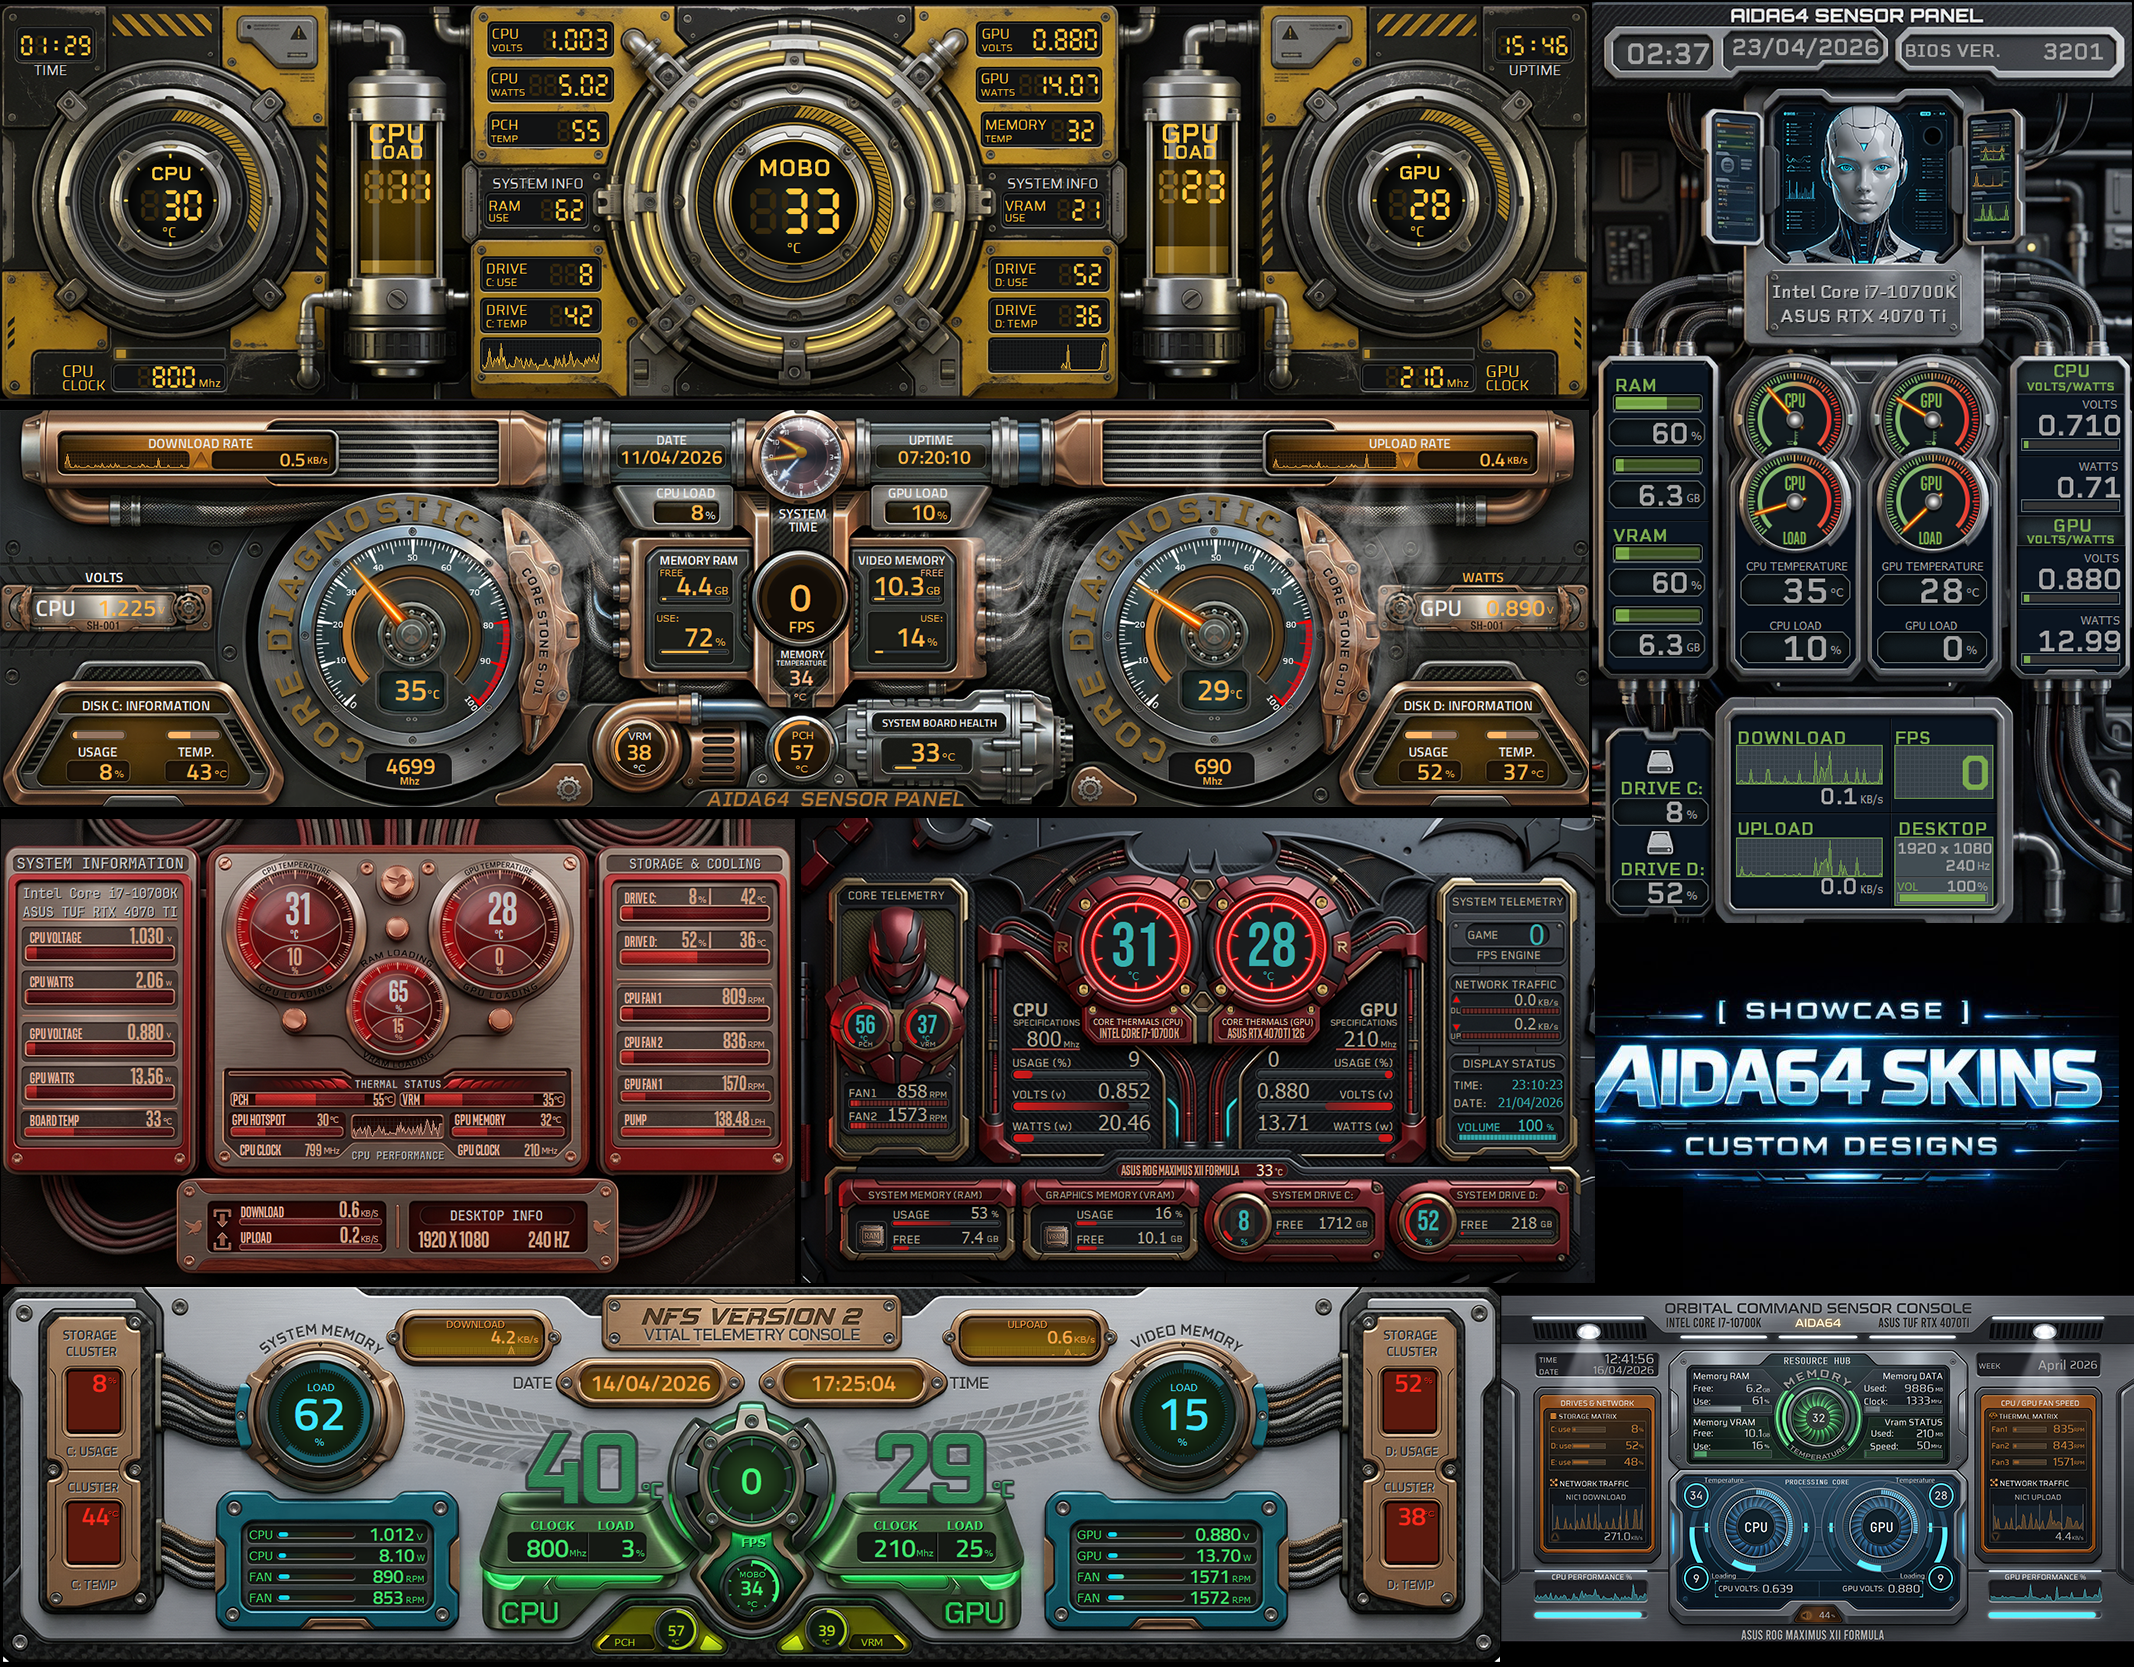
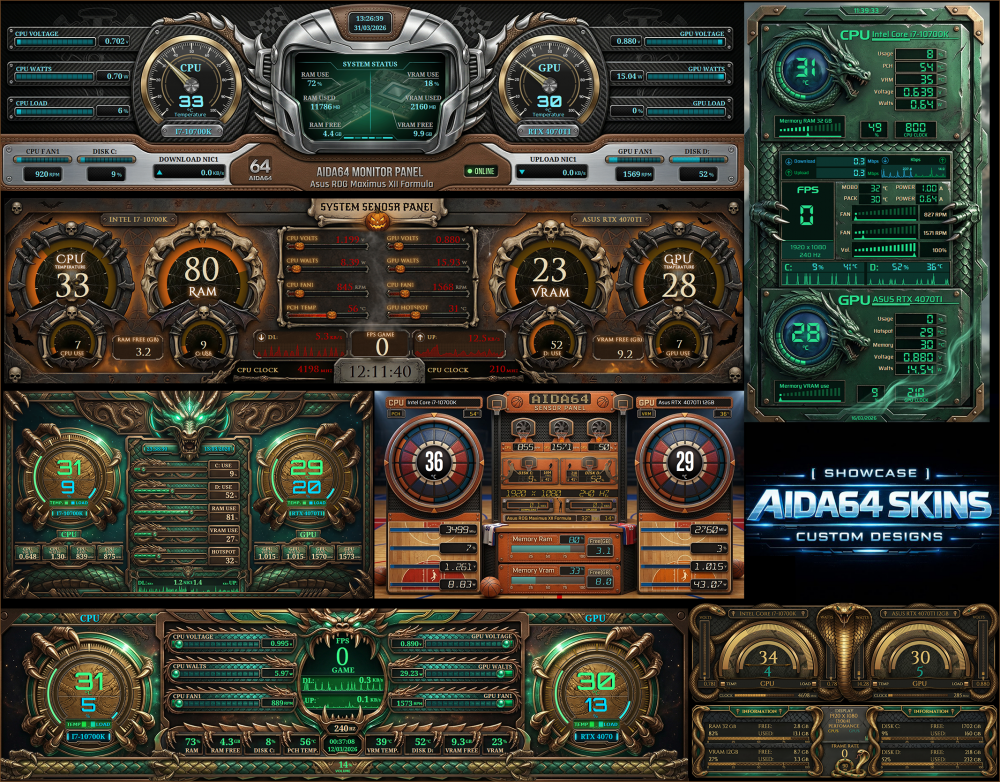
The new AIDA64 skins are now available on our website. This new set features brand-new designs with even more impressive visuals, including exclusive models in 2560×720 resolution, specially developed for the Xeneon Edge. If you want to take your setup’s look to the next level, this is something you need to check out. Visit the website and explore all available models. 🚀🔥 AidaSkins
-
This and many other amazing models are now on our website. Explore the 20 new skins for April. aidaskins.com
-
The new AIDA64 skins are now available on our website. This new set features brand-new designs with even more impressive visuals, including exclusive models in 2560×720 resolution, specially developed for the Xeneon Edge. If you want to take your setup’s look to the next level, this is something you need to check out. Visit the website and explore all available models. 🚀🔥 AidaSkins
-
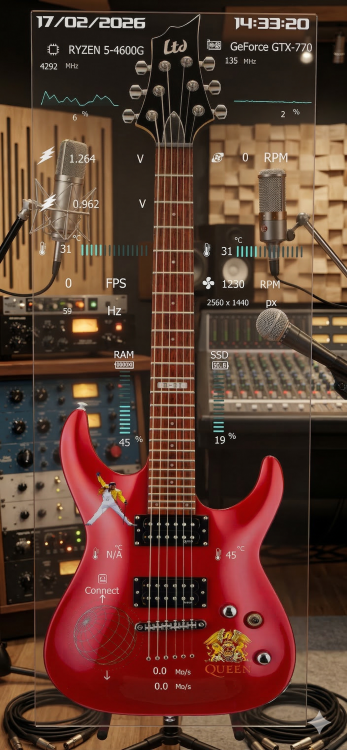
Take a look — I added a recording studio background to better match the image. You might try adding something that relates more to your theme. It’s just an idea, but I hope it helps you get the result you’re looking for. ✨
- 1 reply
-
- 2
-

-
The new AIDA64 skins are now available on our website. This new set features brand-new designs with even more impressive visuals, including exclusive models in 2560×720 resolution, specially developed for the Xeneon Edge. If you want to take your setup’s look to the next level, this is something you need to check out. Visit the website and explore all available models. 🚀🔥 aidaskins.com

-
What is aida 64 and what sensors do I need??
COSTAJUNIOR replied to Mbibalo89's topic in SensorPanel
Hey man, relax — this is way simpler than it sounds 😄 You definitely don’t need to be a NASA engineer to use this. What is AIDA64? AIDA64 is a hardware monitoring software. It reads your PC’s hardware information in real time, like: 🌡 CPU temperature 🎮 GPU temperature ⚡ Voltages 🌀 Fan speeds 📊 RAM, GPU and CPU usage 💾 Disk space 🌐 Download/upload speed These numbers come from physical sensors that already exist in your motherboard, CPU and GPU. Every modern PC has them. AIDA64 just reads that data. And what is the “Sensor Panel”? AIDA64 has a feature called SensorPanel. It’s basically a customizable dashboard that you can display on a secondary screen — like that 8" display you’re thinking about buying. You turn that small screen into a dedicated hardware monitoring panel. Think of it like a digital dashboard for your PC. How does it work in practice? You connect the small display to your PC (usually HDMI + USB). Windows detects it as a second monitor. You install AIDA64. You create or download a SensorPanel layout. You drag it onto the small screen. Done. It becomes a dedicated hardware status display. Do I really need AIDA64? In most cases: yes. Some small displays come with their own software, but: They’re usually limited Not very customizable The interface is basic AIDA64 is what most people use to build clean, fully customizable monitoring panels. Will it work on an 8" screen? Yes. Perfectly. It works with: 5" 7" 8" 10" up to 12" You just need to design or use a layout that matches the screen’s resolution. Straight to the point The small screen acts as a second monitor. AIDA64 reads your PC’s sensors. SensorPanel displays that data in a clean, customizable way. There’s nothing complicated or mysterious about it. You’re basically adding a mini control dashboard to your setup.- 2 replies
-
- 1
-
-
- touchscreen
- aida 64
- (and 4 more)
-
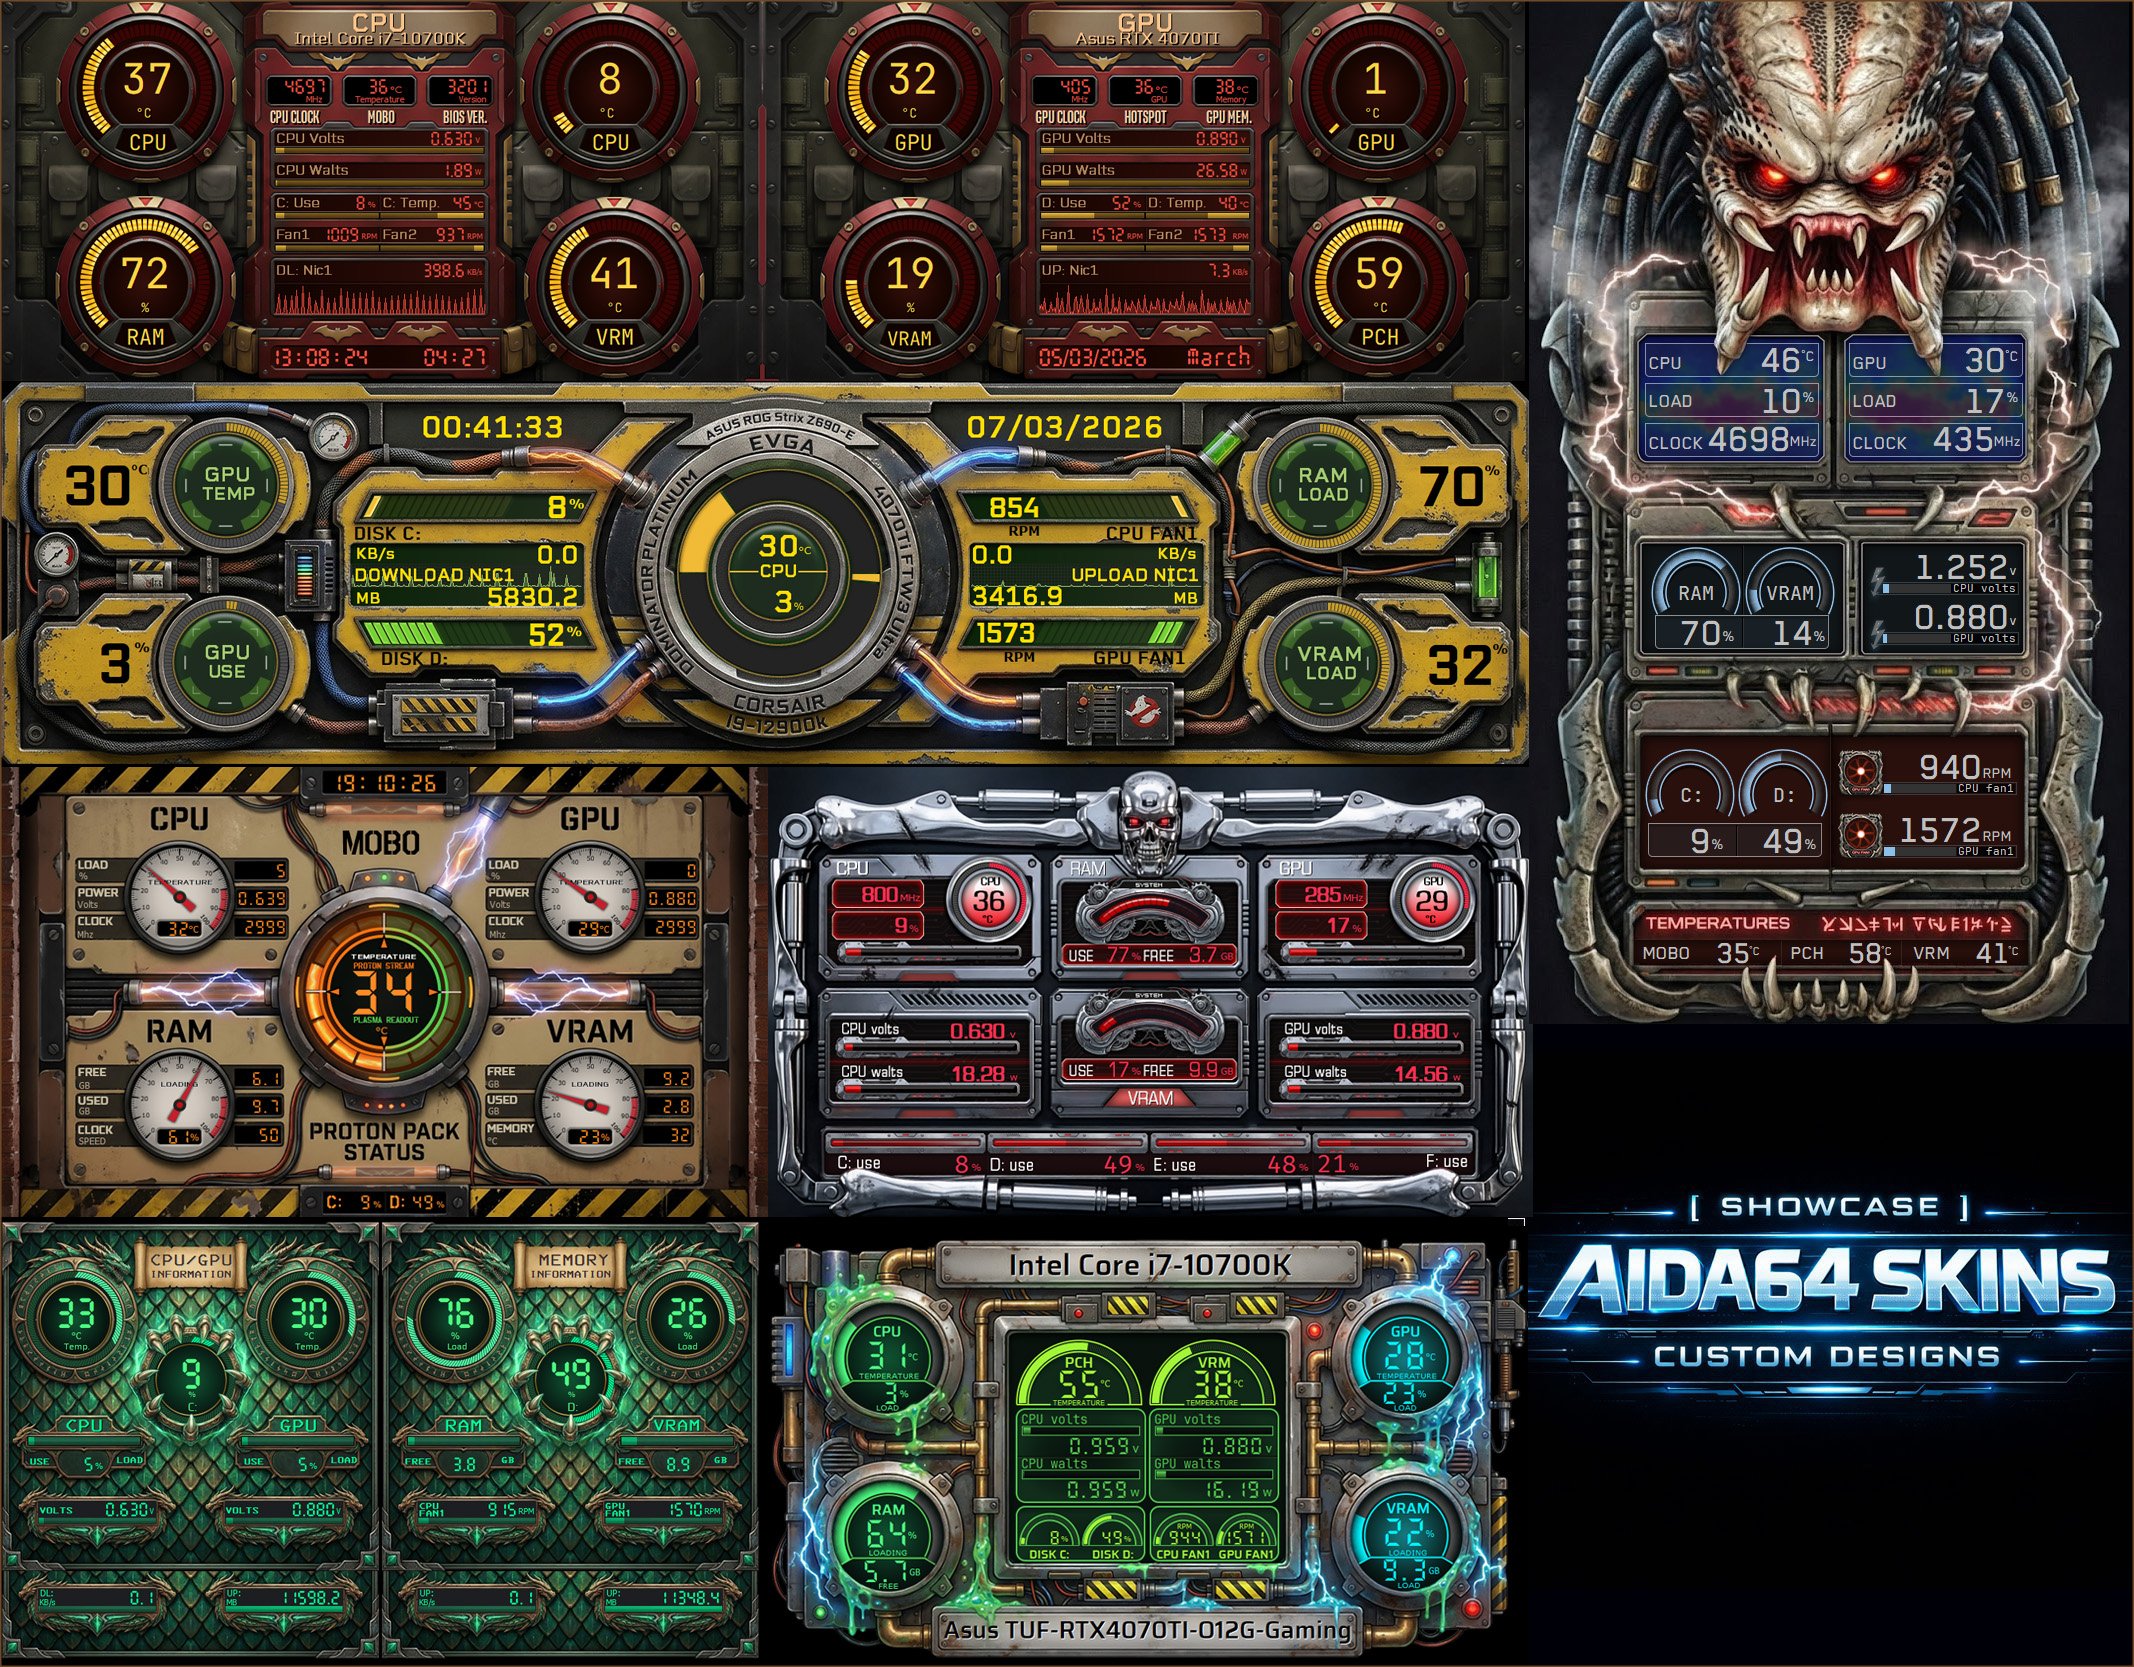
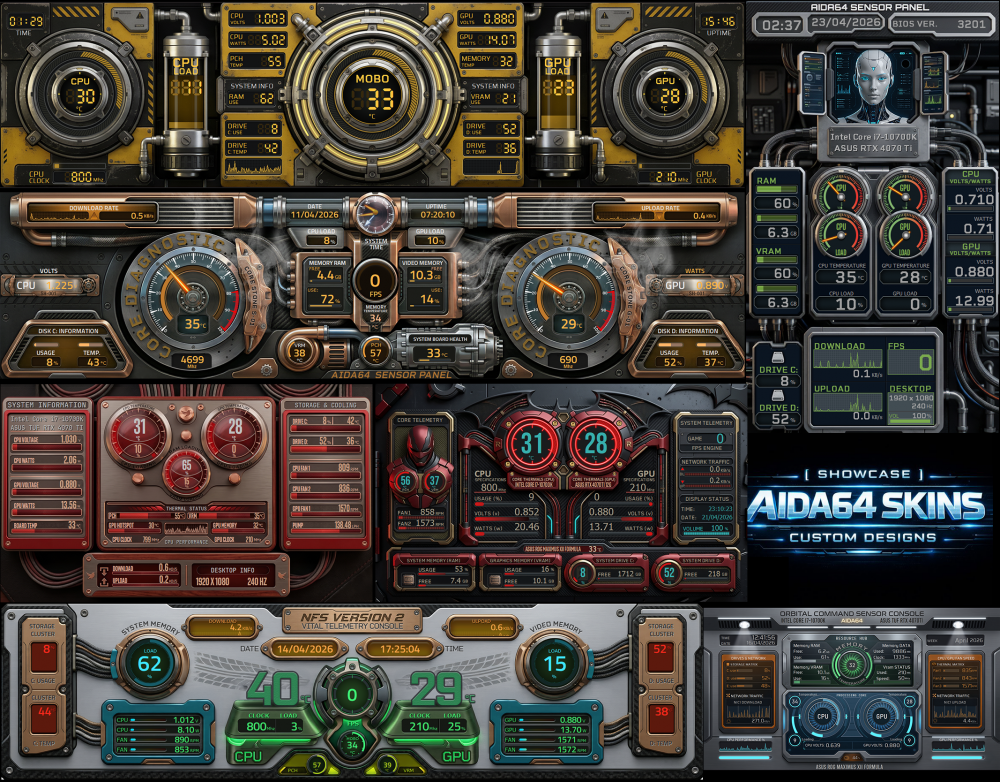
These and other amazing AIDA64 skin models are now available on our website. A variety of styles, clear sensor readability, and a visual design focused on gamer setups and case modding. aidaskins.com
-
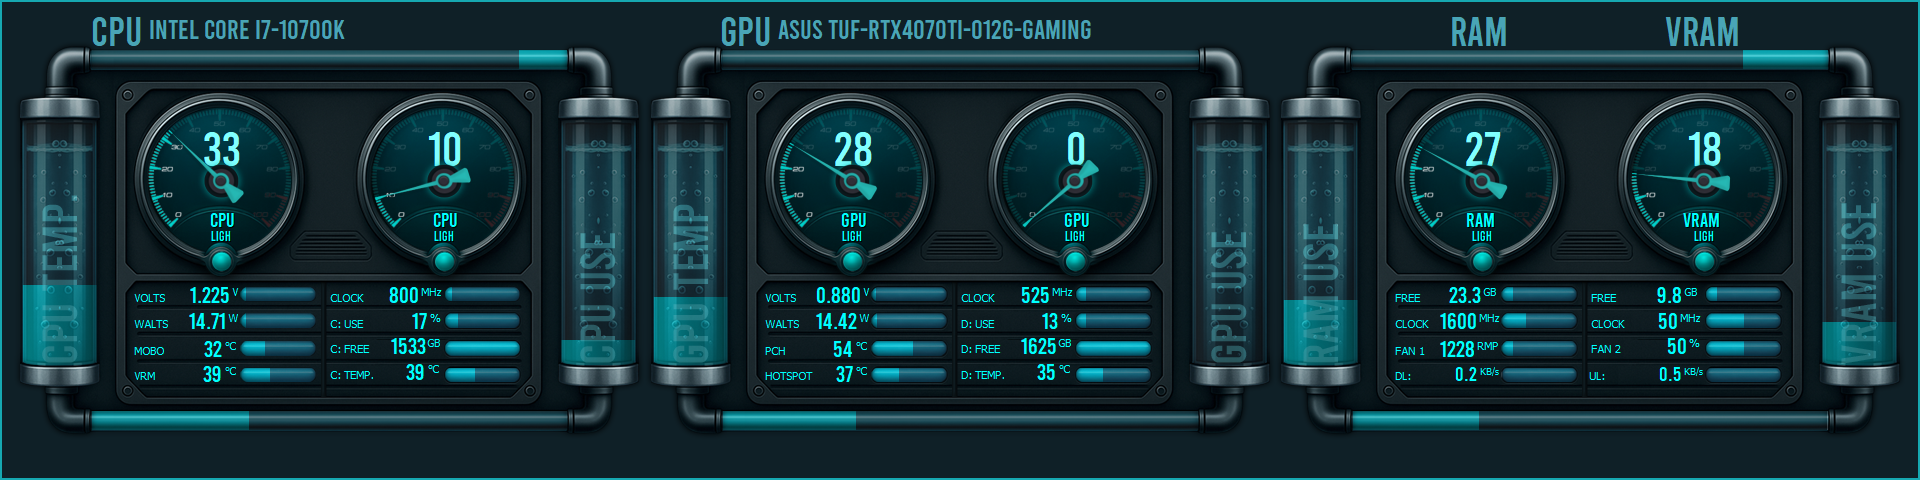
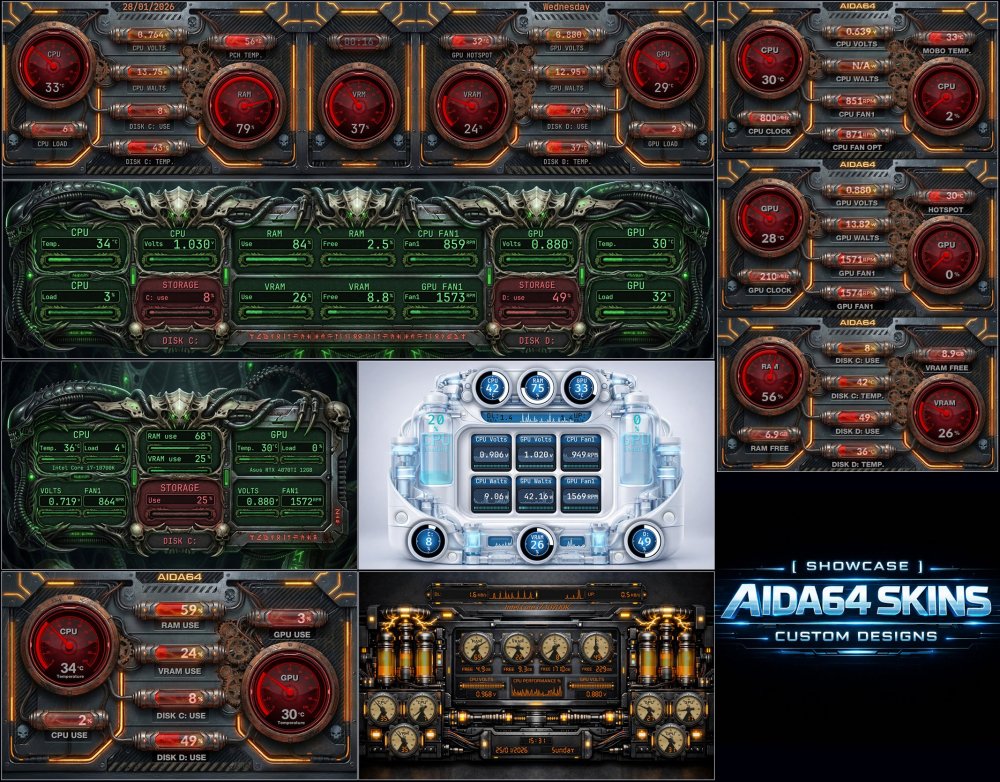
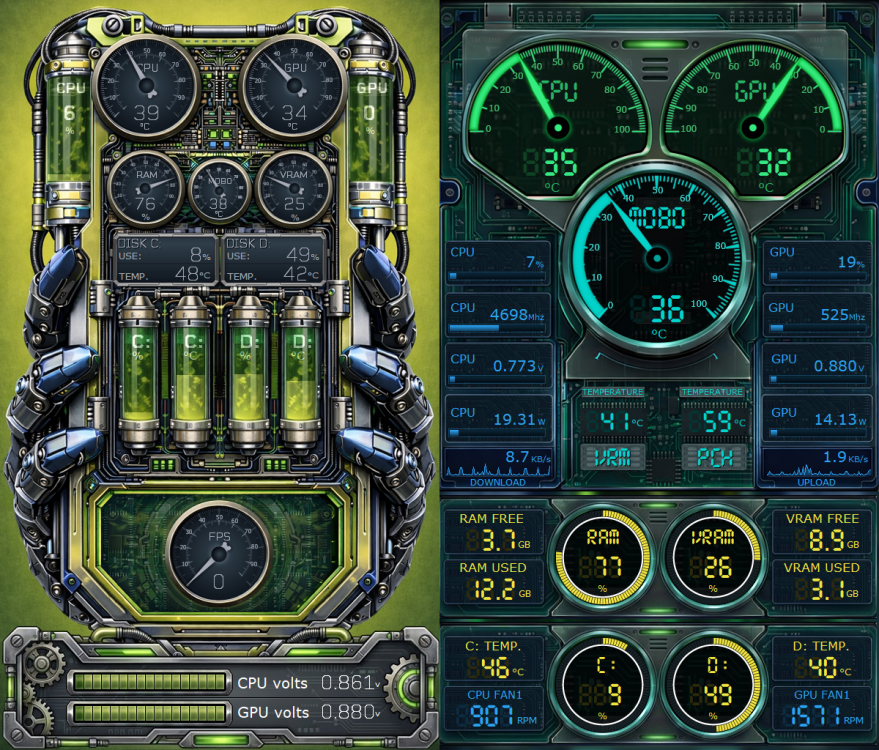
🔧 Cybercell 600x1024 Industrial biomechanical skin inspired by sci-fi reactors and exoskeletons. Analog gauges, green fluid reservoirs, and a dense layout turn AIDA64 into a living core for full system monitoring. ⚙️ Dashboard Circuit 600x1024 Clean futuristic skin with a neon digital interface in green and cyan. Smooth needles, clear displays, and a well-organized layout for fast, precise monitoring of CPU, GPU, RAM, temperatures, and real-time performance. ➡️ These and many other amazing models are now available at: Aidaskins.com
-
Excellent initiative! The SynQPanel concept is very interesting and significantly expands the possibilities for visualizing AIDA64 data. Congratulations on the project and the work done so far. I downloaded the tool and completed the installation, but I must admit I had some difficulty understanding the initial workflow, especially regarding the creation, import, and configuration of panels. At times, it’s not entirely clear how to build a panel from scratch or how to properly organize elements so everything works as expected. I believe creating a step-by-step video tutorial or more detailed documentation explaining how SynQPanel works — from layout creation and adding sensors to saving the final panel — would be extremely helpful. This would greatly benefit both new and advanced users, making it easier to fully take advantage of the tool. Overall, the project has great potential, and with clearer onboarding materials, adoption within the community will certainly grow. Thank you for sharing and for the excellent work!
-
Digital circuit 1920x480.mp4 🔧 Digital Circuit (1920x480) Digital circuit–style skin, featuring translucent electronic traces and truly transparent circuitry, creating layered depth and an authentic high-tech look. Clean, technical, and highly functional layout, focused on essential sensors: CPU, GPU, RAM, storage, and network. This and other amazing models can be found on our website. AidaSkins
-
Merry Christmas everyone! 🎄 Wishing you health, peace, and great moments. Also, be sure to check out the new skins that have just been added to our website. Refreshed design, strong visuals, made for those who truly love their setups. aidaskins.com
-
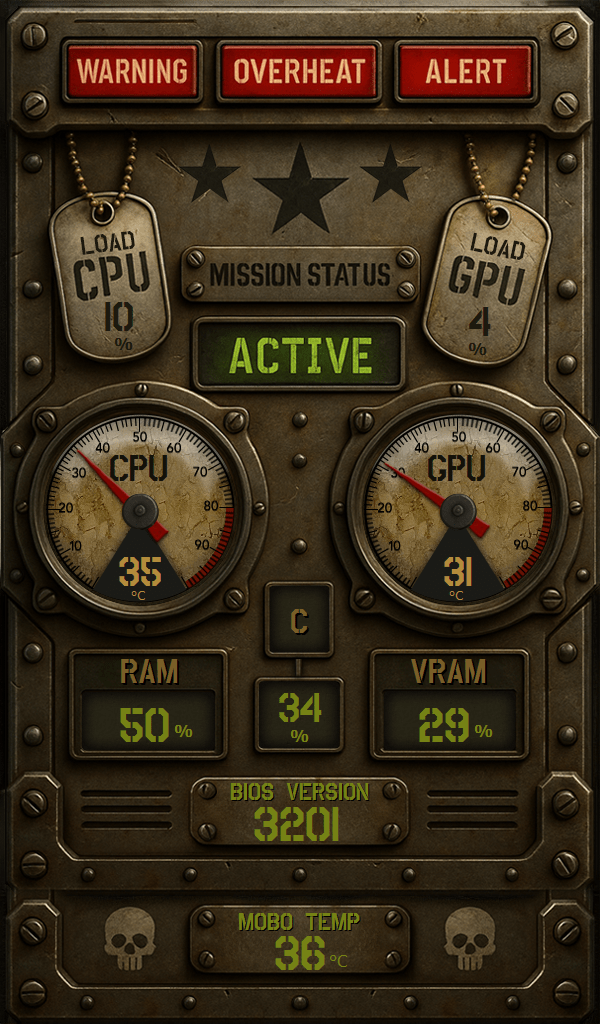
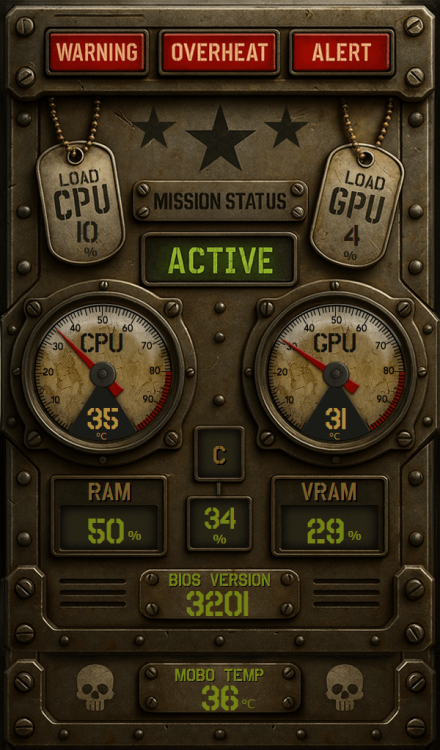
Retro-industrial military-style skin, featuring aged metal, rivets, and analog gauges. The dog tags display CPU and GPU usage, while the central panel shows status, temperatures, and WARNING / OVERHEAT / ALERT indicators. A green digital font completes the tactical and post-apocalyptic look. Over 20 new skins have been added to our website! Go check out this one and many other creations that will turn your setup into a true command center. Resolution: 1024x600 aidaskins.com
-
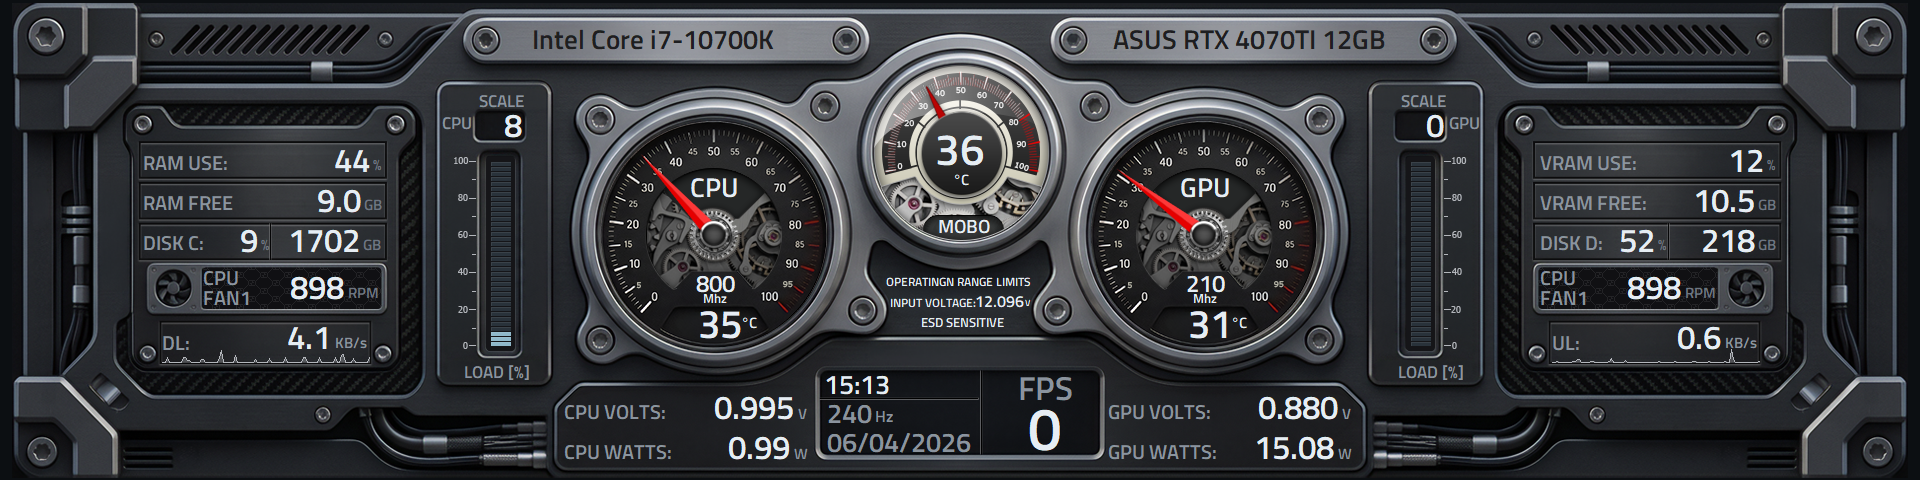
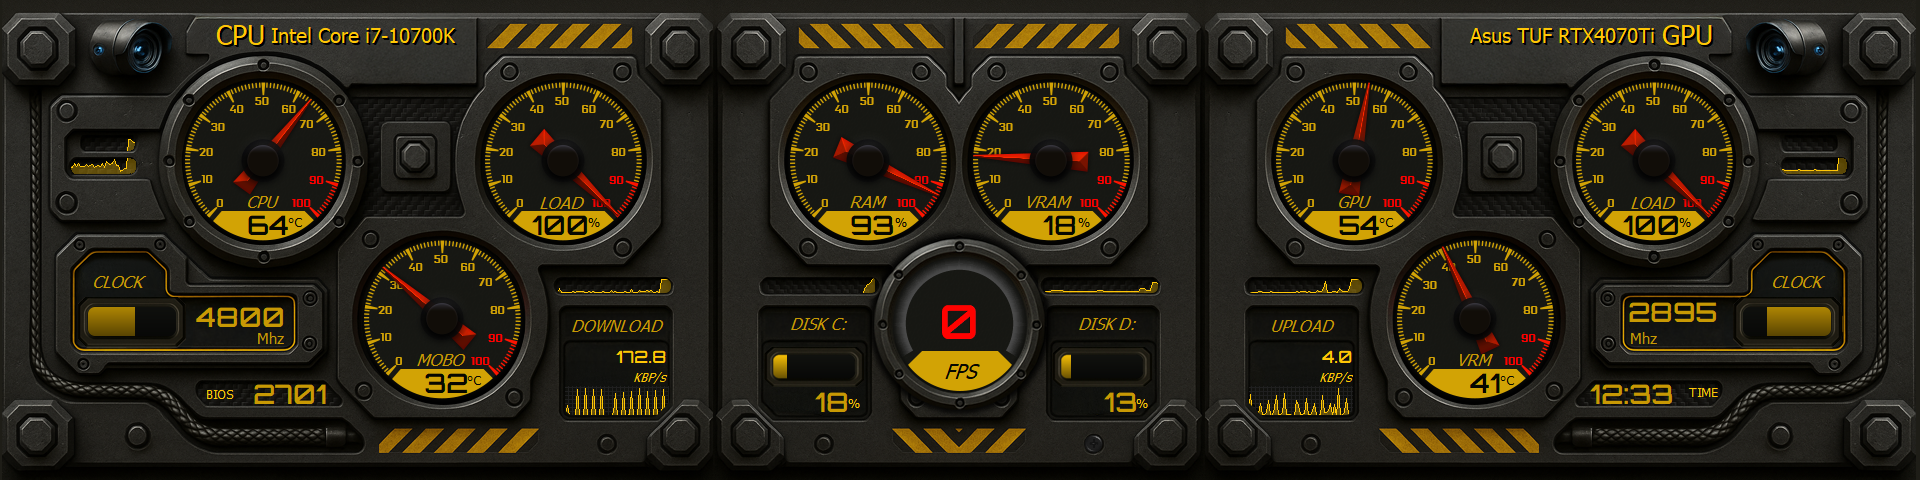
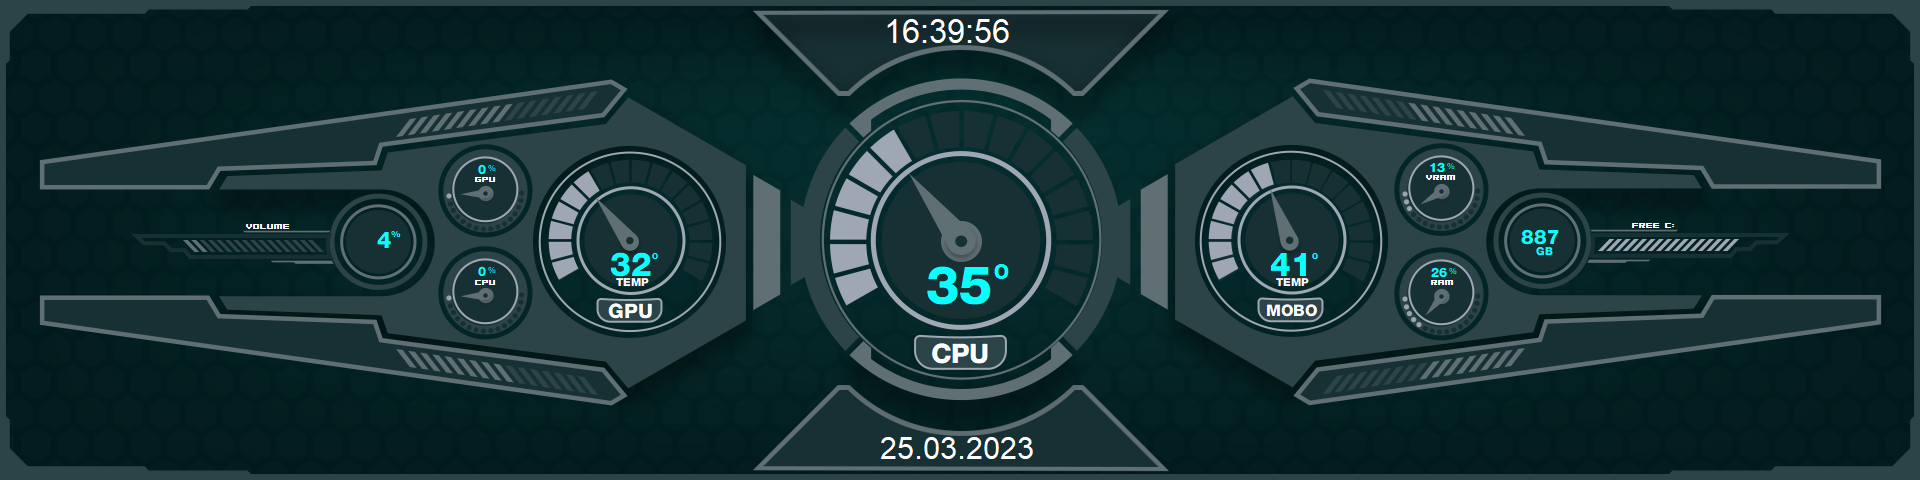
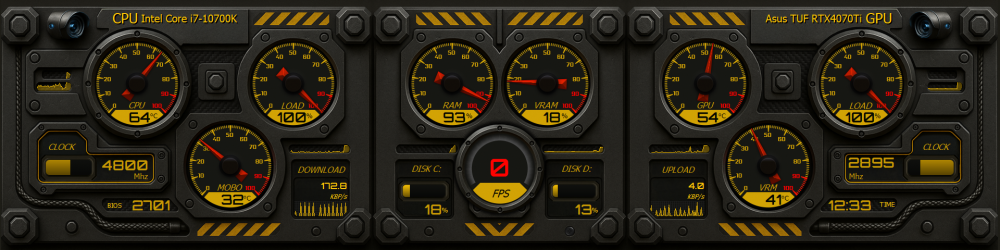
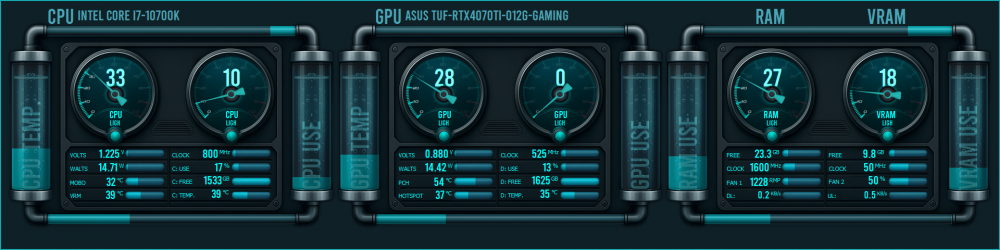
🔧 SentinelCam – Industrial High-Tech Skin (1920x480) SentinelCam is an AIDA64 skin designed in a futuristic industrial panel style, built to give you the feeling of being inside a cockpit or command center. ⚙️ Design Highlights Industrial High-Tech Look: rugged metallic structure, exposed screws, reinforced cables, and realistic textures. 3D Analog Gauges: CPU, GPU, VRAM, RAM, VRM, and MOBO indicators, all in speedometer style with precise pointers. Digital Displays: real-time clocks, centered FPS, time, BIOS, plus disk usage and network (upload/download). Signal Colors: metallic black with alert yellow and critical red accents, reminiscent of industrial panels and heavy machinery instruments. 📊 Included Sensors CPU Temp + Load + Clock GPU Temp + Load + Clock RAM and VRAM Usage VRM and MOBO Temp Disks C and D with usage bars Network: Real-time Upload and Download FPS (centered in a dedicated display) Clock and BIOS 🖥️ Resolution 1920x480 – ideal for horizontal secondary screens. Descubra este e outros modelos em: [ AidaSkins ]
-
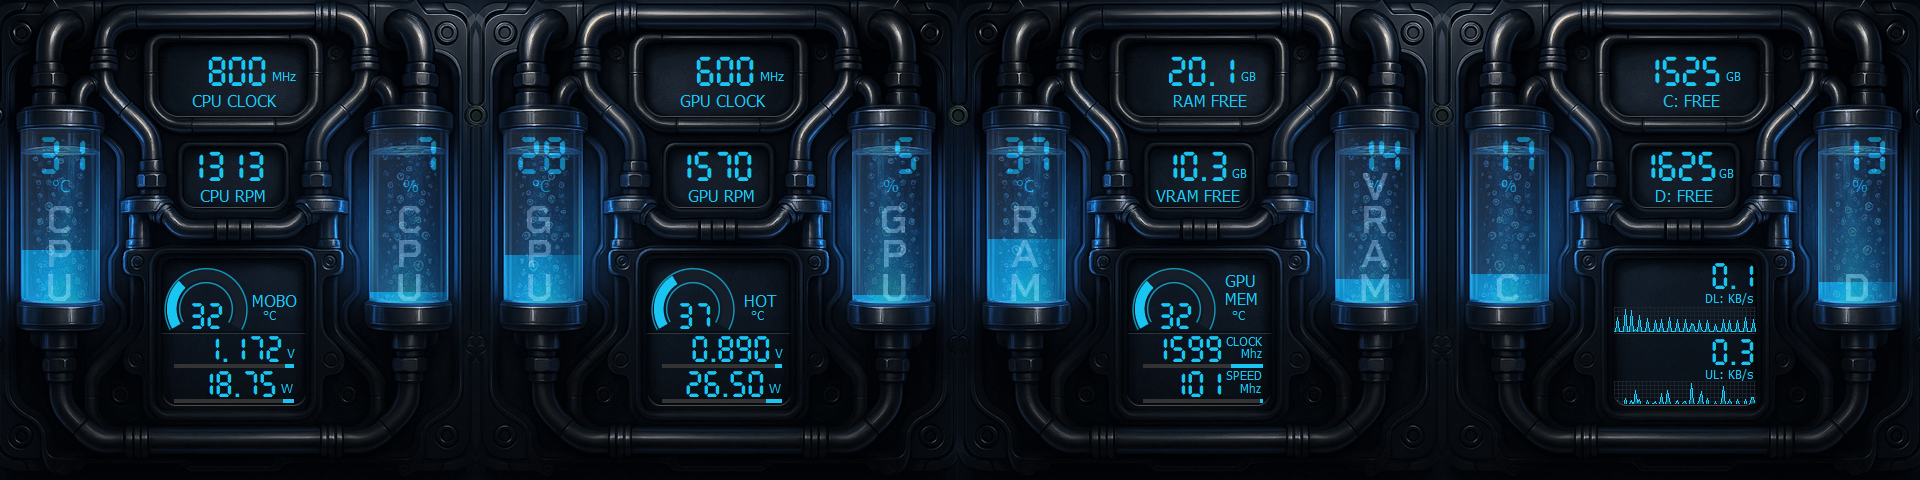
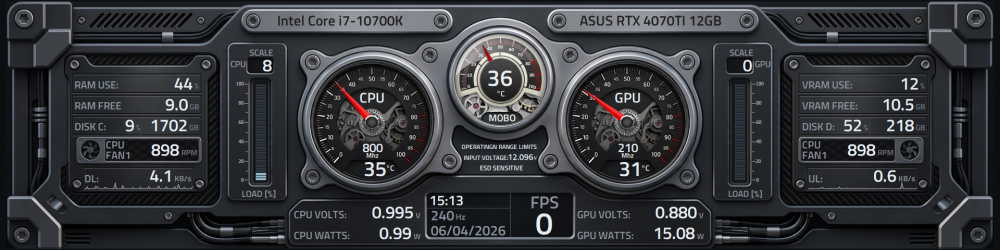
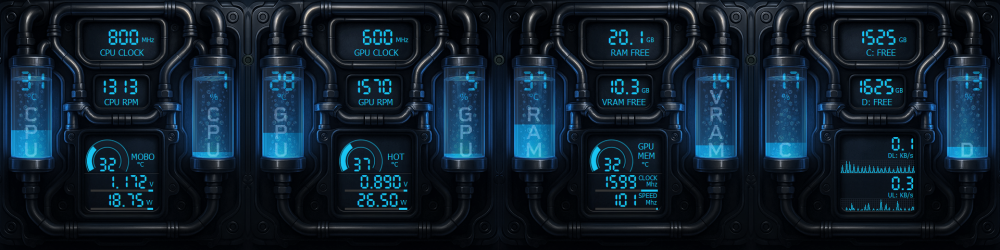
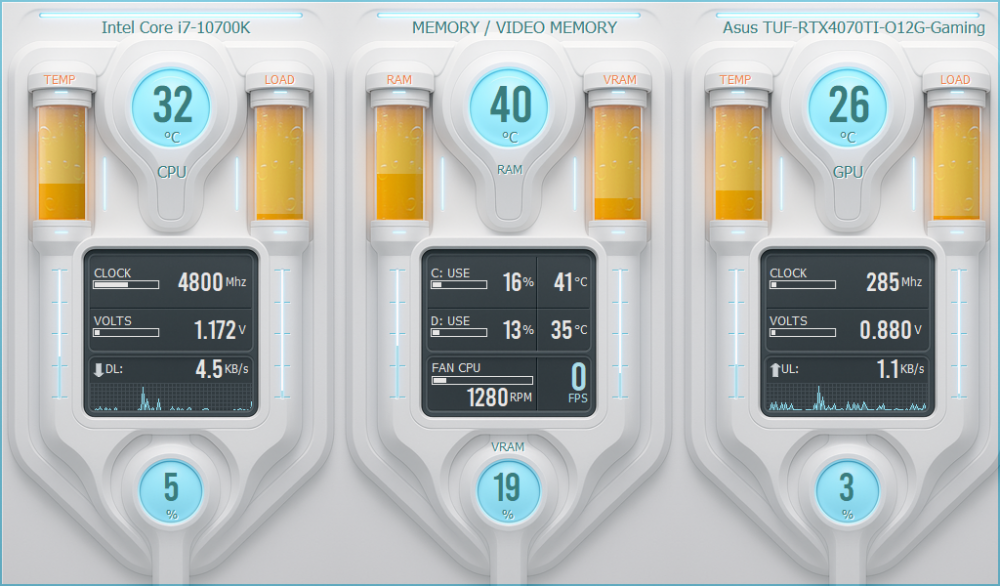
AIDA64 Skin – Neon Coolant Drive A skin with a realistic liquid cooling look, in a sci-fi industrial style. Pipes, blue neon coolant, and sensors organized into easy-to-read panels. All gauges use 100 states for smooth and accurate animations. Included sensors: CPU and GPU: Clock, RPM, temperature, voltage, and power usage Available RAM and VRAM GPU memory temperature Free space on drives C:/ and D:/ Download and Upload with animated network graph Available in the following resolutions: 📏 1920x480 📏 1920x515 📏 1024x600 📏 1920x1080 Available on the website along with several other exclusive skins. [AidaSkins]
-
This latest AIDA64 update brought several new features and important improvements — and your panel looks excellent! One of the highlights is the preview function: now, when loading a new panel, you can preview the skin before even installing it. To do this, just save the file with the name 'preview', place it on the first layer, and keep it hidden.
-
🔥 AIDA64 SKIN – FROZEN IGNITE 🔥 Available in 1024x600 and 1920x1080 Frozen Ignite is a skin that looks like it came straight out of a cryogenic command center. Everything shines with an icy aesthetic: cyan lights, amber fluid tubes, and data displayed with surgical precision. 🎯 Monitor in style: CPU and GPU temperature and load with reactor-style visuals Real-time clocks, voltages, and network traffic Disk usage for and drives with temperature RAM, VRAM, FPS, and fan status Circular indicators with a futuristic capsule effect ⚪ Symmetrical and clean interface ⚪ Perfect for white setups, clean builds, or sci-fi PCs ⚪ 100% functional and responsive Choose your resolution: 📐 1024x600 — ideal for vertical secondary displays 📐 1920x1080 — perfect for wide top-mounted monitors 🧪 Like what you see? This is just the beginning — there’s a lot more coming on our website. [AidaSkins] •••••••••••••••••••••••••••••••🔥 FROZEN IGNITE 🔥••••••••••••••••••••••••••••••
-
This rule also applies to the Promote your SensorPanel section. Avoid posting the same skin multiple times — even if it’s just a different color. Share only one image per model to keep the section organized and pleasant for everyone.
-
hello i need panel sking for aida res 320 x 240
COSTAJUNIOR replied to masterza1074's topic in SensorPanel
Here you can find some models. https://forums.aida64.com/search/?q=320x240&quick=1 -
Here you can find some models https://forums.aida64.com/search/?q=1280x800&quick=1&type=forums_topic&item=13296
-
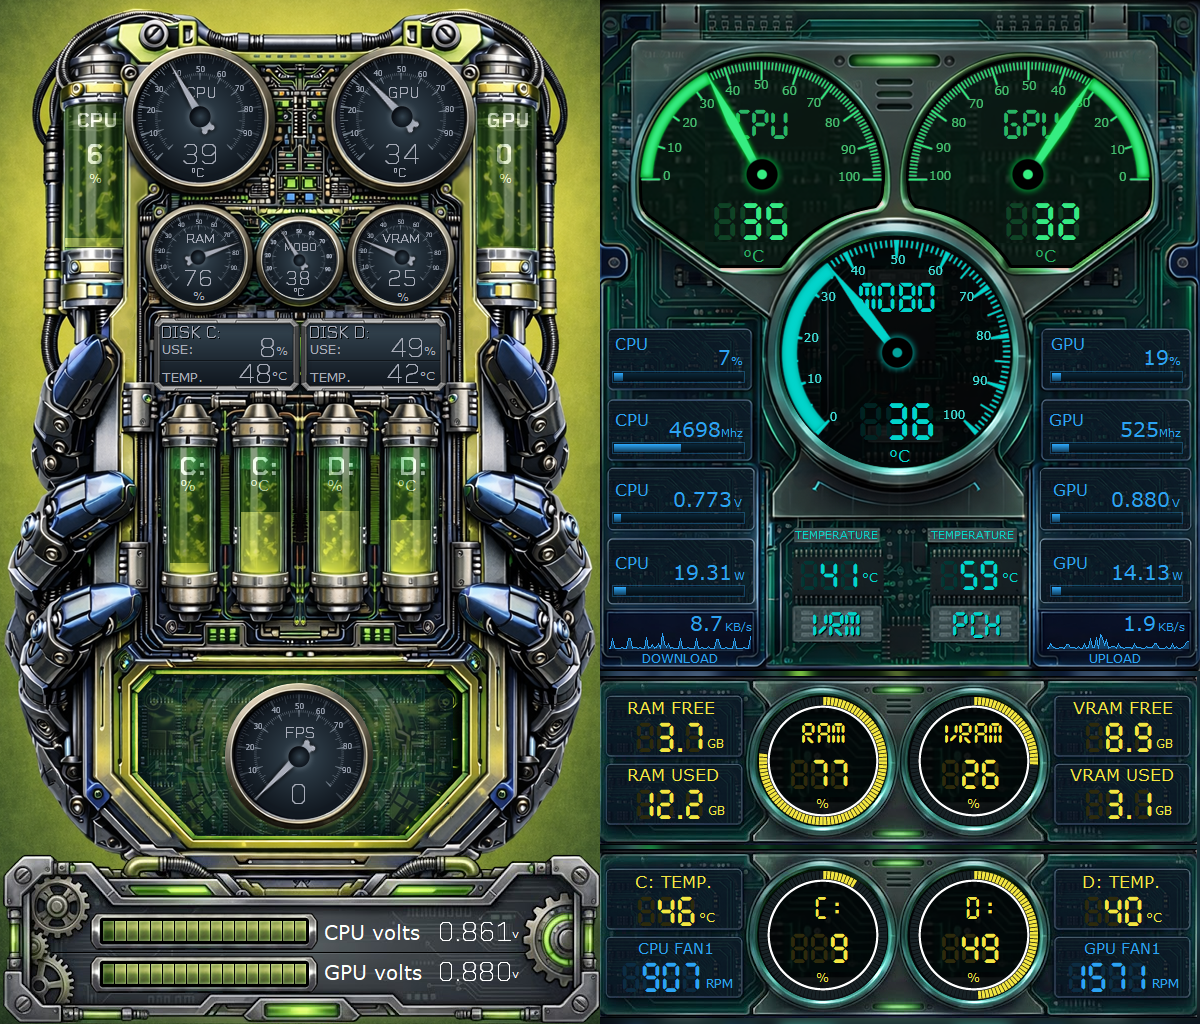
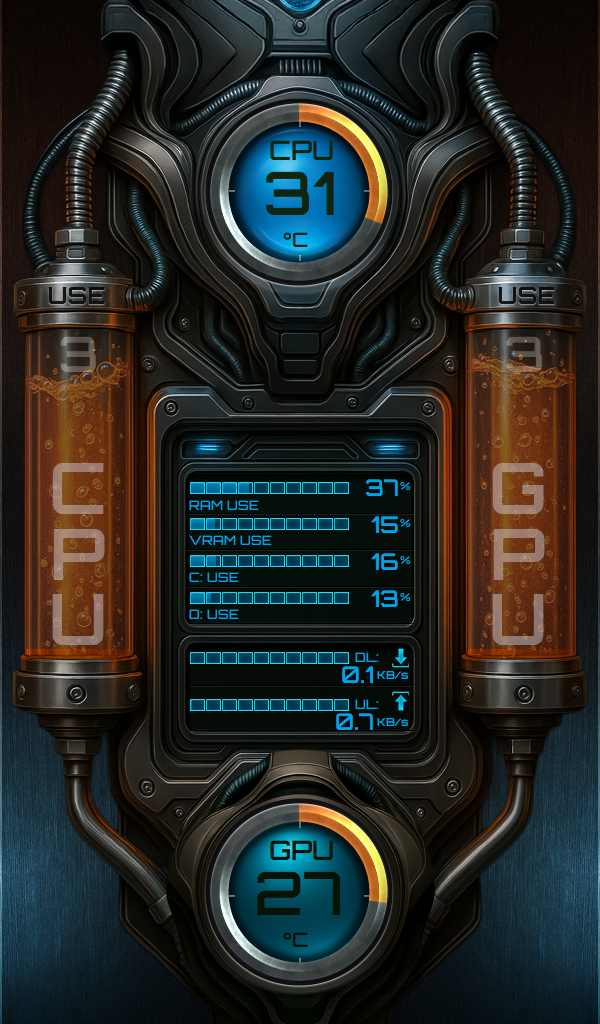
────── ✦✧✦✧✦ ───── LIQUIDFORGE 1920x480 ──────── ✦✧✦✧✦ ─────────── ───── ✦✧✦✧✦ ──── THERMOFLUX MONITOR (600x1024)──── ✦✧✦✧✦ ─────── ⌬⌬⌬⌬⌬⌬⌬⌬⌬⌬⌬⌬⌬⌬⌬⌬⌬⌬⌬⌬⌬⌬⌬⌬⌬⌬⌬⌬⌬⌬⌬⌬⌬⌬⌬⌬⌬⌬⌬⌬⌬⌬⌬⌬⌬⌬⌬⌬⌬⌬⌬⌬⌬⌬⌬⌬⌬⌬⌬⌬⌬⌬⌬ 🔹 LIQUIDFORGE (1920x480) Style: Horizontal panel split into 3 blocks (CPU / GPU / RAM-VRAM) Visuals: Realistic tubing, animated fluid, and analog indicators Sensors: • CPU: temperature, usage, clock, voltage, power draw • GPU: temperature, clock, hotspot, usage, power draw • RAM & VRAM: usage, clock, fans, download/upload Perfect for those who love that “futuristic test bench” look. 🔸 THERMOFLUX MONITOR (600x1024) Style: Vertical panel with a mecha/sci-fi vibe and a cyber-industrial touch Visuals: Two side tubes with bubbling fluid, energy lines, and brushed metal structure Sensors: • CPU + GPU with central gauges • RAM, VRAM, Drive C and D usage • Network speed with digital bars 📐 Resolutions: • LIQUIDFORGE: 1920x480 – perfect for a horizontal secondary screen 1024x600 – optimized for compact auxiliary displays • THERMOFLUX: 600x1024 – designed for a vertical side panel Wanna turn your setup into a futuristic lab or sci-fi control panel? These skins deliver it all — clean layout, functional data, and a striking visual experience. 🧪 Like what you see? This is just the beginning — there’s a lot more coming on our website. [AidaSkins]

-
I support this new update because I believe it can make the experience faster and more intuitive. While I'm at it, I'd like to suggest adding a search field to make it easier to find specific fonts. When the list is long, manually searching becomes tiresome. 😁
-
Major update! 🔧 Now with custom color renaming and deletion, the control is total. 🔥 Huge thanks for delivering exactly what we needed! 😉
-
REQUEST NEW FEATURE - Date in the Custom Gauge
COSTAJUNIOR replied to Surjeet's topic in General Discussion
Awesome! Excellent update — these new hour, minute, and second sensors will open up more possibilities for real-time visuals. Thank you so much for this! I’m already imagining tons of ideas 😎👏 Let’s test it out! -
REQUEST NEW FEATURE - Date in the Custom Gauge
COSTAJUNIOR replied to Surjeet's topic in General Discussion
Interesting comparison! The difference between 32GB CL40 and 64GB CL30 is definitely significant, especially for tasks that involve reading and writing large files — so it makes sense that the save time improved with the new RAM. I also agree with the tip about optimizing images: the smaller and fewer the unique files in the skin, the faster the saving process will be. Using a common base as the background and separating only the dynamic elements (like the clock hand) is a great practice to maintain performance. Smart move! 😉 -
I fully support these suggestions. Being able to format values with leading zeros, like in Excel, would make sensor readings much more consistent — especially in fixed-layout designs. It would be great if this option worked across various sensors such as usage, clock, power, temperature, time, network, memory, and others. Ideally, this should be configurable directly within the Modify Item menu, without relying on manual adjustments in Hardware Monitoring. I also believe it’s essential to allow units like °C, %, RPM, W, V, etc. to be displayed directly on custom sensors — this would make the data clearer and more complete. These are simple improvements, but they would make a significant difference in the customization and visual quality of the skins. 👊😉
- 10 replies
-
- 1
-

-
- sensor format
- sensors
- (and 4 more)