BHSY
-
Posts
297 -
Joined
-
Days Won
54
Content Type
Profiles
Forums
Events
Everything posted by BHSY
-
Oh whoa! Again! Repeatedly insulting others doesn’t strengthen your point; it only weakens support for your position. And now, referring to yourself as if you were some Godly creator only makes you sound more arrogant than anyone else here. Bringing up moderators again shows a personal grudge. If you’re that unhappy, why stay here insulting others and wasting time? If you’re comfortable with your work being reused for profit, and even see it as a compliment, that’s your choice. But that doesn’t give you the right to insult others or repost their creations without permission. Respecting intellectual property isn’t optional; it’s the foundation of any creative community. If you truly don’t mind others profiting from your panel, then be consistent: share your own work, create more, and state openly, ‘You can use my work any way you want, even make money from it, I’m fine with that.’ That would align with the stance you’re taking, instead of reposting other people’s work. For example, imagine someone sees your panel and thinks, ‘Whoa, this design is amazing; it will surely attract buyers.’ Since you don’t mind people using it for profit, they could decide, ‘I’m going to recreate the exact same design as a hard copy and present it as my own.’ In that scenario, your contribution is erased, and you’re denied recognition as the creator. It’s like erasing your identity. That’s exactly why respecting ownership matters; without it, anyone can strip away your identity as the author. Of course, if you truly don’t mind having your identity stripped away, that’s your choice. No one will know of your existence. But it also shows why copyright exists in the first place: to protect creators from being erased and ensure they receive recognition for their work. Without that protection, talented creators would stop producing art and paintings, and the world would become far less colorful. Please note that my post isn’t about gaining popularity in the community; it’s about copyright and respect. These principles matter to everyone, not just me.
-
🚀 Introducing SynQPanel - A New Panel-Based Visualization Tool for AIDA64 Users
BHSY replied to GaHile's topic in SensorPanel
I switched from the 1920×515 dark version panel to the 1920×480 white version to better match my NZXT white chassis case. Although the 1920×480 display is slightly smaller, its colors are noticeably more vibrant compared to the 1920×515 display.
-
Statement on Sharing Sensor Panels Without Permission It needs to be said plainly: sharing sensor panels that are not your own, especially those no longer distributed, without the creator’s consent, is against forum rules and against basic respect for the work of others. No amount of argument changes this fact. The rules exist to protect creators and their rights, whether the panel is freely shared or paid, and they apply equally to every member here. If you did not design the panel, you do not have the right to repost or distribute it. While I cannot control whether our panels have already been distributed elsewhere without permission, that does not make it acceptable here. This time, I must speak up because it concerns our new member, @toveyr, and it directly relates to my sensor panel. @toveyr post is not fake. I repeat: it is not fake. Accusing him of fabricating a post is both unfair and baseless. He was trying to locate the original creator of the sensor panel design. He found me, and I advised him to remove the image from the forum since it is no longer distributed. As the author, it is my right to make that decision. What Tovery mentioned in his apology was not wrong; he acknowledged the issue and respected the principle of consent. That is the standard we should uphold in this community, and he has my respect. I am sure everyone here understands why the panel is no longer distributed: because some individuals were using it for profit without permission. As for the insults directed at other members, they do not strengthen any argument. They only increase hostility and weaken credibility. I’ve seen this same behavior on social media, particularly in online gaming communities, where some people resort to abusive language instead of constructive discussion. That approach adds nothing of value here. This community thrives when we respect each other. Ignoring that principle undermines trust and discourages creators from contributing. Moderation should be consistent, but members also need to accept responsibility for following the rules. Let me make it clear once again: rules are set for a reason. If you do not agree with them, then this forum is not the place for you. I normally would not respond to a post like this publicly, but since it concerns our new members, it is important to address it.
-
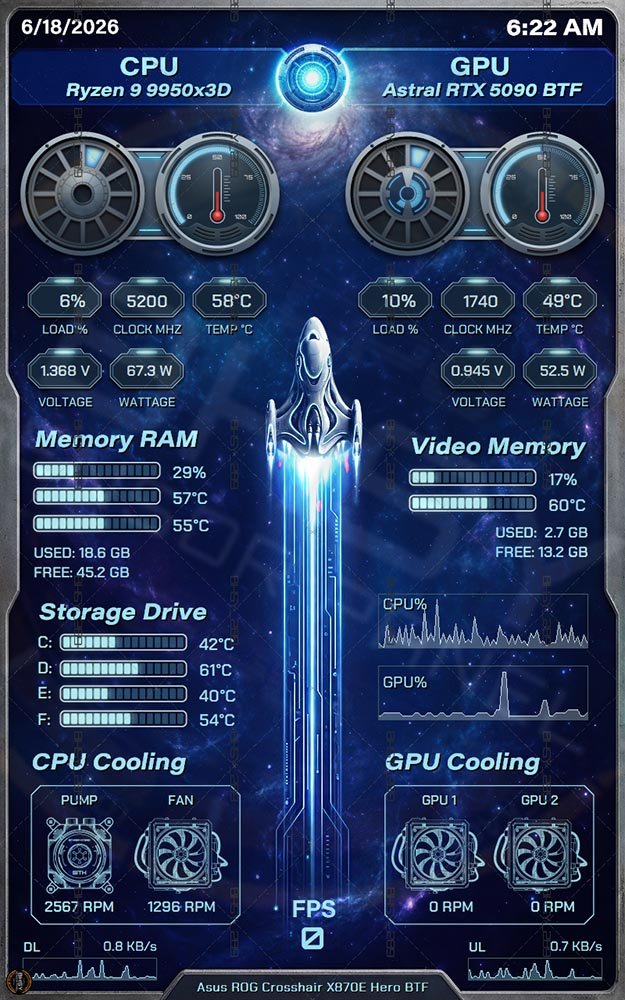
81 - Falcon Performance Core - 800x1280 A streamlined, space‑inspired system monitor that merges sci‑fi design with real‑time PC metrics. It displays CPU, GPU, memory, storage, and cooling data against a cosmic backdrop, with a radiant starship symbolizing system power. The design elevates technical information into an engaging, futuristic showcase while preserving a polished, high‑tech aesthetic. The sensor panel offers two interchangeable backgrounds with two distinct starship visuals. Visit BHSYSensorPanel for more info. and designs

-
🚀 Introducing SynQPanel - A New Panel-Based Visualization Tool for AIDA64 Users
BHSY replied to GaHile's topic in SensorPanel
No, this is a paid sensor panel. The gauge you saw on the forum was intended for SynQPanel testing purposes. If you have any questions, please message @BHSY. -
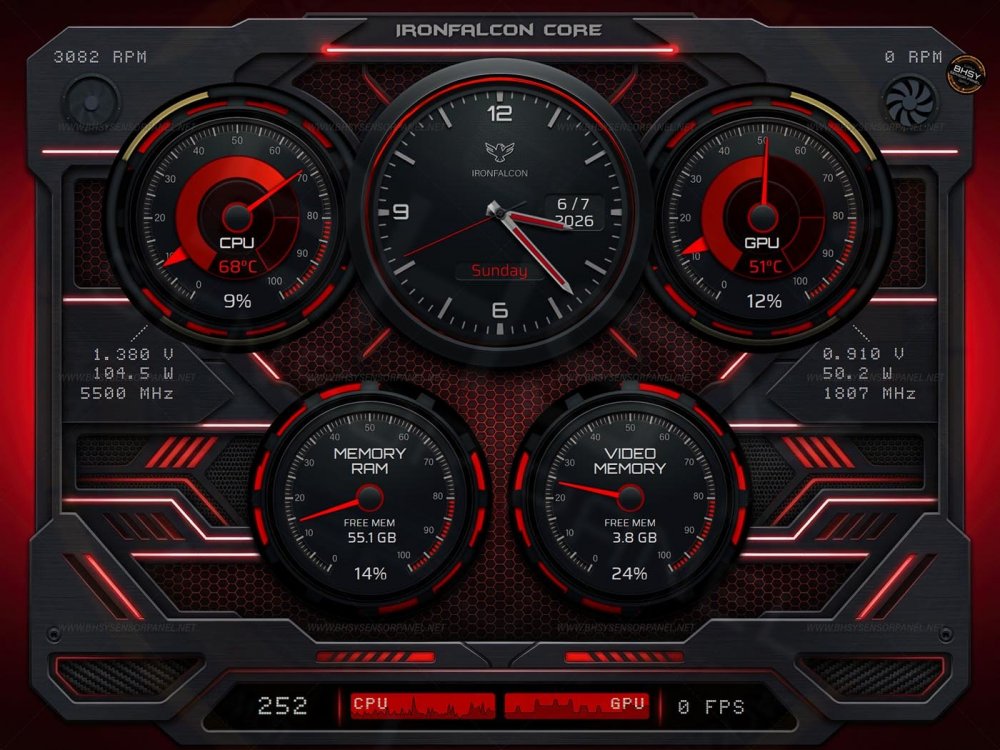
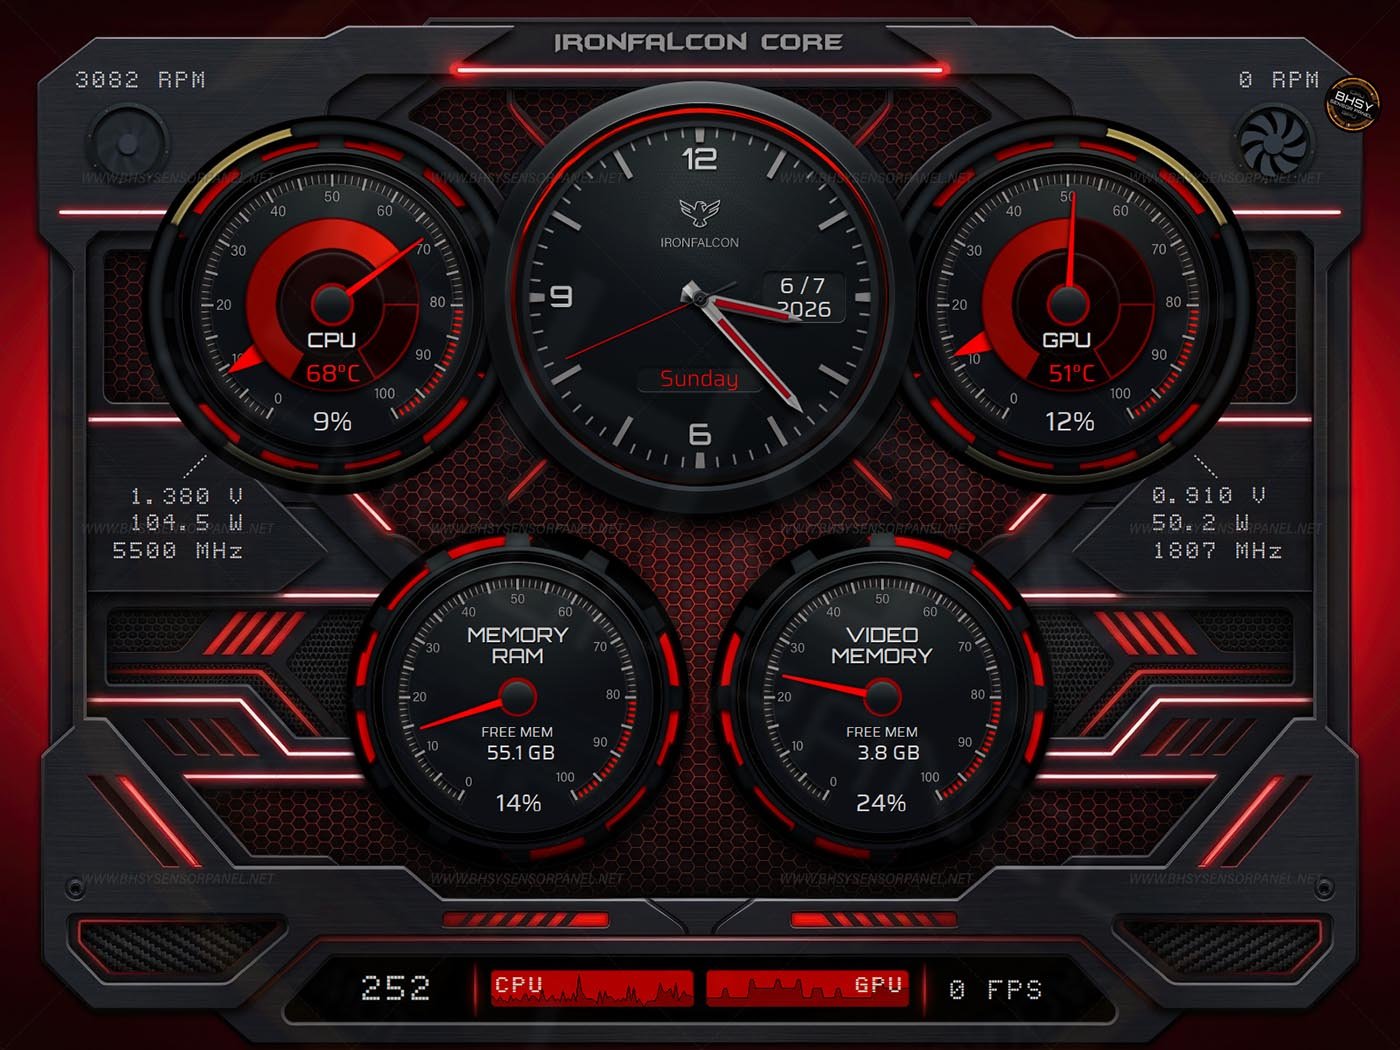
73-AIDA64 Sensor Panel - IronFalconCore is now available in 1600x1200. For other sizes such as 1280x800, please submit a request. Thank you. Visit BHSYSensorPanel for more info. and designs
-
Whoa! 3D printing really is impressive. That is a good idea. I wish I had one too. Then again, I’d probably end up using it only occasionally, or worse, printing unnecessary things or failed experiments that just turn into waste. 😅
-
Hi Surjeet, Thank you for your kind words. 🙏 I know you’ve always credited me as the original creator of my panels and respected my requests, and I truly appreciate that. One thing I’d like to highlight is that while giving credit is important, seeking permission before uploading or sharing someone else’s panel file should always come first. Permission should be the top priority, and only after that should a file be uploaded. Back then, we were all new and not fully aware of how important this was, but over time I’ve learned a lot, and I’m no longer as naive as I once was. It’s been three years since I joined this forum, and as I mentioned in my earlier post, I used to be a very closed‑minded person. AIDA64 changed that; it opened me up to sharing, learning, and connecting with others in ways I never expected. If you ever have questions about panels, feel free to reach out anytime. I’ll do my best to explain things clearly so they’re easy to understand.😉
-
From what I understand, a temperature of around 60 °C is still within the acceptable range for the card to operate reliably. However, lowering it further would be beneficial in helping to extend the card’s lifespan. Adding extra cooling fans could help the card, provided the PC case has enough space to accommodate them. I hope the AIDA64 program will be able to monitor the card’s temperature so that I don't have to get additional devices.
-
Yes, because regional requirements differ. That’s why your TP-Link support site still lists the V1 version. In our country, 10Gbps consumer adoption came much later than in other regions; we began introducing consumer-level 10Gbps broadband in mid‑2024, with rollout scheduled through 2026. So the V1 card was never introduced here. I just recontract my gamer plan from 2.5Gbps to 10Gbps. Since my motherboard doesn’t have an AUX sensor header, I’ll need to rely on either an external controller or a USB sensor device that works with AIDA64. If adding this thermal detection feature cannot be implemented directly through the AIDA64 program, I’ll consider purchasing one, or I could get a budget infrared thermometer, but it will be difficult to target the NIC card because of my horizontal GPU card holder is in the way.😕 Thank you. Thank you.
-
Hi Exhumed, Thank you for reading my post and sharing your experience. I’ve come across some of your and CostaJunior’s posts before, and I understand how frustrating it is when shared panel designs are taken for granted and misused. When I created my first digital artwork, I was nervous about posting it here. I worried people might laugh at it or that nobody would like my design. I was new and naive — it never crossed my mind that someone would misuse my shared panel for profit, or worse, add their own watermark and claim it as their own. Because of that, I eventually removed all my shared panels and asked others to do the same. Some respected my decision and complied, while others refused or never replied. In those cases, I had no choice but to request moderator assistance. I want to thank you and Costa for the support you’ve given. I used to share your view that exchanging panels within the community was a positive thing. However, after my panel was misused by people outside the forum, my perspective changed. If someone wants to modify my panel and upload it here while giving proper credit to the original author, I have no issue with that. But using it for profit is wrong, and it undermines the effort I put into creating it. That’s why I decided to stop distributing my older panels. Speaking of credibility, I’d like to share my perspective. Suppose I uploaded someone else’s panel file without mentioning the author’s name and received many “likes” and “thanks” for sharing. Without proper credit, people would assume I designed the panel, and I’d gain popularity unfairly. Even adding a vague note like “I didn’t create these, credit to the original authors” doesn’t make it right. That’s why, if anyone wants to upload or share another person’s panel, or if someone requests a panel, it’s important to clearly identify of the author. If you don’t know who created it, then it’s better not to upload the file, because you’ll end up receiving recognition that belongs to the original creator. Regarding the line you quoted: “I asked that the panel be removed, but the request was not followed” — this was not directed at any moderators or members here. It referred to individuals outside the forum who uploaded my panel to their own websites for profit and refused to remove it when I asked. Recently, I submitted a removal request using the “Report” option (the three-dot menu at the top right of the post). I assumed this would notify all moderators so that one of you could respond. I felt this was a more appropriate approach than trying to decide which moderator to contact directly. I agree with and respect the rules set by the forum admin, and that’s the reason I’m still part of this forum.
-
Hi @Toddel Yes, I believe I’m using the newer chipset. I purchased and installed the card today. Because of regional differences, our TP-Link support site lists only two hardware versions: V1 and V2. I initially forgot to check the version label on the card itself. However, the box label shows “UN/2.0” (Universal 2.0), which confirms it is a V2 card. The TP-Link website provides drivers only for Windows 10, so I checked Marvell’s official site for alternatives. I haven’t installed those drivers yet, as my current connection is working without issues. I plan to wait until my new ISP broadband plan is fully set up before making any changes. From what I understand, maintaining temperatures around 40 °C during operation and up to 70 °C in storage helps ensure stable performance and prevents hardware damage. HWinfo only displays total download and speed metrics, but not temperature readings. That’s why I’m hoping AIDA64 will be able to detect and report the card’s temperature.
-
Hi @Fiery I recently installed a TP-Link TX401 Gigabit PCIe Network Adapter and will soon upgrade to a new ISP modem and router that support 10 Gbps WAN and 10 Gbps LAN. I want to monitor its temperature, too. HWiNFO reports the card as a Marvell AQC113 FastLinQ Edge 1‑Gigabit Network Adapter, and my current driver version is 3.1.10.0. Thank you.
-
Proof of Authorship — 1920×515 & 1280×800 Panel (No File Distribution) (Note: The 515×1920 vertical version was a modification by a forum member, based on my original design.) I am the original creator of the 1920×515 sensor panel design, including all custom gauge elements. To prove authorship, I am sharing screenshots of my AI/vector source file with the original creation date, along with images of my vector drawings that show the design process. The files were created in 2023 and 2024. The original file is no longer distributed. This decision is intentional, it ensures my work cannot be exploited for profit by third parties. Unfortunately, some third parties have been monetizing free and shared panels created by community members, restricting downloads behind a subscription fee. This includes modified versions of my panel, where they even added their own watermarks to falsely claim ownership. Simply altering the layout or layers of a panel does not make someone its rightful creator. I want to emphasize that this panel was originally shared freely with the community and was never intended for resale at that time. When I first learnt about AIDA64 programs three years ago, I was excited. Not only could I use it to monitor my hardware temperature and performance, but I also discovered the joy of designing my own interface. My first inspiration came from MSI Afterburner. I was never comfortable posting on social media or forums, let alone sharing something I designed. AIDA64 changed that. When I uploaded my panel design to the forum, I was genuinely surprised by how many users it attracted. At the time, I believed that sharing freely would benefit the community, but I was naive — I didn’t realize that some people would take other designers’ panels, profit from them, and even add their own watermarks to claim ownership. Because of this, I asked that the panel be removed, but the request was not followed. As the original creator, I want to emphasize that I have the right to request its removal. Not honoring such requests disregards the effort put into creating it, which is why I no longer upload any of my old panels to the share forums. I hope that any third parties reading this will recognize the importance of respecting original work and remove the unauthorized versions, even if I remain doubtful that they will. My intention here is simply to clarify authorship and protect the community. I appreciate the genuine support from members who respect original work. Disclaimer: The original panel file is no longer distributed. Please do not seek it from third‑party sites, as those versions are unauthorized and may include false watermarks and malware. The images here are provided solely to establish proof of authorship.
-
#80-Ranger Tactical Readiness Interface Available in 1280x800 / 1920x480 / 1920x515 / 2560x720 #80-Ranger Tactical Readiness Interface (dark) Available in 1280x800 / 1920x480 / 1920x515 / 2560x720 Includes both Standard and Dark versions in one bundle - 1280x800 / 1920x480 / 1920x515 / 2560x720 For different panel sizes, please send in a request. Visit BHSYSensorPanel for more info. and designs
.thumb.jpg.d17e9cce8fef0ec5b0204652d4fffa01.jpg)
-
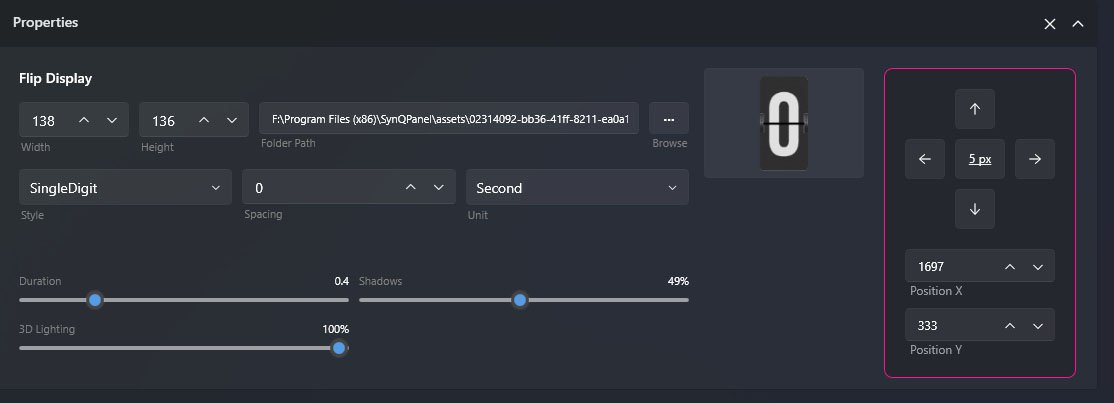
Hi @Fiery, I’ve been using the Image Resize function for my images and gauges, along with the upscale and downscale options. These features have been very helpful, especially when resizing from 2560×720 to 1920×515, though I still need to make some minor adjustments afterward. 👍 Would it be possible to add an option to manually input the scale percentage based on either width or height? For example, downsizing the height from 720 to 515 works out to about 71.5%, with the width resizing automatically to match. Having the ability to enter percentages directly, ideally with decimal support, but even whole numbers like 71% would be fine. It would make resizing much easier and more precise. I believe this feature may have been mentioned before on the forum, but I’d like to bring it up again. This would also be useful in cases such as downscaling from 1920×515 to 1920×480, where resizing by height first and then adjusting element spacing according to the panel’s width provides a smoother adjustment. I understand if this feature can’t be added at present or if it’s not practical to implement at the moment. Thank you!
-
I sent you a private message. Please check your inbox.
-
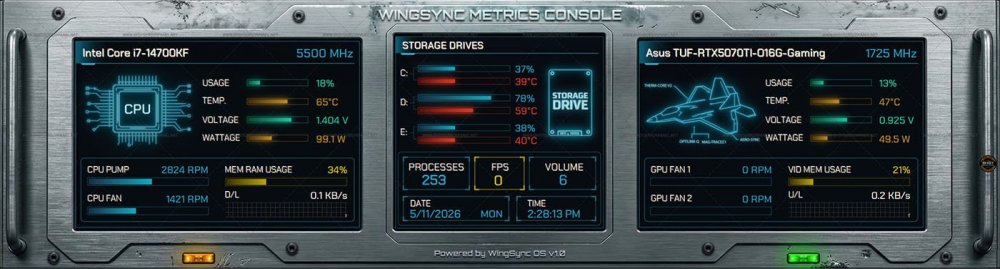
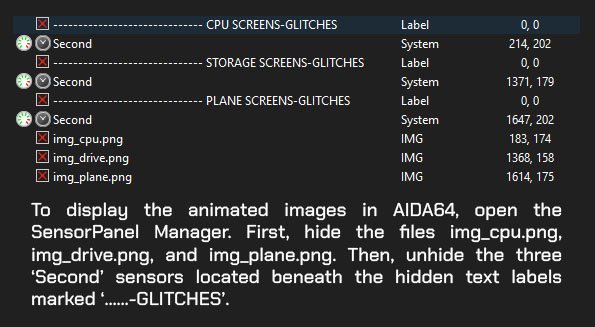
#79 - WINGSYNC METRICS CONSOLE Ready size: 1280x800 / 1920x480 / 1920x515 / 2560x720 / 515×1920 / 720×2560 Playing a video of logo glitch effects via SynQPanel. Feel free to contact me for sizes not currently listed on the website. Experience a sleek, sensor panel with sci‑fi design, live performance tracking, and easy‑to‑read system metrics. This AIDA64 panel offers two types of still images: standard static logo visuals and glitch-style effect animated stills. By tapping the ‘seconds’ sensor, the glitch effect imitates animated motion. The package includes two files: the AIDA64 file (.spzip) and the SynQPanel file (.sqx). Video display functionality requires SynQPanel, which is not supported on Turing Smart Devices. The video file is not supported on AIDA64. The SynQpanel file is included as a free. Visit BHSYSensorPanel for more info. and designs

-
Sorry to hear the panel didn’t meet your expectations.😟 Let me clarify how this works. SynQPanel is the only platform that can display GIFs and video animations. AIDA64’s sensor panel system does not support video playback, even on Turing Smart devices. It only renders static layouts with live sensor data updating on top. That’s why the design looks animated inside SynQPanel but doesn’t “run” as a video once uploaded to your Turing display through AIDA64. This is why my listing specifies: “Video display functionality requires SynQPanel.” I included the video version as a complimentary (free) addition. At present, SynQPanel does not support Turing Smart devices. Please also note that SynQPanel and AIDA64 are not interconnected programs; SynQPanel relies on AIDA64’s shared memory to access sensor data, but they operate independently. For the most reliable experience, I recommend using a USB‑powered HDMI display in the future. That way, you don’t have to worry about whether Turing Smart devices can support the programs. Turing Smart devices are limited to their own built‑in software, so unless you’re using that software to monitor system sensors, it’s difficult for third‑party programs to provide full support. If you have any further questions, please feel free to reach out to me. Thank you.
-
I’ve just sent you a private message. Please check your inbox.
-
☹️ Sorry, this content is no longer available. Remove by @BHSY
-
☹️ Sorry, this content is no longer available. Remove by @BHSY
-
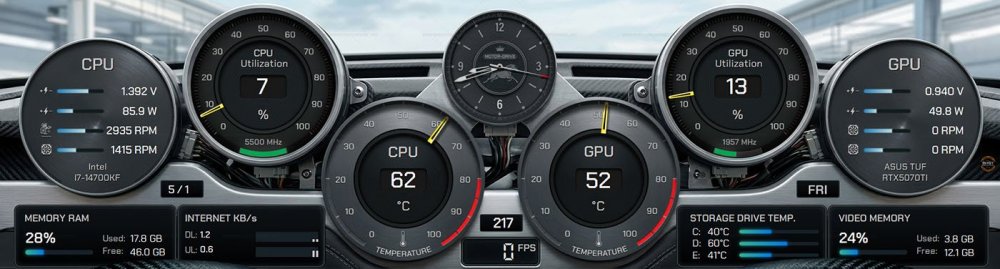
#77 - ThrottleSync Ready size: 1920x480 /1920x515 / 2560x720 / 515x1920 / 720x2560 Experience performance like a dashboard. Our automotive-inspired sensor panel transforms CPU, GPU, RAM, storage, and network stats into a sleek, gauge-style interface. With industrial visuals and dynamic design, system health feels alive—like watching an engine roar. Perfect for gamers, creators, and tuners who demand both style and substance. This isn’t just monitoring—it’s motordrive for your machine. The AIDA64 file provides two selectable background images for use in the sensor panel The package includes two files: the AIDA64 file (.spzip) and the SynQPanel file (.sqx). Video display functionality requires SynQPanel, which is not supported on Turing Smart Devices. The SynQpanel file is provided free of charge as a bonus. Visit BHSYSensorPanel for more info. and designs
-
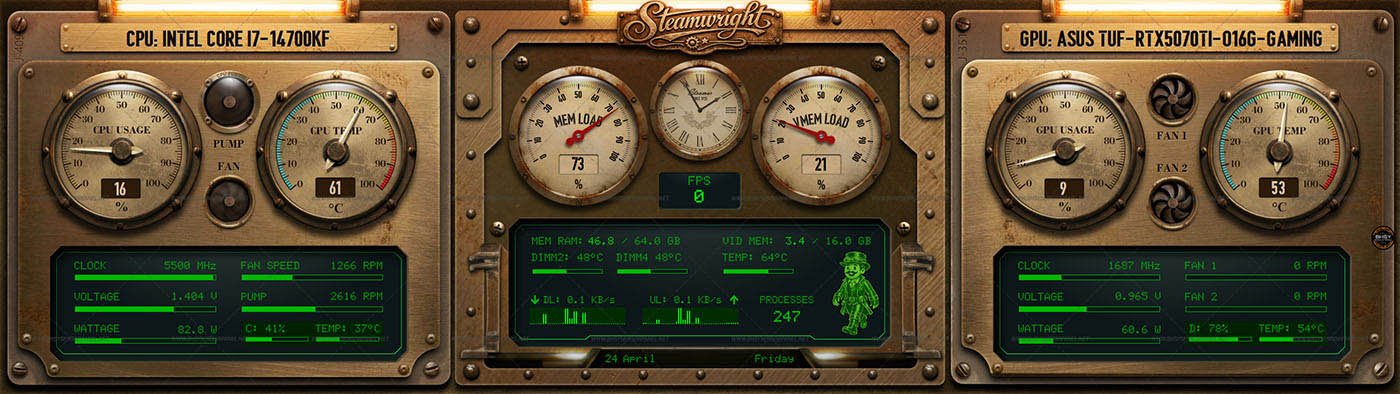
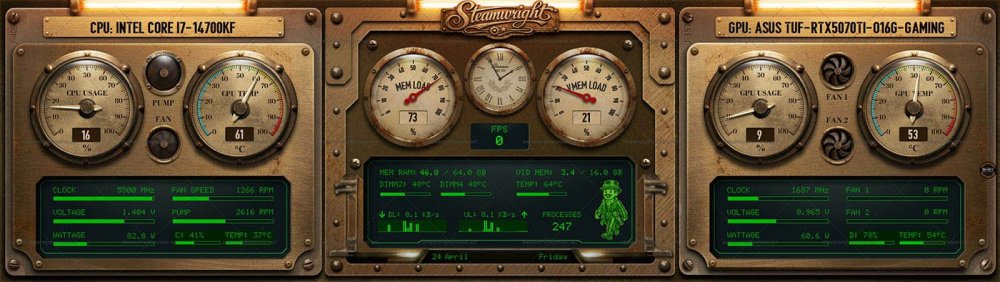
#78 - Steamwright Panel Ready size: 1280x800 / 1920x480 / 1920x515 / 2560x720 / 515x1920 / 720x2560 Visit BHSYSensorPanel for more info. and designs
-
🚀 Introducing SynQPanel - A New Panel-Based Visualization Tool for AIDA64 Users
BHSY replied to GaHile's topic in SensorPanel
Hi GaHile, it’s been a month since we last heard from you.🥺 I hope you’re doing well. Have you set the project aside for now, or has work kept you busy? It would be great to hear from you whenever you can.


.jpg.0ad9ddbb65351b6e81f5c15420df6ca2.jpg)