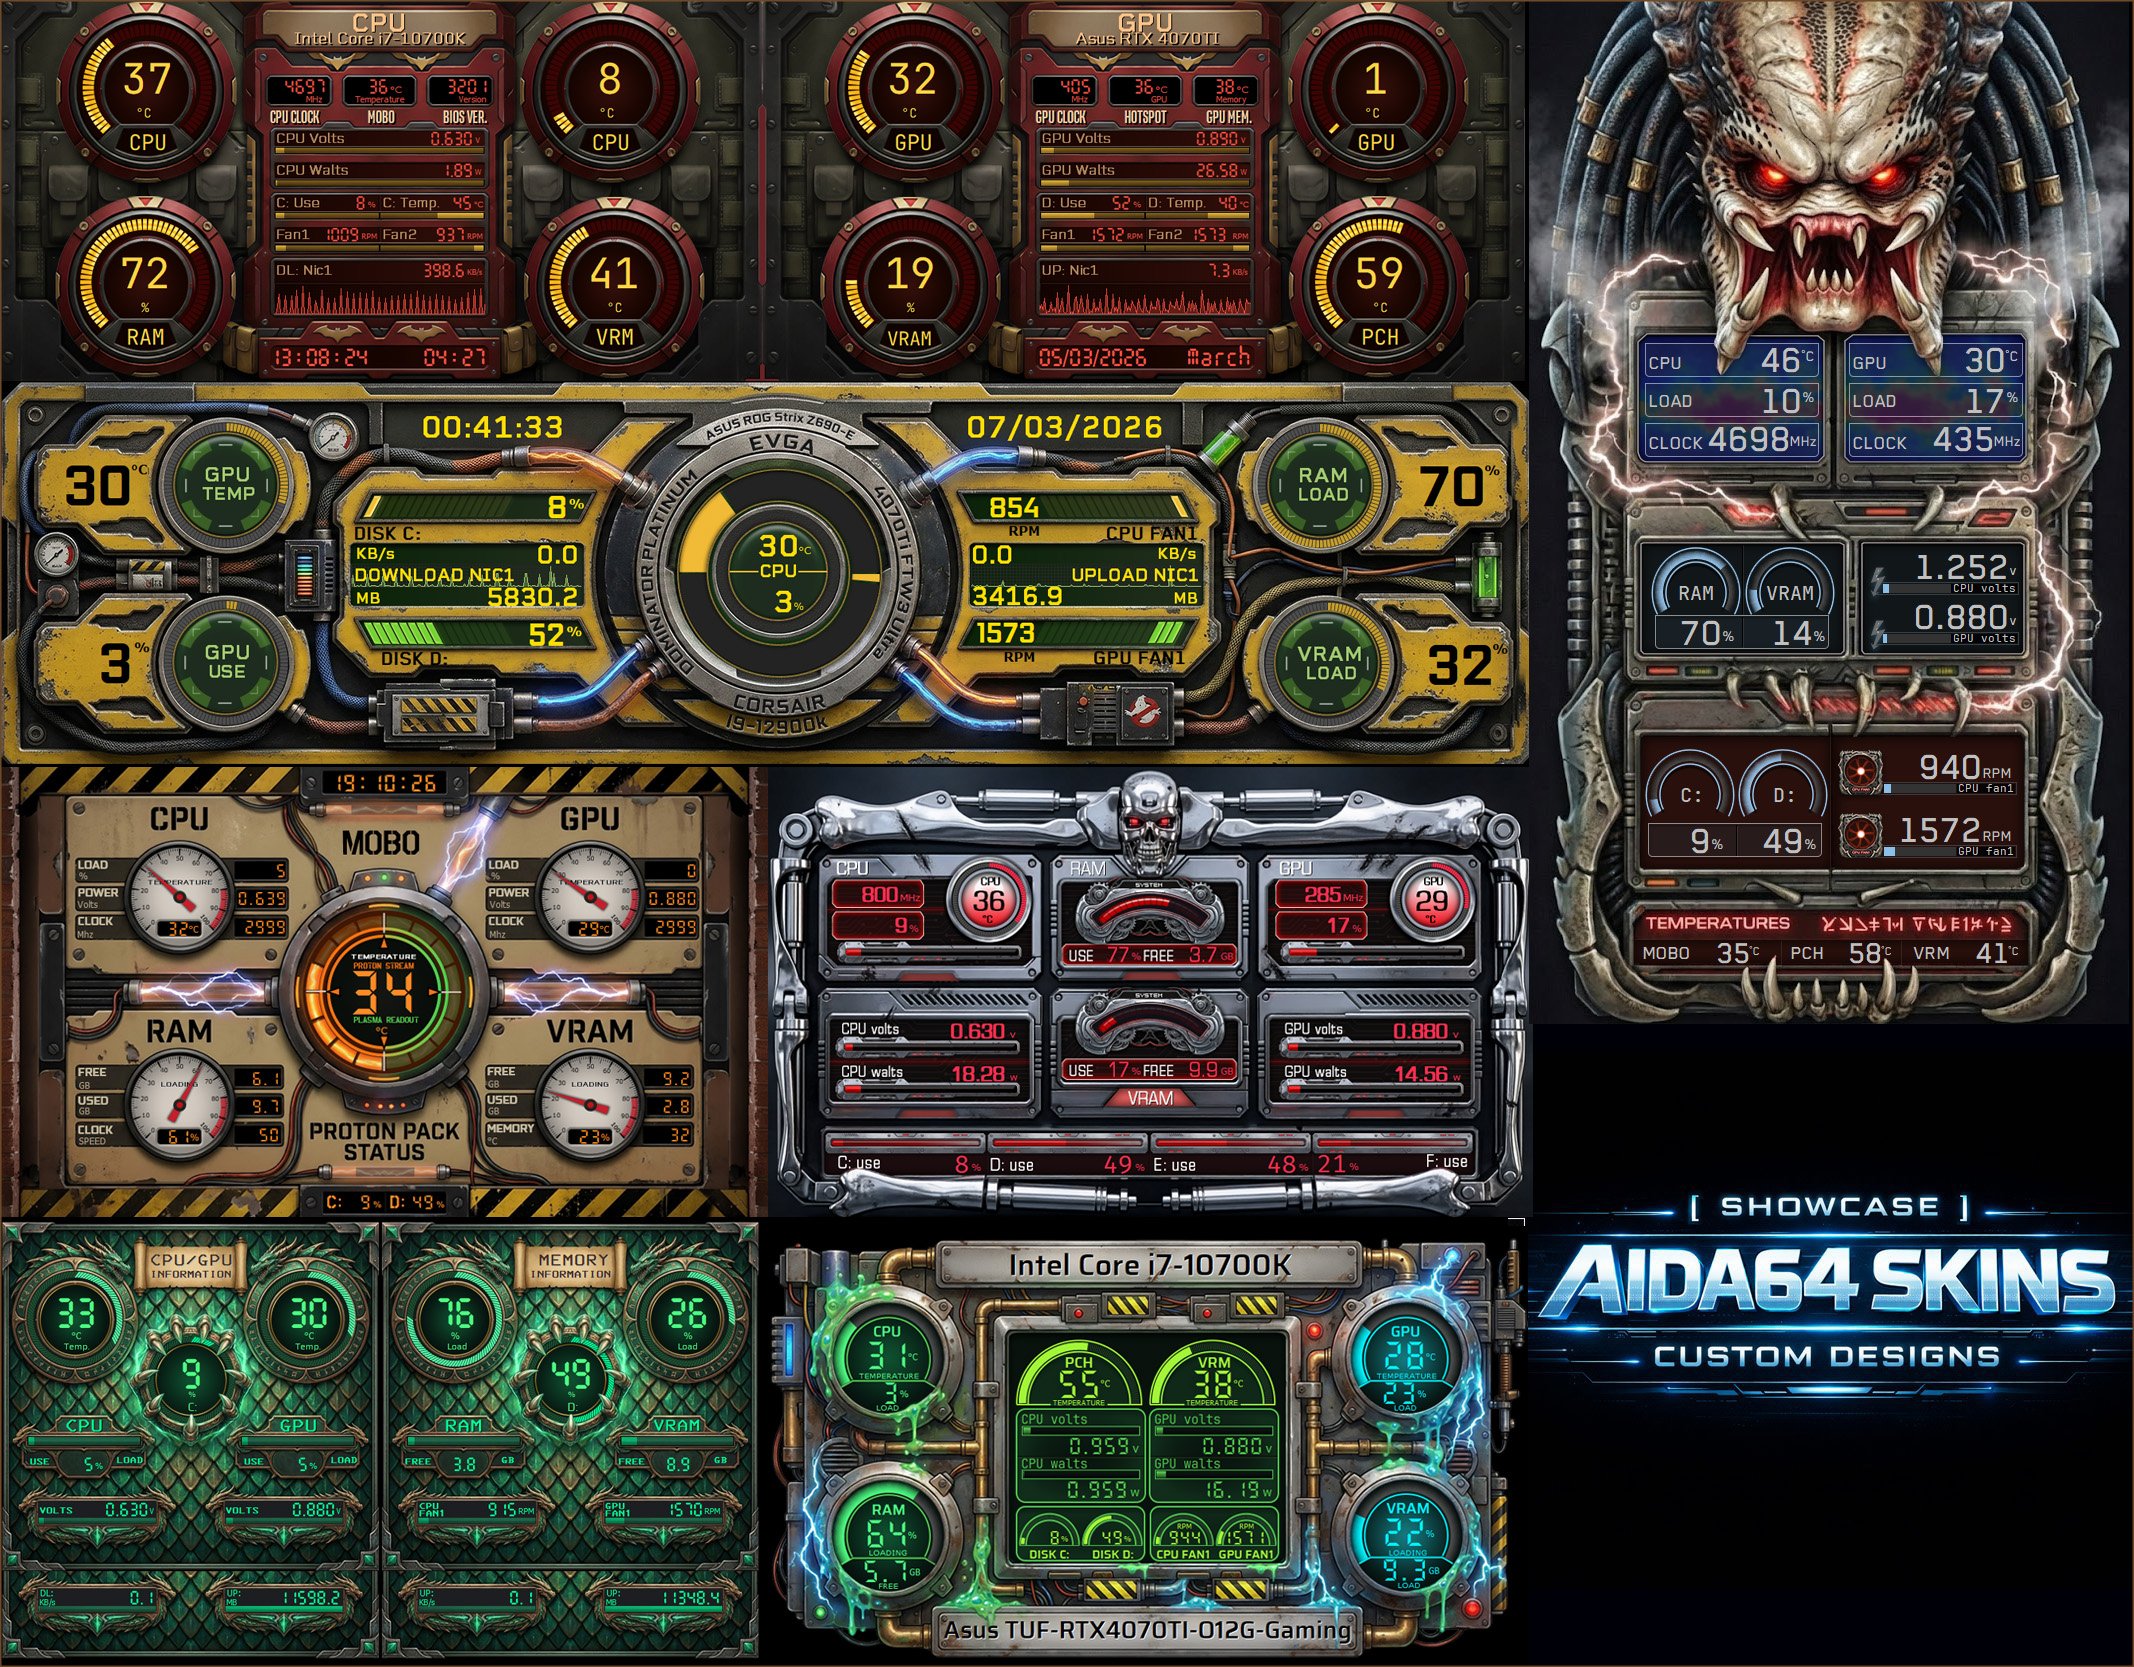
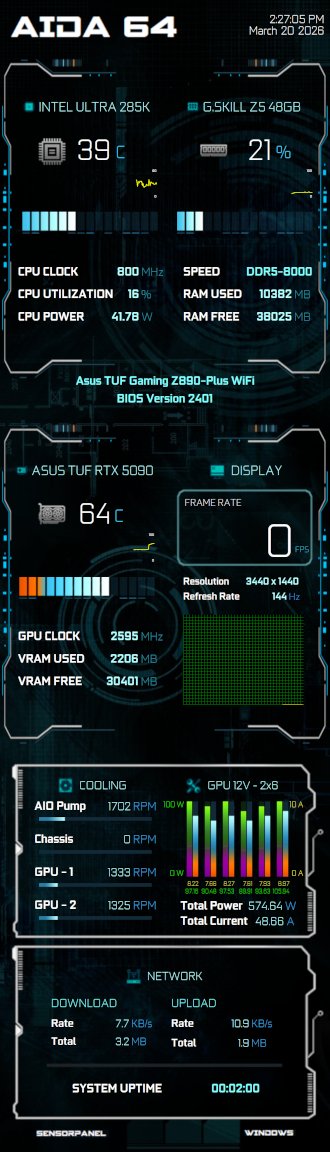
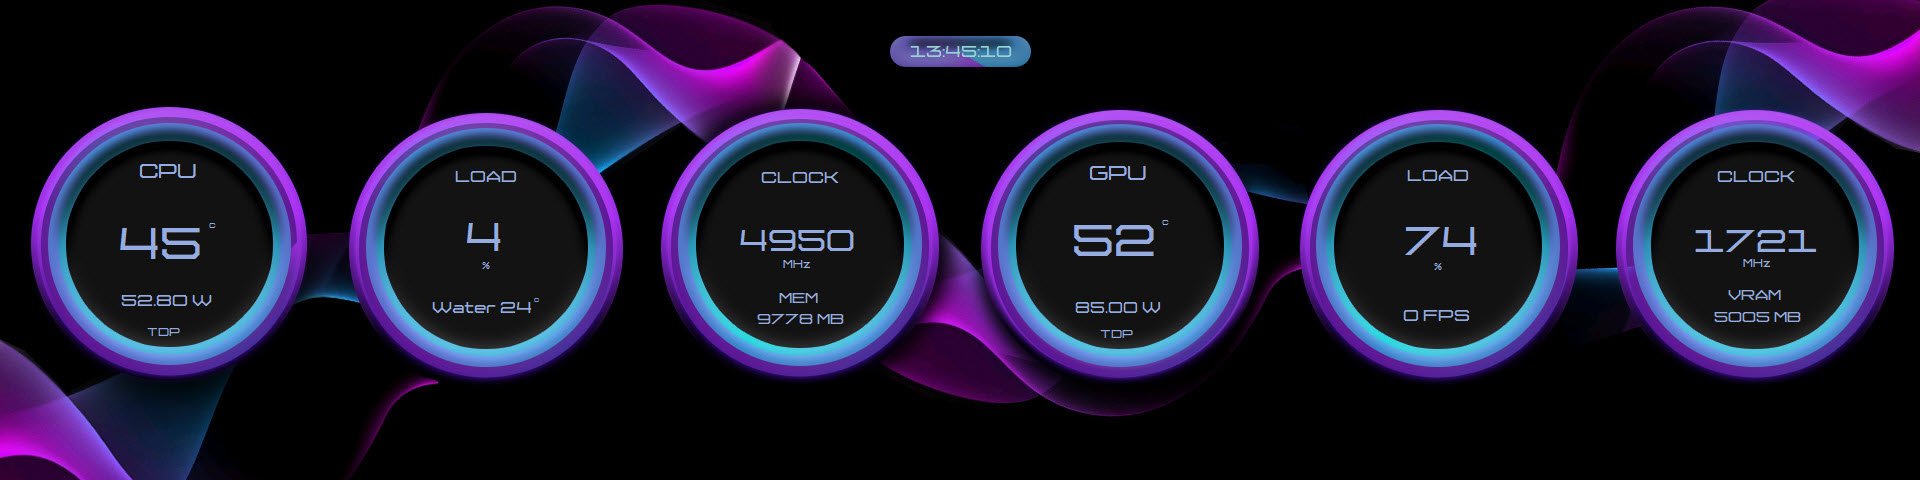
Leaderboard


Popular Content
Showing content with the highest reputation since 03/07/26 in all areas
-
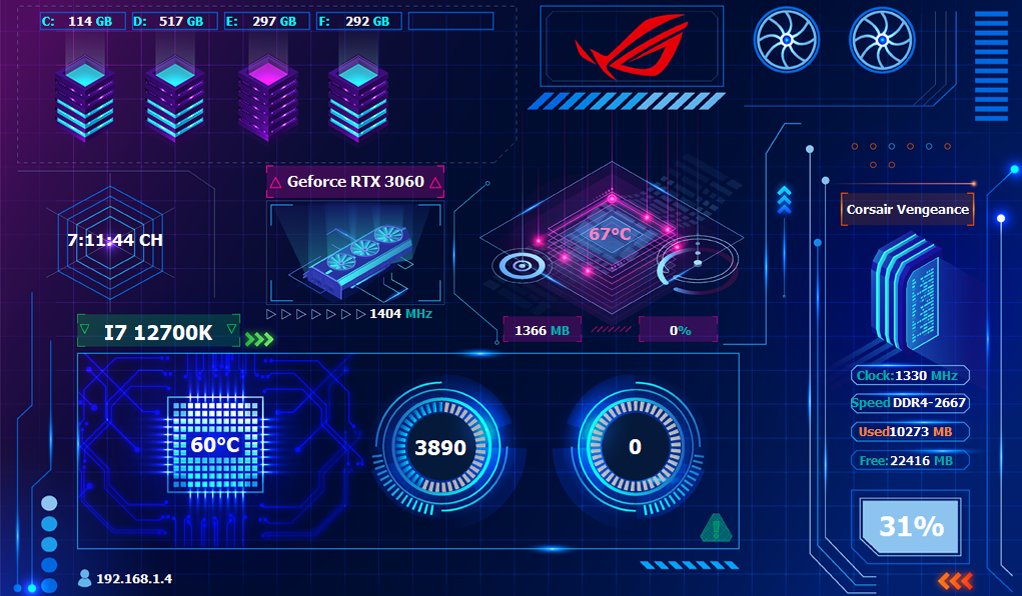
I’d like to share a detailed solution for anyone struggling with the Sensor Panel moving, resizing, or resetting when using a secondary display with different scaling or resolution. This is a common pain point discussed by users like scotts, supes, WeakLaugh, and Atila on the official AIDA64 forums, where many report that the panel resizes itself or jumps between monitors after rebooting or reconnecting displays. (https://forums.aida64.com/topic/7580-sensor-panel-resized-itself-after-connecting-new-monitor-now-i-cant-fix-it/) Goal Lock your Sensor Panel on a secondary monitor with fixed size/position and make it launch reliably with Windows — even if monitors disconnect/reconnect or have different DPI scaling. 1) Edit the AIDA64 configuration file (AIDA64.ini) Close AIDA64 entirely. Open Notepad as Administrator. Locate your AIDA64.ini file: %localappdata%\FinalWire\AIDA64\AIDA64.ini or in your installation folder. Find the [SensorPanel] section or add it at the end if it doesn’t exist. Replace or set the following values according to your monitor setup: [SensorPanel] Active=1 FixedSize=1 Width=1280 Height=400 PositionX=-1600 PositionY=1040 LoadLayout=1 LayoutFile=C:\AIDA64\SensorPanel_Fixed.spzip [Display] AutoAdjustDPI=0 AutoAdjustResolution=0 What to change for your setup: Width / Height → set these to the exact resolution of your Sensor Panel window. This locks the panel size. PositionX / PositionY → coordinates of the panel on your screen: PositionX = horizontal offset relative to the primary monitor; multiply by the primary monitor’s DPI scaling if it differs from 100%. PositionY = vertical offset from the top of the virtual desktop; usually PrimaryMonitorHeight - SecondaryPanelHeight if the panel sits at the bottom. LayoutFile → point to the .spzip or .a64sp layout you saved. Use the full path, without quotes. [Display] section prevents AIDA64 from automatically adjusting DPI or resolution when monitors reconnect. 2) Create an automatic startup script (.bat) This ensures AIDA64 opens after Windows has initialized monitors, preventing resizing or jumping. Open Notepad. Paste: @echo off REM Close AIDA64 if already running taskkill /f /im aida64.exe >nul 2>&1 REM Wait 8 seconds for Windows to arrange displays (adjust if your monitors need more time) timeout /t 8 /nobreak >nul REM Start AIDA64 start "" "C:\Program Files (x86)\AIDA64 Extreme\aida64.exe" What to change for your setup: timeout /t 8 → increase if your secondary display takes longer to initialize. Path to aida64.exe → replace with the actual path where AIDA64 is installed on your PC. Save as AIDA64_Startup.bat (type: All Files, not .txt). Create a shortcut to this .bat and place it in the Startup folder: Win + R → type shell:startup → paste shortcut. Optional: In the shortcut properties → Run: Minimized, so the console window doesn’t appear. What This Fix Solves Locks Sensor Panel size & position on your secondary monitor Prevents Windows DPI scaling from resizing it unexpectedly Ensures AIDA64 launches after monitors are ready Stops AIDA64 from jumping to the primary display on reboot or after connecting virtual monitors Why This Is Needed Many users report that the Sensor Panel keeps resizing or moving after disconnects, restarts, or when DPI scaling differs between monitors — even with “Lock panel size/position” enabled in preferences. (https://forums.aida64.com/topic/7580-sensor-panel-resized-itself-after-connecting-new-monitor-now-i-cant-fix-it/) Credits & References Thanks to users across the AIDA64 community (e.g., scotts, supes, WeakLaugh, Atila) for identifying that the core issue relates to panel resizing on monitor changes and scaling, which inspired this workflow. (https://forums.aida64.com/topic/7580-sensor-panel-resized-itself-after-connecting-new-monitor-now-i-cant-fix-it/) Disclaimer Text created using ChatGPT, as English is not my native language. It is strongly recommended to make a backup of your .ini file before editing anything. No responsibility is assumed for unexpected malfunctions; use at your own risk. EDIT: Tested and working with version 8.25.8200 of the program8 points
-
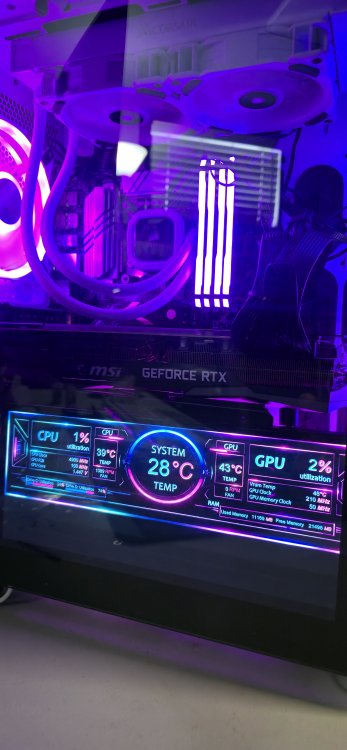
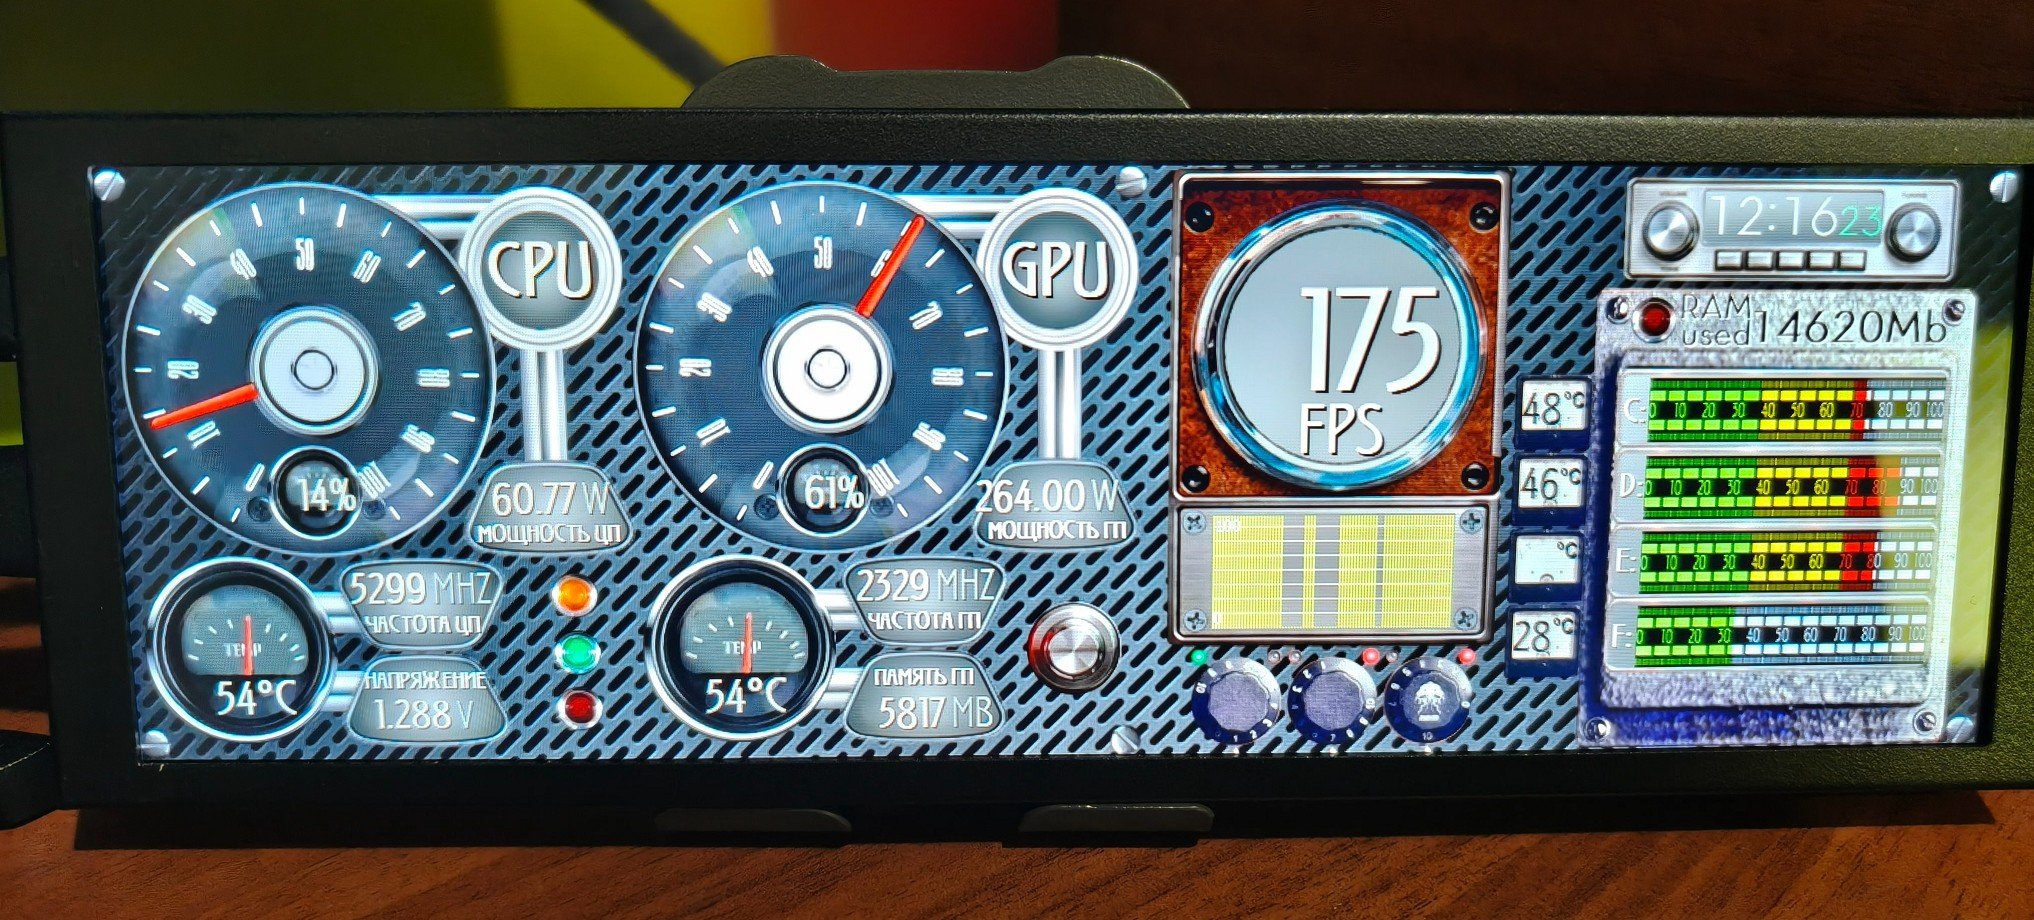
My firs Panel 1920 x 1280 Grabación de pantalla 2026-03-13 164727.mp4
 6 points
 -
Here is mine v4 with a ping indicator. To make it work, you also need to copy the included files into your Startup folder so the script runs automatically for ping update Startup.zip GEFORCE_2560x720v4.sensorpanel
 5 points
 -
After Flip Clock, I am excited to share something experimental: The "Butter" Glide Dynamics approach: Add buttery gauge physics (removes crossfade ghosting) to your custom gauges and they will feel sliding. Please see and share your thoughts if you feel any difference: ❤️ This lovely panel was shared by @BHSY 😍 Screen Recording 2026-03-17 172945.mp4 @Loyd I have now fixed the issue where new sensors/items were added to the bottom of the list and changing there position up was not getting saved.5 points
-
What do you think based on your design?

 5 points
 -
Oh Wow! 😍 This Butter Glide Dynamics is a huge game-changer. I love it. Awaiting for your next update.4 points
-
link please?4 points
-
Thank you so much for your kind and encouraging words! Your support truly means a lot 🙏 Please find the answers to your questions below: 1. Vertical Bars Yes, vertical bars are available. Simply decrease the width and increase the height, and the bars will automatically adjust to a vertical orientation. Example: 2. Fix Screen Option Could you please try enabling the Fix Screen option and let me know if it works on your end? Your feedback will help us confirm everything is functioning as expected. In addition, I’ll also check whether we can include a reset button (or hotkey) to quickly restore the application to its default state. Please feel free to reach out if you need any further assistance - we’re always happy to help! 😊 Thank you!


 4 points
 -
Custonizei uma skin 480x320, baixada aqui no fórum. WhatsApp Video 2026-04-05 at 08.41.36.mp4
 3 points
 -
76 - SysVitals Ready size: 1920x480 / 1920x515 / 2560x720 / 515x1920 / 720x2560 For other widescreen sizes, please PM me or use the contact form on the website. Visit BHSYSensorPanel for more info. and designs
 3 points
 -
Hello everyone. I'm offering my own panel option. 1280x400 izis-one.ttf Old_style.spzip NeutraTextTF-LightAlt.otf

 3 points
 -
Enter the CyberCurrent with “Voltaris Nexyra | D-6”! Where energy finds form, and precision becomes art. Size: 1920x480 and 2560x720 Need a custom fit? Your panel, your way - tailored dimensions on request: 3840x1100 | 1280x800 | 1024x768 | 1920x720 | 1920x1080 & more! Precision > Futuristic: Temperature: CPU · GPU · RAM · VRAM: 100 State Utilization: CPU · GPU · RAM · VRAM: 100 States Clock: CPU · GPU: 60 States Note: Requires AIDA64 v7.70.7500 or Beta v7.99.7829 or above. Please click here to send me a PM to claim your exclusive Sensor Panel. Rise Beyond Limits - Where your system speaks in light, motion, and soul. Explore more on my webpage: Surjeet Skins From Reading Data to Experiencing It.
 3 points
 -
My preliminary version of the Asus Armoury Crate theme skin. 1024x600. Asus_AC.spzip ROGFonts-Regular_0.otf OCRAEXT.TTF
 3 points
 -
@Skinny12 @Kleimo @Tanis53 @braintez @ParisV We've implemented support for Thermal Grizzly WireView Pro II in the latest AIDA64 beta update available at: https://www.aida64.com/downloads/latesta64xebeta3 points
-
KILLNAGATHUL PANEL.spzip BEBASNEUE-REGULAR.rar3 points
-
Enter the Electric Future with “Sci-Fi IonWire | I-9” A fusion of energy, signal, and precision - crafted for those who see beauty in every byte. Size: 1920x480 Need a custom fit? Your panel, your way - tailored dimensions on request: 3840x1100 | 1280x800 | 1024x768 | 1920x720 | 1920x1080 & more! Precision > Perfected: Temperature: CPU · GPU: 100 States Utilization: CPU · GPU · RAM · VRAM: 100 States Note: Requires AIDA64 v7.70.7500 or Beta v7.99.7829 or above. Please click here to send me a PM to claim your exclusive Sensor Panel. Forge Tomorrow - Precision engineering for minds that dare. Explore more on my webpage: Surjeet Skins Turning Every Byte Into Beauty.
 3 points
 -
1920x480 2026-03-07.spzip3 points
-
Changed it a bit to my liking
 3 points
 -
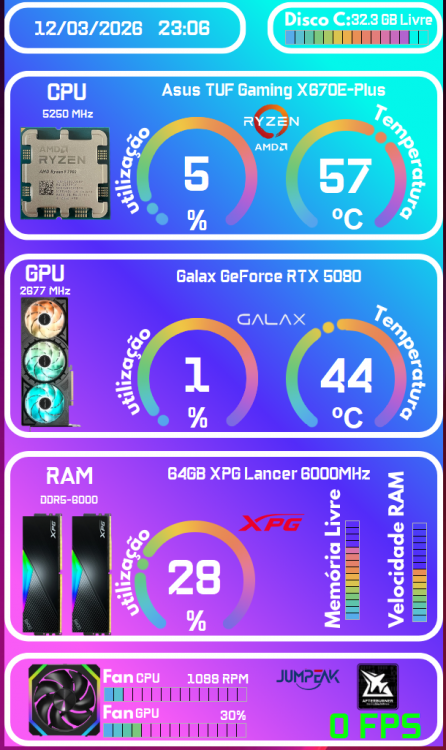
My first AIDA64 sensor panel, something simple even though it was my first time. The resolution is 1920x1080
 3 points
 -
The new AIDA64 skins are now available on our website. This new set features brand-new designs with even more impressive visuals, including exclusive models in 2560×720 resolution, specially developed for the Xeneon Edge. If you want to take your setup’s look to the next level, this is something you need to check out. Visit the website and explore all available models. 🚀🔥 AidaSkins
 2 points
 -
Hello, i have new sensor Panel Theme Cyberpunk 1920 x 480 https://aidadeco64.etsy.com/listing/4475579263
 2 points
 -
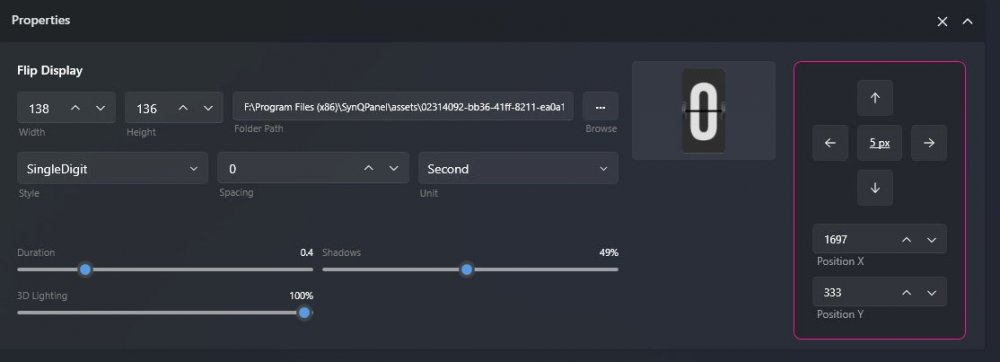
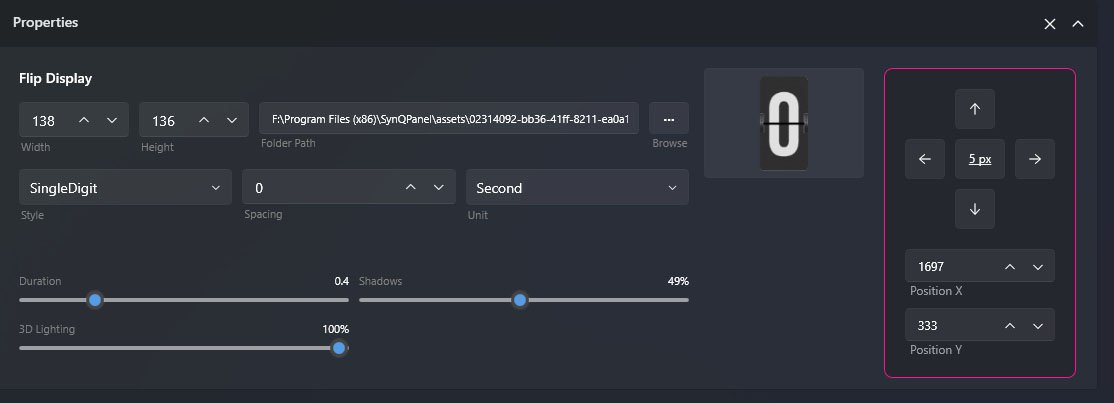
AIDA64 SensorPanel Watcher – Complete Guide Introduction The AIDA64 SensorPanel can sometimes open in the wrong position or size, especially on multi-monitor setups. This Watcher system ensures the panel always opens in the correct location and size, using a master .ini file as reference. Features: Automatically runs when Windows starts Monitors the AIDA64 .ini file every few seconds Fixes the SensorPanel window position and size Runs silently in the background The system uses: Master .ini file – your reference configuration PowerShell Watcher script – monitors the .ini file and fixes the window Hidden VBS launcher – runs the batch silently with admin rights Optional batch file – copies the master .ini file and restarts AIDA64 Step 1: Prepare the Master .ini File Create a folder to store your reference .ini file. Example: C:\Path\To\Master\aida64.ini Copy your desired AIDA64 .ini file into this folder. This is the file the watcher will use as a reference. Step 2: Create the Batch File Open Notepad and paste: @echo off taskkill /f /im aida64.exe >nul 2>&1 timeout /t 5 /nobreak >nul copy /y "C:\Path\To\Master\aida64.ini" "C:\Program Files\FinalWire\AIDA64 Extreme\aida64.ini" >nul start "" "C:\Program Files\FinalWire\AIDA64 Extreme\aida64.exe" Save as AIDA64_Fixed_SensorPanel.bat. Note: Replace the paths with your master .ini file path and AIDA64 installation folder. Step 3: Create the Hidden VBS Launcher Open Notepad and paste: Set objShell = CreateObject("Shell.Application") If WScript.Arguments.Length = 0 Then objShell.ShellExecute "wscript.exe", """" & WScript.ScriptFullName & """ runas", "", "runas", 1 WScript.Quit End If batPath = "C:\Path\To\Watcher\AIDA64_Fixed_SensorPanel.bat" Set WshShell = CreateObject("WScript.Shell") WshShell.Run """" & batPath & """", 0, False Save as AIDA64_Fixed_SensorPanel_Hidden.vbs. Note: Replace batPath with the path to your batch file. Step 4: Create the PowerShell Watcher Script Open Notepad and paste: $master = "C:\Path\To\Master\aida64.ini" $install = "C:\Program Files\FinalWire\AIDA64 Extreme\aida64.ini" $vbs = "C:\Path\To\Watcher\AIDA64_Fixed_SensorPanel_Hidden.vbs" $SensorPanelClass = "TForm_HWMonitoringSensorPanel" if (-not ("WinAPI" -as [type])) { Add-Type @" using System; using System.Runtime.InteropServices; using System.Text; public class WinAPI { public delegate bool EnumWindowsProc(IntPtr hWnd, IntPtr lParam); [DllImport("user32.dll")] public static extern bool EnumWindows(EnumWindowsProc lpEnumFunc, IntPtr lParam); [DllImport("user32.dll", SetLastError=true)] public static extern int GetClassName(IntPtr hWnd, StringBuilder lpClassName, int nMaxCount); [DllImport("user32.dll")] public static extern bool IsWindowVisible(IntPtr hWnd); [DllImport("user32.dll")] public static extern bool MoveWindow(IntPtr hWnd, int X, int Y, int nWidth, int nHeight, bool bRepaint); } "@ } $global:foundHandles = @() function Get-FileHashMD5($file) { if (Test-Path $file) { return (Get-FileHash $file -Algorithm MD5).Hash } else { return "" } } function Fix-SensorPanel { $global:foundHandles = @() $callback = { param($hWnd, $lParam) if ([WinAPI]::IsWindowVisible($hWnd)) { $classSb = New-Object System.Text.StringBuilder 256 [WinAPI]::GetClassName($hWnd, $classSb, $classSb.Capacity) | Out-Null if ($classSb.ToString() -eq $SensorPanelClass) { $global:foundHandles += $hWnd } } return $true } $delegate = [WinAPI+EnumWindowsProc]$callback [WinAPI]::EnumWindows($delegate, [IntPtr]::Zero) | Out-Null foreach ($hWnd in $global:foundHandles) { for ($i=0; $i -lt 10; $i++) { [WinAPI]::MoveWindow($hWnd, -1280, 1040, 1280, 400, $true) Start-Sleep -Milliseconds 200 } } } while ($true) { if (Get-FileHashMD5($master) -ne Get-FileHashMD5($install)) { Start-Process "wscript.exe" -ArgumentList ('"' + $vbs + '"') -Verb RunAs } Fix-SensorPanel Start-Sleep -Seconds 5 } Save as AIDA64_Watcher.ps1. Note: Update paths to your master .ini file, installation folder, and VBS file. Step 5: Create a Hidden Scheduled Task Open Task Scheduler (Win + S → Task Scheduler) Click Create Task… General Tab: Name: AIDA64 Sensor Panel Watcher Check Run only when user is logged on Check Run with highest privileges Configure for: Windows 10 Triggers Tab: New → Begin task: At log on → OK Actions Tab: New → Action: Start a program Program/script: powershell.exe Add arguments: -WindowStyle Hidden -ExecutionPolicy Bypass -File "C:\Path\To\Watcher\AIDA64_Watcher.ps1" Settings Tab: Allow task to run on demand Run task as soon as possible after a missed start Restart task if it fails (1 min interval, 3 attempts) Click OK → Enter password if requested How it Works The Watcher checks the installed .ini file against the master .ini file If differences are detected, it runs the batch file silently to update AIDA64 The PowerShell script searches for the Sensor Panel window by class name Moves it to the correct monitor and resizes it Runs invisible in the background with very low resource usage Resource Usage: The Watcher uses minimal CPU and memory (typically <5 MB RAM, negligible CPU). Disclaimer Text created using ChatGPT, as English is not my native language. It is strongly recommended to create a Windows system restore point before editing anything. No responsibility is assumed for unexpected malfunctions; use at your own risk.2 points
-
1280 * 480 - For Star Wars fans and supporters of the Galactic Empire. Long Live the Emperor. StarWars-Empire-1280x480.spzip
 2 points
 -
Estou a alguns dias aprendendo a mexer no painel em uma tela de 600x1024, uma grande luta até entender o funcionamento, mas consegui até um bom resultado e fiz alguns temas diferentes usando partes de alguns daqui... isso é muito viciante de mexer hehe.

 2 points
 -
Wonderful, your advice seems to work fine! Thanks a lot! //Nils2 points
-
Take a look — I added a recording studio background to better match the image. You might try adding something that relates more to your theme. It’s just an idea, but I hope it helps you get the result you’re looking for. ✨
 2 points
 -
The new AIDA64 skins are now available on our website. This new set features brand-new designs with even more impressive visuals, including exclusive models in 2560×720 resolution, specially developed for the Xeneon Edge. If you want to take your setup’s look to the next level, this is something you need to check out. Visit the website and explore all available models. 🚀🔥 aidaskins.com
 2 points
 -
My first sensor panel 1024x600. Not everything turned out well, especially the fonts. I’ll keep working on it.
 2 points
 -
Logs are looking PERFECT! I have shared a DM with you. Please reinstall SynQPanel as it seems something incomplete with the application causing crashing!2 points
-
We are already working on it...2 points
-
Beautiful, can you share it ?2 points
-
Thank you! I will try to reproduce the issue and see if anything can be done here Looking absolutely amazing! The clean panel design and the way SynQPanel has been used really stand out. We’ll take care of the remaining issues step by step… slowly but surely. It’s truly encouraging to see the download numbers growing and people being curious enough to try something new. That kind of support means a lot ❤️ 🙏2 points
-
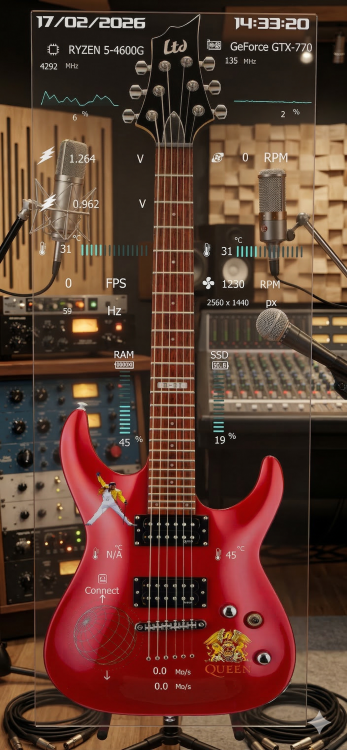
Thank you, GaHile, and well done for getting the flip‑clock feature working.👍 It's not a fancy design, but I’ve put together a simple 1920x515 flip‑clock with a weather forecast panel for my personal use. Now, I have my fancy system stats sensor panel (2560x720) underneath my monitor and a weather forecast with a flip-clock panel inside my PC case. 💪 Today's weather will be very hot, and the humidity is always high. ☹️ Note: The month, day, and week use normal custom gauge sensors.
 2 points
 -
Thank you @Loyd, Beautiful 2560×720 resolution panel designs are waiting for you here: https://surjeetskins.great-site.net/2560-x-720-arena/ Don’t miss your chance to own something truly exclusive. Please click here to send me a PM (message) to claim your exclusive Sensor Panel.2 points
-
Liquid Metal Comes Alive With “Argentum Vita - A7”! Size: 1920x480 and 1280x800 and 1600x1200 and 2560x720 Need a custom fit? Your panel, your way - tailored dimensions on request: 3840x1100 | 1280x400 | 1024x768 | 1920x720 | 1920x1080 & more! Precision > Strong: Temperature Monitoring CPU · GPU - 100 States of Accuracy Utilization Tracking CPU · GPU - 100 States RAM · VRAM - 50 States Note: Requires AIDA64 v7.70.7500 or Beta v7.99.7829 (or newer) Please click here to send me a PM to claim your exclusive Sensor Panel. Built for the era ahead - Innovation shaped without compromise. Explore more on my webpage: Surjeet Skins Raw metal. Living silver. Absolute precision.
 2 points
 -
can you share this. Thanks in advance2 points
-
aida view is for rslcd files not sensor panels. works great for those panels1 point
-
By looking for a solution for anyone still having issues with the SensorPanel moving, changing size, or restarting when using a secondary display with a different scale or resolution on Windows (as me, running latest AIDA64 8.25 version), and coming from this: I would like to introduce y'all: AIDA64 SensorPanel Watcher AIDA64 SensorPanel Watcher is a light script in refinement phase (but actually working) that checks if the AIDA .ini configuration file has changed and automatically readjust the position and size of the SensorPanel if they have changed as well. Note: The full script has been shared, but the Position and Size of the SensorPanel have to be changed according to users' preference.
 1 point
 -
They should be there as Temperature #1 and Temperature #2 in your case.1 point
-
900x1600
 1 point
 -
cordioli: Ryobi Green. Well Done!
 1 point
 -
Criando uma versão 480x320, ainda falta vários ajustes...
 1 point
 -
It's been almost 5 years since I first posted this panel. I refreshed it once to a higher resolution to support 3800 x 1100 displays, in horizontal orientation. This is the second (and probably last) refresh, this time in vertical resolution: 1100 x 3800. I recently built a new box so I decided to mount the display vertically, thus I needed to update the panel. The zip file contains the updated panel along with the font files needed Reminder that in order for FPS to display, RivaTuner is required I noticed that it's more of a trend lately to sell sensor panels. No issue there, if you're selling your own work. What is despicable are those that are taking from this site and others, and claiming our contributions as their own and profiting from it. Like this bottom-feeder: https://www.etsy.com/shop/FaCeRo3LShop I was able to remove one of my panels from his "store" but was not able to shut it down, since I could only make a claim for my own work. Anyway, despite all of that, I'm still posting for free for the community. This is a hobby for me, not a business. Thanks for all the downloads, messages and positive feedback over the years! ------ UPDATE: Added updated vertical and horizontal versions of the panel with new gauges built in support of the Wireview Pro II Aida - Return of Spy - Vertical - Wireview.spzip Aida - Return of Spy - Horizontal - Wireview.spzip
 1 point
 -
What do you think ?1 point
-
Hi All So after taking a little here, a little there and spending a day on it I finally have what I personally want to have out of my sensor panel. This is a white version and its 1920x480 I dont plan on making any other sizes. It uses the Geforce font included in the zip file Please be kind. This is my 1st panel and in future I might get a little better at it ToxicAngel.zip
 1 point
 -
1920 x 480 Panel and font in zip Cheers Vimy.zip
 1 point
 -
@rinaldop Where can i find this panel please?1 point
-
demo after a working day. 1024x600
 1 point
 -
The title says, "Share," so I'm sharing. 8 custom gauges, interchangeable and stackable with 8 background images. Each gauge is 170 by 170 pixels, resized from 751 by 751 pixels originals exported from Microsoft Publisher. I created all images from scratch. Let me know if you would like a different size. I've been working on gauges for over a month for my panels. I wish I had seen Kirstein Tito's post earlier, (Dashboard on 11/28 seen on page 181). The use of transparency and overlay is awesome (IMNSHO). I would have come up with mine much earlier. I knew I wanted multiple items on a single gauge. More like a mechanical gauge (non-transparent). I tried making gauges with a transparent canvas to the sides to have the text (when ticked) not centered. They worked, but the 16 images needed to be modified every time I changed font and/or font size, so after issues with fonts and text overwriting images, I started over having several images and gauges to make one. It sure would be nice if Aida64 would add an offset option to the custom gauges for text. Another thing Aida64 (if you are listening,) you can align left or right but not center on sensor items. That one I have an alternative: Use a 100% transparent .png image with all 16 stages of a gauge. But this method sadly has no labels. This sensor panel is not much to look at, but it was easier for me to make and upload it instead of uploading 145 images, not to mention explain it. All LED and hand gauges can be placed atop each other to create different gauges. Example 1 has activity percent of threads 1 and 2, core 1 temp and core clock speed. Example 2 has AIO pump RPM and CPU temp. Example 3 has only master volume. Example 4 has my 3rd drive's activity and both of its temperature sensors. Example 5 has GPU temp and FPS gauges with standard Aida sensor text mixed in. 2045868797_StackingExample(170x170)_sensorpanel.985d385e593aa81036af7ea5b89b4bb7
copy.thumb.png.015ee09a95cb9b3014969b9cd2781ac7.png) 1 point
1 point -
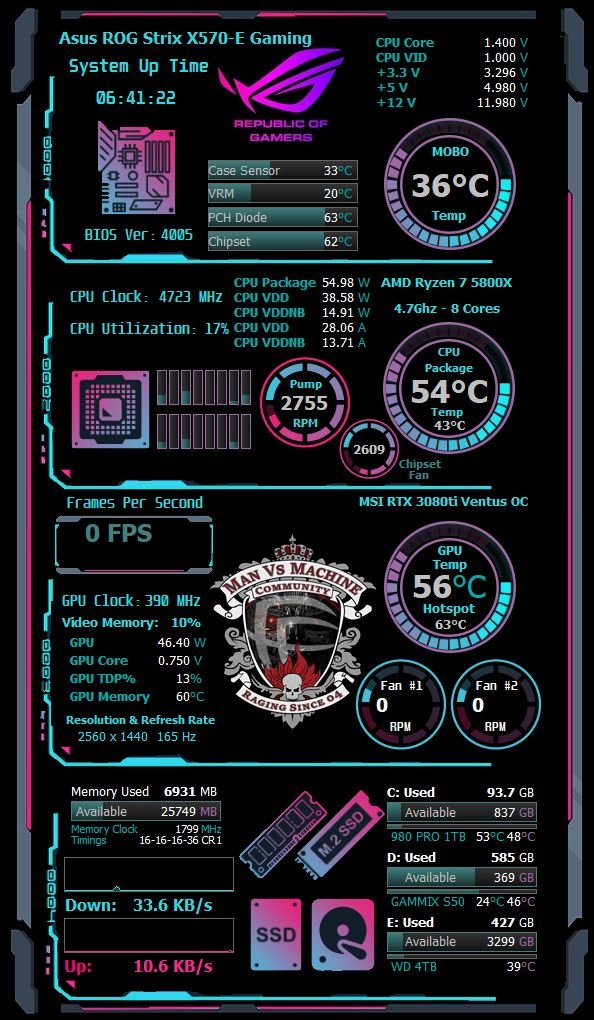
Thanks to some of the members in here for inspiration, I took some of their hard work and changed it to 600x1024 and added pretty much as much info thats available for my system. I also added a smaller version of the temp. dial and my gaming community logo. Enjoy. HK3.sensorpanel
 1 point


copy.png.b1d5eecadd6dacd1bc1cd999abfbdb16.png)